This simple tutorial mainly shows you how to transfer movies from iTunes to Nexus 10 for playback without restrictions by converting DRM iTunes m4v to Nexus 10 MP4 videos.
There’s no other large Android tablet quite so impressive as the Nexus 10 right now, but that slim body and stunning 2560 x 1600 pixel LCD need looking after. Anyway, Google Nexus 10 is really worth owning. Do you also want to watch purchased iTunes movies on Nexus 10?

However,those M4V videos from iTunes are mostly DRM protected to prevent playing on non-ios devices. Obviously Nexus 10 is no exception. At first, if you want to play iTune M4V videos on Nexus 10, firstly you need to remove DRM protection from iTunes M4V files and convert them to Nexus 10 compatible MP4 files.
To get the work done, a DRM converter is needed. Here Pavtube ChewTune, a top iTunes M4V Converter for Android is highly recommended (Read the review) to help you convert protected iTunes M4V to DRM-free MP4 for play on Nexus 10. With it, you can effortlessly make your DRM protected iTunes M4V, Blu-ray/DVD Digital Copy and Amazon WMV videos playable on Nexus 10 in just a few mouse clicks in Windows (Windows 8.1/8/7 included) XP/7/Vista. Meanwhile the playback of the converted videos is as decent as possible as original. Now just download it and check out the steps below to transfer your iTunes movies to Google Nexus 10.
How to Convert iTunes M4V for play on Google Nexus 10
1. Add iTunes videos to the DRM remover
After you have downloaded and installed the iTunes Movie Decoder, launch the program and import your iTunes files (movies or TV shows). Batch conversion is supported, so you can add as many videos as possible.

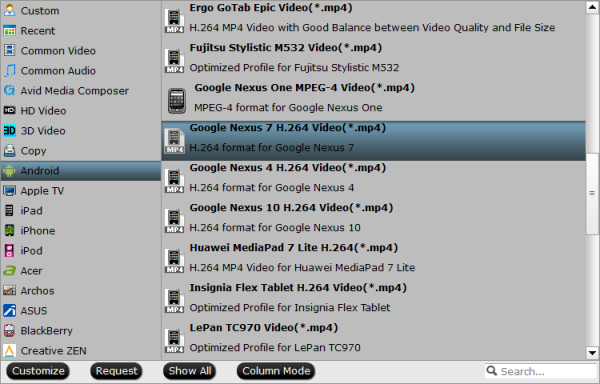
2. Select the output video format as Nexus 10
Choose the output video format and output folder. Click "Format" bar and move mouse to "Android" column, you can easily find the video preset of "Google Nexus 7 H.264 Video(*.mp4)". The output videos could fit on Google Nexus 10 perfectly.

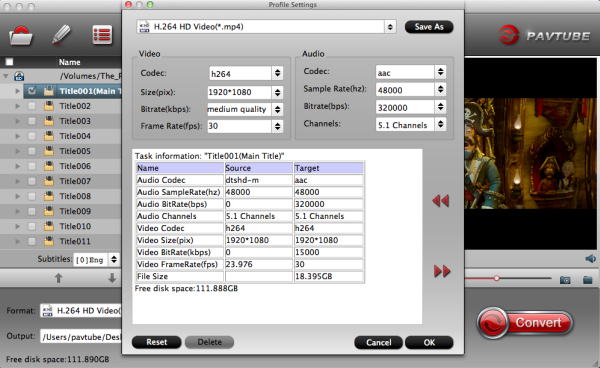
If you like, you can click "Settings" to change the video encoder, resolution, frame rate, etc. as you wish.

3. Start to remove iTunes DRM and convert iTunes to Nexus 10 MP4
When all is OK, click the "Start" button to convert iTunes files to Google Nexus 10 supported MP4. When the conversion finishes, you can click "Open" to locate the DRM-free MP4 video files. And then you can simply transfer the converted iTunes videos to your Google Nexus 10 for playback without DRM restrictions.
Also, you can also play Blu-ray, DVD and common videos to play on your Nexus devices.
There’s no other large Android tablet quite so impressive as the Nexus 10 right now, but that slim body and stunning 2560 x 1600 pixel LCD need looking after. Anyway, Google Nexus 10 is really worth owning. Do you also want to watch purchased iTunes movies on Nexus 10?
To get the work done, a DRM converter is needed. Here Pavtube ChewTune, a top iTunes M4V Converter for Android is highly recommended (Read the review) to help you convert protected iTunes M4V to DRM-free MP4 for play on Nexus 10. With it, you can effortlessly make your DRM protected iTunes M4V, Blu-ray/DVD Digital Copy and Amazon WMV videos playable on Nexus 10 in just a few mouse clicks in Windows (Windows 8.1/8/7 included) XP/7/Vista. Meanwhile the playback of the converted videos is as decent as possible as original. Now just download it and check out the steps below to transfer your iTunes movies to Google Nexus 10.
How to Convert iTunes M4V for play on Google Nexus 10
1. Add iTunes videos to the DRM remover
After you have downloaded and installed the iTunes Movie Decoder, launch the program and import your iTunes files (movies or TV shows). Batch conversion is supported, so you can add as many videos as possible.
2. Select the output video format as Nexus 10
Choose the output video format and output folder. Click "Format" bar and move mouse to "Android" column, you can easily find the video preset of "Google Nexus 7 H.264 Video(*.mp4)". The output videos could fit on Google Nexus 10 perfectly.
If you like, you can click "Settings" to change the video encoder, resolution, frame rate, etc. as you wish.
3. Start to remove iTunes DRM and convert iTunes to Nexus 10 MP4
When all is OK, click the "Start" button to convert iTunes files to Google Nexus 10 supported MP4. When the conversion finishes, you can click "Open" to locate the DRM-free MP4 video files. And then you can simply transfer the converted iTunes videos to your Google Nexus 10 for playback without DRM restrictions.
Also, you can also play Blu-ray, DVD and common videos to play on your Nexus devices.