Thursday, March 1, 2018

Play ISO on Cyberlink PowerDVD

As the world's number 1 media player software for Windows 10, Cyberlink PowerDVD allow users to watch Blu-ray, 4K, 3D, HD, MKV & DVD videos with enhanced surround sound audio. Have some ISO files backed from Blu-ray or DVD disc and wish to play ISO files on Cyberlink PowerDVD? You can follow the steps below to playback ISO file.

Steps to play ISO file on Cyberlink PowerDVD

Step 1: Browse and find the ISO file in Cyberlink PowerDVD, either in the Movie Library or via the My Computer tab.

My computer ISO file

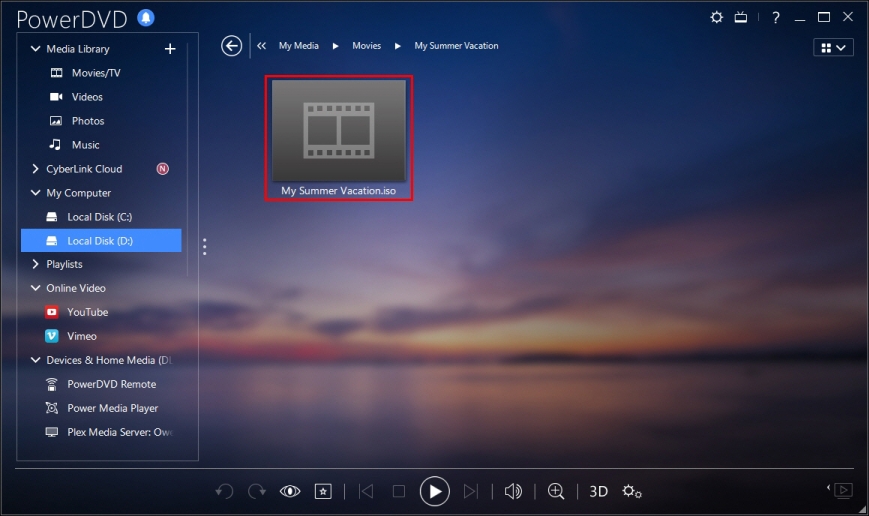
Step 2: Select the ISO you want to play and then click on the play button.

Step 3: Cyberlink PowerDVD displays a message asking you to install the required drive

Install virtual drive

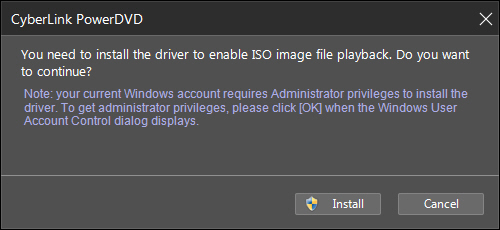
Step 4: Click on Install button and then Yes when prompted in the User Access Control dialog.

Step 5: Cyberlink PowerDVD will start playing the ISO file once the drive is installed.

Problems when viewing ISO files on Cyberlink PowerDVD

"I upgraded from PDVD 16 to 17 for my preparation of playing UHD movies. However I'm unable to play .iso files with PDVD17, it plays blu-ray dvd folders but won't reconize .iso files. I have a physical copy of PDVD 16 so I'm not worried about reverting back. I'm just wondering if there is a solution?"

"Just upgraded to PowerDVD Ultra Version 16, and the .ISO file support no longer seems to be working Is this a known bug being worked on? "

"PDVD15 fails to play any encrypted iso BD files. "

Solutions to fix Cyberlink PowerDVD not play ISO files?

Sometimes, your virtual drive might not be compatible with Cyberlink PowerDVD. If Cyberlink PowerDVD can not detect your virtual drive, your mounted ISO image cannot be played back in Cyberlink PowerDVD. Therefore, make sure to upgrade your virtual drive to make it adapt with your Cyberlink PowerDVD.

As for playing encrypted ISO files on Cyberlink PowerDVD, you will need a specific application to bypass that protection. Here, we highly recommend Pavtube ByteCopy to you. The program can assist you to powerfully bypass all protection from the Blu-ray/DVD ISO files in the background with its built-in disc decrypter. So that you can then freely convert the ISO files to Cyberlink PowerDVD playable digital file formats such as AVI, WMV, MP4, MKV, MP4, MOV, MPEG, Divx, Xvid, 3GP, 3G2, etc with no limitation.

Related article: Rip DVD to PowerDVD 16 | Best ISO File Converter | ISO to MKV with AAC

Pavtube ByteCopy is pretty simple to use, no matter experienced user or fresh could handle it very well. In addition, it has perfect compatibility with the new Windows 10/8.1/8/7. What's more, it supports to produce high quality conversion results, you can't tell the difference between the ripped video and the original Blu-ray/DVD ISO image file.

Step by Step to Rip Encrypted ISO Files for Cyberlink PowerDVD Playing

Step 1: Load ISO files into the application.

Initiate the program on your computer, on the main menu bar, click "File" > "Load IFO/ISO" to import ISO files to the program. 

Load ISO files

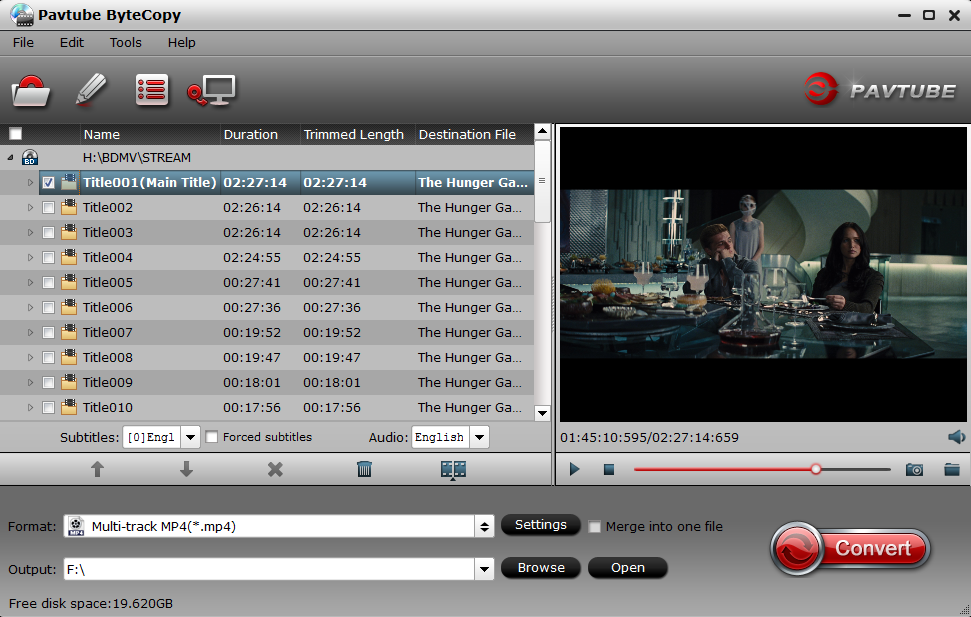
Step 2: Define the output format.

Clicking the Format bar, from its drop-down list, select one of Cyberlink PowerDVD supported digital file formats such as "Divx AVI - Audio Video Interleaved(Divx)(*.avi)" under "Common Video" main category.

Output Cyberlink PowerDVD supported digital file formats

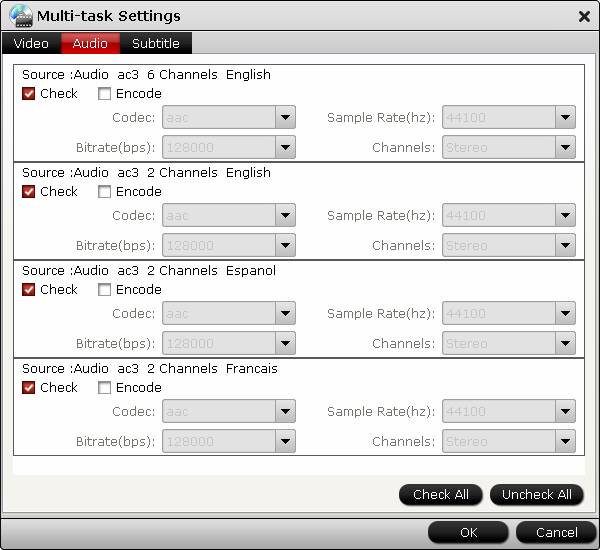
Tips: Click "Settings" on the main interface to open "Profile Settings" window, here, you can flexibly adjust the output profile parameters including video codec, resolution, bit rate, frame rate, audio codec, bit rate, sample rate, channels, etc as you like to get better output video and audio quality.

Step 3: Begin the conversion process.

After all setting is completed, hit the "Convert" button at the right bottom of the main interface to begin the ripping process from ISO to Cyberlink PowerDVD supported playback digital file formats.

When the conversion is finished, click "Open Output Folder" icon on the main interface to open the folder with generated files. Then you can directly view the converted digital files on Cyberlink PowerDVD without any limitation.

Friday, February 23, 2018

Backup Blu-ray Movies with Chapter Markers Preserved

As a standard feature in Blu-ray disc, chapter markers can let viewers and listeners quickly skip through sections of a program using the Previous and Next buttons on their playback app or device to quickly jump to these points in the movie. The chapter markers can be recognized during playback by various portable devices, media players and also most standard DVD and Blu-ray players.

For people who plan to backup movies to protect it from being damaged or for convenient playback on different devices without flipping through the whole Blu-ray disc collection, you may wish to preserve your chapter markers when you perform the Blu-ray disc ripping or copying process. The good news is that here comes Pavtube ByteCopy, which can assist you to rip Blu-ray movies with chapter markers well preserved in the following 2 two ways:
- 1:1 full disc copy of Blu-ray disc with original file structure including chapter markers, audio tracks and subtitle streams and also special features/bonus contents/extras well preserved.
- Make a lossless multi-track MKV copy from Blu-ray with all your desired audio streams, subtitle tracks and chapter markers well preserved.

Related article: Extract SRT Subtitles from Blu-ray | Encode Blu-ray to H265 with GPU Acceleration | Digitize Blu-ray/DVD on Mac

Pavtube ByteCopy can powerfully bypass all Blu-ray copy protection and region code, in addition, it also keeps constant update with perfect support for the new MKB63/MKB62 used on many recently released Blu-ray disc. Apart from chapter markers, you can also get best sound quality when ripping Blu-ray with 7.1 surround sound when using above 2 methods to copy or backup Blu-ray movies.

For your great convenience, Pavtube ByteCopy is available on both Windows and Mac platform. For Mac users, you can switch to download Pavtube ByteCopy for Mac to perform Blu-ray chapter marker ripping process on macOS High Sierra, macOS Sierra, Mac OS X El Capitan, Mac OS X Yosemite and Mac OS X Yosemite.

Step by Step to Backup Blu-ray Movies with Chapter Markers Well Preserved

Step 1: Load Blu-ray disc.

Insert the Blu-ray disc into your computer's Blu-ray drive. If your computer doesn't ship with a drive, you will need to purchase an external USB Blu-ray drive to read the data on Blu-ray disc. Then press "File" > "Load from disc" option on the main interface, alternatively, you can also import Blu-ray folder or Blu-ray ISO files with the program.

Load Blu-ray disc

Step 2: Rip Blu-ray with chapter markers.

Full disc copy of Blu-ray with chapter markers

On the top tool bar of the main interface, use the  option to make an entire disc copy of original Blu-ray structure with chapter markers well preserved.

Lossless MKV copy of Blu-ray with chapter markers

From "Format" bar drop-down list, select "Lossless/encoded multi-track MKV(*.mkv)" under "Multi-track Video" category to backup Blu-ray with your chapter markers and your wanted subtitle languages and audio tracks.

Lossless MKV copy of Blu-ray with chapter markers

Step 3: Adjust multi-task settings.

When you output the lossless/encoded multi-track MKV format, all the subtitle languages and audio tracks in original source file will be preserved. If there are some subtitle languages or audio tracks you don't like, you can click Settings button and go to Multi-task Settings window to uncheck and remove them under Audio tab and Subtitle tab.

Adjust multi-task settings

Step 4: Start Blu-ray chapter marker ripping process.

Click the button "Convert" on bottom right to start entire Blu-ray disc copy or Blu-ray to lossless MKV conversion with chapter markers. After conversion, just press "Open Output Folder" to find generated videos. You can set auto shut down by checking the box of "Shut down computer after conversion".

Friday, February 16, 2018

Merge 4K Video into One File

As a standard feature in Blu-ray disc, chapter markers can let viewers and listeners quickly skip through sections of a program using the Previous and Next buttons on their playback app or device to quickly jump to these points in the movie. The chapter markers can be recognized during playback by various portable devices, media players and also most standard DVD and Blu-ray players.

For people who plan to backup movies to protect it from being damaged or for convenient playback on different devices without flipping through the whole Blu-ray disc collection, you may wish to preserve your chapter markers when you perform the Blu-ray disc ripping or copying process. The good news is that here comes Pavtube ByteCopy, which can assist you to rip Blu-ray movies with chapter markers well preserved in the following 2 two ways:
- 1:1 full disc copy of Blu-ray disc with original file structure including chapter markers, audio tracks and subtitle streams and also special features/bonus contents/extras well preserved.
- Make a lossless multi-track MKV copy from Blu-ray with all your desired audio streams, subtitle tracks and chapter markers well preserved.

Related article: Extract SRT Subtitles from Blu-ray | Encode Blu-ray to H265 with GPU Acceleration | Digitize Blu-ray/DVD on Mac

Pavtube ByteCopy can powerfully bypass all Blu-ray copy protection and region code, in addition, it also keeps constant update with perfect support for the new MKB63/MKB62 used on many recently released Blu-ray disc. Apart from chapter markers, you can also get best sound quality when ripping Blu-ray with 7.1 surround sound when using above 2 methods to copy or backup Blu-ray movies.

For your great convenience, Pavtube ByteCopy is available on both Windows and Mac platform. For Mac users, you can switch to download Pavtube ByteCopy for Mac to perform Blu-ray chapter marker ripping process on macOS High Sierra, macOS Sierra, Mac OS X El Capitan, Mac OS X Yosemite and Mac OS X Yosemite.

Step by Step to Backup Blu-ray Movies with Chapter Markers Well Preserved

Step 1: Load Blu-ray disc.

Insert the Blu-ray disc into your computer's Blu-ray drive. If your computer doesn't ship with a drive, you will need to purchase an external USB Blu-ray drive to read the data on Blu-ray disc. Then press "File" > "Load from disc" option on the main interface, alternatively, you can also import Blu-ray folder or Blu-ray ISO files with the program.

Load Blu-ray disc

Step 2: Rip Blu-ray with chapter markers.

Full disc copy of Blu-ray with chapter markers

On the top tool bar of the main interface, use the  option to make an entire disc copy of original Blu-ray structure with chapter markers well preserved.

Lossless MKV copy of Blu-ray with chapter markers

From "Format" bar drop-down list, select "Lossless/encoded multi-track MKV(*.mkv)" under "Multi-track Video" category to backup Blu-ray with your chapter markers and your wanted subtitle languages and audio tracks.

Lossless MKV copy of Blu-ray with chapter markers

Step 3: Adjust multi-task settings.

When you output the lossless/encoded multi-track MKV format, all the subtitle languages and audio tracks in original source file will be preserved. If there are some subtitle languages or audio tracks you don't like, you can click Settings button and go to Multi-task Settings window to uncheck and remove them under Audio tab and Subtitle tab.

Adjust multi-task settings

Step 4: Start Blu-ray chapter marker ripping process.

Click the button "Convert" on bottom right to start entire Blu-ray disc copy or Blu-ray to lossless MKV conversion with chapter markers. After conversion, just press "Open Output Folder" to find generated videos. You can set auto shut down by checking the box of "Shut down computer after conversion".