Monday, September 26, 2016

How to Watch Subtitled Movies?

Sometimes, the reason that you can 't play external video on PC or standalone DVD Player is the settings wrong or your subtitles has some errors. To watch video with external subtitle on your PC and standalone DVD Player without hassle, you can check if your external subtitle has error info and make right subtitle settings with some freeware programs.

Required Software

This brief guide explains how to view movies with subtitle files easily.

Step 1: Check the external subtitle file

To avoid unpleasant surprises with the subtitles in the middle of the video, it is recommended to check the subtitles first with the freeware program DivXLand Media Subtitler.

Start Media Subtitler and open the subtitle file from the File > Open text or subtitle menu. The program supports the most popular sub formats, including SRT, SSA, SUB, SMI, etc.
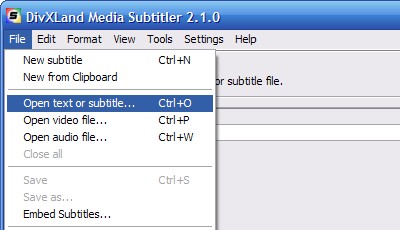

DivXLand Media Subtitler is a free subtitle editing and correction tool.

By default, the program will scan the subtitles and fix all possible errors. A report detailing the corrections made will be shown after loading the subtitles.

Close the report (if appears) and save the subtitle from the File > Save menu. It is recommended to always save the subtitles in SRT (SubRip) format to ensure maximum compatibiliy.

Important:
 Make sure to save the subtitles using a filename identical to the video file. Eg:
  • My Movie (DivX HD).avi
  • My Movie (DivX HD).srt

This way the subtitles will be auto-loaed when opening the movie.

Step 2: Configure Media Player Classic

In this step we will setup this free player to make it show the subtitles with a custom style.

Open Media Player Classic and go to the View > Options menu. At the Playback > Output section, you must select a DirectShow video mode that supports subtitles. You can select either the VMR-7 (renderless) or VMR-9 (renderless)modes, both support external subtitles.
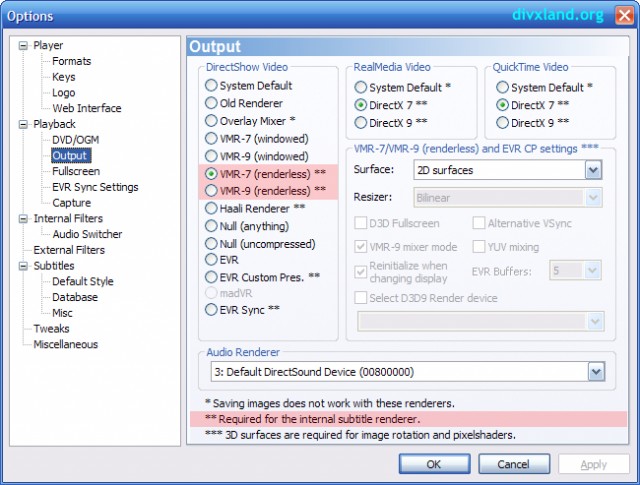

Media Player Classic DirectShow video modes that support subtitles.

Now you should set the subtitles style, from the Subtitles > Default Style tab. It is recommended to use a simple font such as Arial, a Border width of 1 and a Shadow depth of 1 as well, as shown below. Clicking on the button inside theFont section will show the Font Selection dialog, where you can set the font type and size.
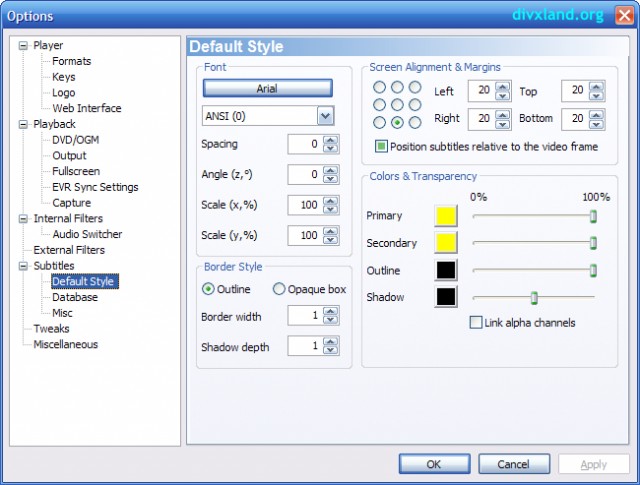

Subtitle style selection for Media Player Classic.

Click OK to save all the settings and restart Media Player Classic to apply the new DirectShow video mode selected. All these settings will be saved permanently.

View subtitled video with Media Player Classic

Once Media Player Classic has been configured, simply open the desired video file and the subtitles will be automatically loaded. Remember that for this to work both video and subtitle files need to have an identical filename.
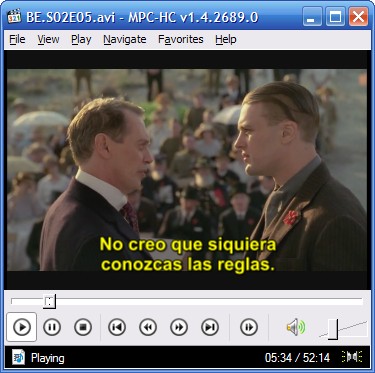

Media Player Classic using the internal subtitler filter.

Now you can adjust the subtitle style at any time without reloading the video or closing the player, the new style will be applied immediately.

View subtitles on standalone DVD player with DivX® support

Most standalone DVD and BD players with DivX® video support can show movies with external SRT subtitles, as long as they have been perfectly checked to avoid errors.

Most Philips DVD players now support DivX® video and external SRT subtitles.

To watch subtitled movies on these, make sure to burn the movie and subtitles using an identical and short filename(such as 10 characters) to ensure they will work. Start the movie and use the Subtitle button in the remote control to enable/disable the subtitles.

On these players you will rarely be able to edit the subtitles style. You can, however, perform a firmware upgrade on certain models to modify the style, but you must use third party firmware (unofficial) that is not guaranteed to work and could damage the device when choosing the incorrect one. Make sure to proceed with caution in this case.

You can also embed the subtitles on the AVI video with Pavtube Video Converter Ultimate  if your player does not support external subtitles. In this case you will be able to set the subtitle font and style desired, but this process requires recompressing the entire video, with the inherited loss of video quality.

How to Add Subtitle to AVI videos with Pavtube Video Converter Ultimate?

Step 1. Drag & drop AVI files to the program directly. Or go to the “File” menu, choose “Add Video” to locate the AVI files you want to add. You can add several files to do batch conversion. 
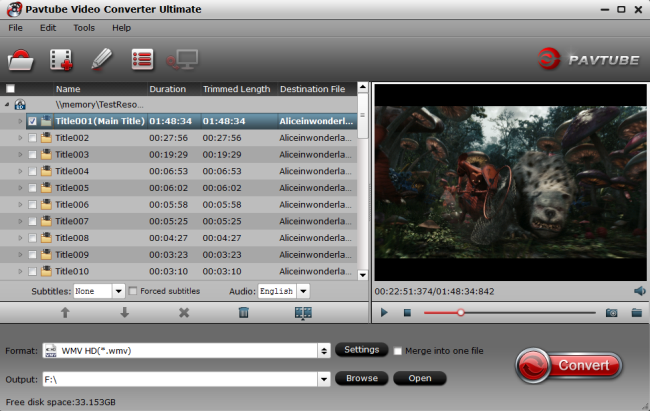


Step 2. Add subtitles to AVI videos

Click “Edit” or the pencil icon  to switch to the editing interface, where you can find multiple editing functions and “Subtitle” is just one of them. Click the “Subtitle” tab and check the “Enable” box to allow you to add SRT/ASS/SSA subtitles to AVI videos. Then Click “Browse” to find and import the downloaded SRT/ASS/SSA subtitles.
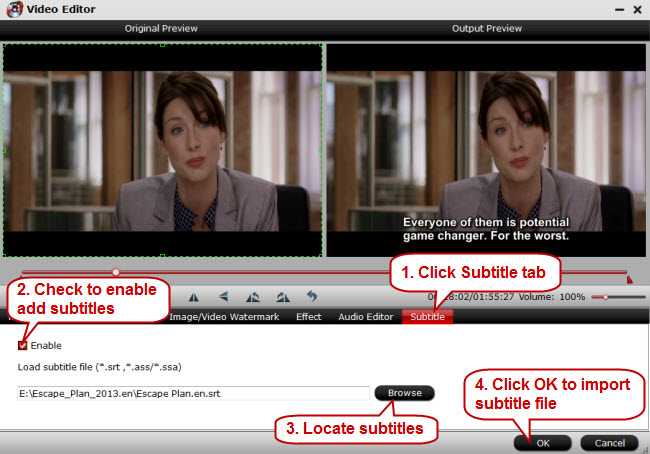


Kindly note: Pavtube Video Converter only supports SRT/ASS/SSA subtitles, and make sure that the subtitle file and your AVI video files are kept in the same folder sharing the same name.

Step 3. Start inserting subtitles to AVI video

Go back to the main UI and click “Convert” to start inserting SRT/ASS/SSA subtitles to your AVI videos. If you don’t want to keep the original AVI format, just click the format bar to choose the output video format you want before conversion.

Pavtube Video Converter Ultimate not only can add subtitle to AVI but also can attach subtitle to MP4 video, hard burn subtitle to MKV, hardcode subtitle to FLV, etc to make you play subtitled video.

Related Articles:
Monday, September 19, 2016

Convert Disney DVD Files to MP4 on Windows and MacOS

These days, we live in a world where we want every movie and TV show we own to be available at our fingertips on every electronic device in our arsenal. Shelves chock full of movies now seem overly cumbersome, and they’re also an unnecessary waste of space that can be better used for something else. On top of that, we all know how boring a flight or train ride can be without access to a robust library of entertainment.

Related: Remove Disney X-project DRM DVD on Windows 10/Yosemite

Fortunately, there is more than one way to convert Disney DVDs to a format that’s compatible with a wide range of devices. For that purpose, we prefer MP4. Here’s our guide on how to convert Disney DVD files to MP4s, whether you’re using Windows or MacOS. Keep in mind that reproducing copyrighted material is illegal, so be mindful of whether or not the movie you are ripping is protected.

Learn: Copy Unprotected DVD to MP4 with Handbrake

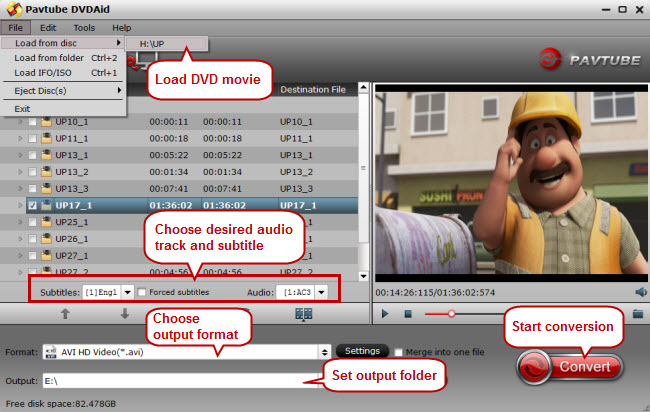
Convert using Pavtube DVDAid

Step 1 — Download and install Pavtube DVDAid

Navigate to the main Pavtube DVDAid homepage and click the orange Free Download button. Afterward, launch the executable file and follow the on-screen instructions. Open the application once installed.

For Mac users: Pavtube DVDAid for Mac

Step 2 — Select a DVD

Once open, click the DVD Disc button and choose the Disney DVD you want to convert into an MP4 from its location.

Step 3 — Choose MP4 and convert

load Disney DVD

Select the file you wish to convert from the list of available options and click "Format" drop-down list to choose MP4 format. Afterward, select a save location for the MP4 and choose your desired audio and video settings in the menu underneath. Click the large Convert button located in the bottom right to begin the conversion process.

Related Articles:

Monday, September 12, 2016

Convert HD videos to 5.1 Apple TV pass-through on Mac

Part 1. Basic Settings to Dolby Digital 5.1 Surround Sound via Apple TV? 

Go into the settings on your Apple TV and make sure Dolby Digital is set to "on" instead of "auto", then you'd better encode your music videos to Apple Lossless (ALAC). To watch movies with AC-3 5.1 surround sound on Apple TV, the media file shall be placed in both “Advanced Audio Coding (AAC) stereo” and “AC-3 surround sound” audio tracks at same sampling rate of about 48kHZ. Aside from that, it is suggested that the audio files be prepared adhering to the following points: 
  •  AAC audio track should be open and put in ahead of AC-3 (DD5.1) 
  • .AC-3 (DD5.1) audio track shall be set "off" as default. 
  • .Proper MPEG-4 / ISO standard shall be applied to the AC-3 (DD5.1) audio track 
The surround sound field would be ported out via HDMI or optical audio-out. Now you can go to the Settings > Audio > Dolby Digital Out and check "on" the DDO to complete a perfect connection.

Main Information:

Please refer to the Pavtube iMedia Converter for Mac and get more instructions related to the new. For example, you are able to find solutions here to watch transfer videos and movies from computer to Apple TV, to encode MKV/AVI/WMV to Apple TV compatible video, and to play HD videos on Apple TV without Problem.

Free download and install Apple Converter: 


Other Download:
- Pavtube old official address: http://www.pavtube.cn/imedia-converter-mac/
- Cnet Download: http://download.cnet.com/Pavtube-iMedia-Converter/3000-2194_4-76177788.html 


Part 2.Step Guide: How to Converter HD videos files with subtitles Apple TV via USB Port 

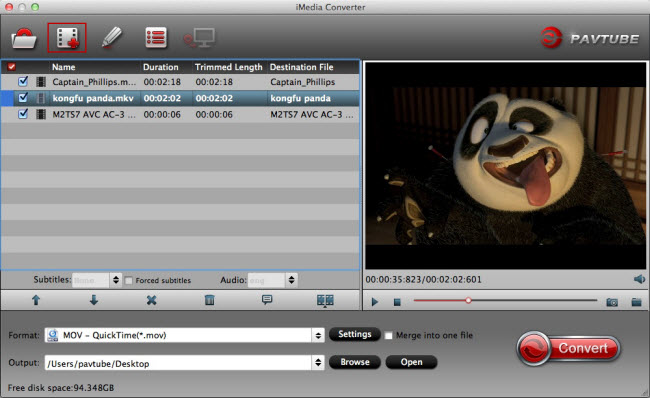
Step 1. Launch the Apple TV Video Converter and import HD videos files.

Drag & drop HD videos files to the program directly. Or go to the “File” menu, choose “Add Video”to locate the HD videos files you want to add. You can add several files to do batch conversion.
Input source file formats

Tip: Freely select the subtitles for you HD videos movies from the “Subtitles” option. Thus, you can watch HD videos on Apple TV via USB Port with Subtitle.

Step 2: Set Output video format for Apple TV.

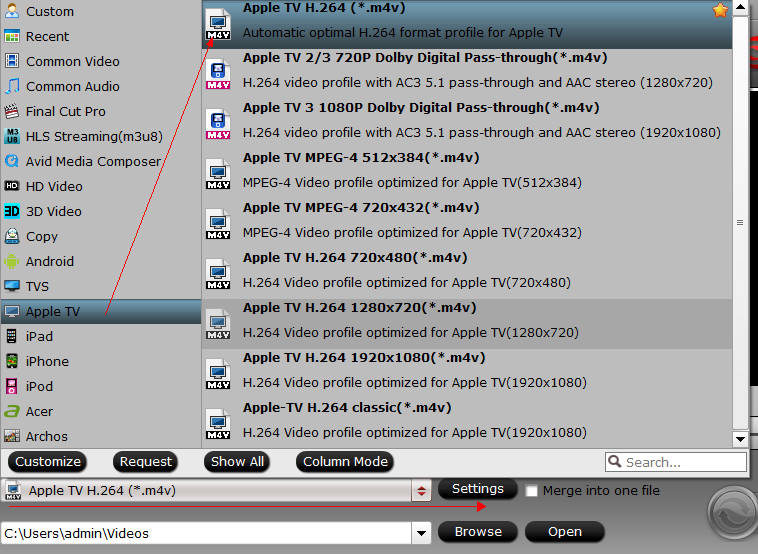
Click the drop-down button on the right side of the “Format” to select “Apple TV″ from “Format >  H.264 Vdieo (m4v)” Category, Which is suitable for Apple TV and also for USB Port. 


Tip: Click “Settings” button, then you are able to adjust all the settings in the following window to customize the output file quality, including codec, size, bit rate, frame rate, sample rate and audio channel.

Step 3: Start converting HD video to Apple TV.

After the above steps are done, you can click “Convert” button to convert your HD videos to Apple TV comfortable MP4 format. Easy operation and faster conversion speed. You can save the movies on a separate external hard drive,then play the HD movies on Apple TV or other device.


Part 3. More Problem about Apple TV With Dolby Digital 5.1 
  • What did happen to my Apple TV that did not deliver Dolby Digital 5.1 audio? 
Apple TV with firmware 4.2.2 many not handle DD 5.1 properly. Update your firmware to the latest version. 
  •  What about I set Dolby Digital to Auto in Apple TV? 
When Dolby Digital is set to auto, the Apple TV will play AAC stereo when the source video contains both Dolby Digital 5.1 and AAC stereo audio. 
  •  Can I stream HD videos with DTS surround to Apple TV? 
Neither Apple TV nor Apple TV would handle DTS audio. The best way to play videos with DRT surround sound in Apple TV is to convert DTS to ATV supported audio formats: HE-AAC (V1), AAC (16 to 320 Kbps), protected AAC (from iTunes Store), MP3 (16 to 320 Kbps), MP3 VBR, Audible (formats 2, 3, and 4), Apple Lossless, AIFF, and WAV; Dolby Digital 5.1 surround sound. 
  •  How to load my HD MKV/AVI/WMV video in iTunes library? 
Actually you can’t stream HD to Apple TV unless they are encoded into Apple TV supported formats (MP4, M4V, MOV). The latest update of Pavtube Video Converter includes Apple TV and Apple TV oriented presets that can keep Dolby Digital 5.1 as well as AAC stereo audio when converting HD MKV/AVI/WMV/VOB/TS/MPEG videos for Apple TV streaming

Part 4.Set up Apple TV for streaming HD videos with Dolby Digital 5.1 sounds

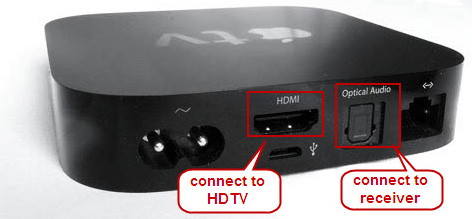
Connect Apple TV to HDTV and audio receiver

HDTV and audio receiver

Unbox Apple TV and follow the below steps to get started with Apple TV .
1. Connect Apple TV to a power outlet.
2. Connect Apple TV to HDTV with an HDMI cable.
3. Connect Apple TV to audio receiver with an optical digital audio cable. Turn on audio receiver, and use Direct Mode for Dolby Digital 5.1 audio reproduction.
4. When Apple TV boots up, it will scan for available WiFi networks to connect to. Use the remote control find yours and choose it, then enter your password. The Apple TV can also connect via Ethernet. Apple explains how to connect the black Apple TV models to network in the Apple TV User's Guide, specifically from pages 16.

Note: There is no HDMI cable or optical cable included in the Apple TV box, so you'll need to purchase an HDMI cable and an optical digital audio cable.

Part 4.Setup for Apple TV to play/stream movies from your computer

At this point, you should be ready to stream the hottest HD movies and TV shows from iTunes Store and Netflix with the black Apple TV.

If you're more into streaming music or videos from computer to Apple TV, you can enable home sharing feature. Home Sharing allows you to stream content from your iTunes library to the Apple TV to be displayed on your HDTV. To use home sharing, you need to have iTunes installed on your computer and set up on your main home computer and on Apple TV. Note that Apple TV works with iTunes 10.2 later and Apple TV iTunes 10.6 and later on versions.

Related Articles: 

Sunday, September 4, 2016

Upscaled 1080P to Native 4K video

Simply put, upscaling produces video that utilizes your television’s or monitor’s maximum resolution, even when playing a standard definition video. Most flat-screen TVs have a 1920 x 1080p resolution, resulting in 2,073,600 pixels in total – that’s 1,920 across, multiplied by 1,080 rows of pixels. Playing a Standard Definition 720 x 567p movie, then, wouldn’t use all of the available pixels.

Q: 1080p Upscaled Too 4K Vs Native 1080p, Which Is Better? “I mostly like PC games but I enjoy consoles for exclusive titles, has anyone compared upscaled 1080p on a 4K tv compared to a native 1080p tv? Which is better? Or is there not much of a difference/no difference at all? I know xbox one and ps4 can only support up too 1080p right now.”

A: “The only time scaling is better is when it is downscaling - taking higher resolution video and displaying it on a screen that is a lower resolution than the video. Native 4K video for example looks positively divine on a 1080p display.”

Note: The good news is that upscaling on 4K TVs doesn't seem to be that awful, so 1080p content being upscaled to a 4K screen does look better than 720p did being upscaled to a 1080p screen. So displaying 1080p content on a 4K display shouldn't be too serious a problem.

4k vs 1080p and upscaling: Is UHD worth the upgrade?

The benefit of 4k over 1080p seems obvious on paper – 4k has four times as many pixels as 1080p, which means it should have a clearer picture – but a 4k TV only improves the picture quality if: 

  • You are watching native 4k content 
  • You sit close enough to notice the difference 

A 4k TV doesn't improve the picture quality of lower quality content like 1080p Blu-rays.

Update: “ In 2016, only budget or small TVs are still being made with a 1080p resolution. So even if you don't care about 4k (for example, if you sit far away or don't have access to 4k content), you will still need to buy a 4k TV if you want the better picture quality found on higher end TVs.”


The two photos above illustrate an identical image at different native resolutions, which means the file resolution and the TV resolution are exactly the same. The first photo is a 4k image displayed on a Vizio M Series 4k TV, and the second is a 1080p image displayed on a Vizio E Series 1080p TV.

The 4k image is smoother, and has more detail than the 1080p image. Look closely and you’ll see that the edges around objects in the 1080p picture are noticeably more jagged. The difference is because the higher pixel count of a 4k screen allows for a more natural representation of the picture, with smoother outlines for distinct objects and added detail in the image.

If you’re underwhelmed by the difference, it’s because there are diminishing returns at higher resolutions. With 4k, you do get more detail than with 1080p, but the upgrade isn’t as staggering as the one between SD and HD.

It’s important to note that this comparison uses a real 4k image. 4k content is more widespread now, but most of what you watch will probably be lower-resolution content upscaled to UHD, which will look different from native 4k and 1080p.

1080p Upscaled to 4k vs Native 1080p

To present lower-resolution material on a 4k TV, the TV has to perform a process called upscaling. This process increases the pixel count of a lower-resolution image, allowing a picture meant for a screen with fewer pixels to fit a screen with many more. It’s important to remember that since the amount of information in the signal doesn’t change, there won’t be more detail present.

The first image is a 1080p picture upscaled to 4k on the Vizio M, and the second is a native 1080p image on the Vizio E.

The Vizio M’s upscaling resulted in a bit of added smoothness, but overall the two images look very similar. There isn’t any more detail in the upscaled picture than you can see in the native 1080p picture, so whether or not it looks better is entirely subjective.

Source:http://www.rtings.com/tv/reviews/by-resolution/4k-ultra-hd-uhd-vs-1080p-full-hd-tvs-and-upscaling-compared 


Read more About DJI Phantom 4 4K video:
Best Tool for Upscaling 1080P as 4K Videos for 4K TV 

Acting as a powerful UHD 4K Converter, Pavtube Video Converter UltimateMac is capable of converting any UHD 4K video to 1080P or other HD formats. Besides changing resolution from 4k to 1080P, you can also transcode between all video and audio formats and set any resolution value you like. The following will introduce a step by step guide on how to convert 4K Ultra HD video to 1080P with Pavtube 4K Converter. Read the Review

Free Download and trail: 


Other Download:
- Pavtube old official address: http://www.pavtube.cn/blu-ray-video-converter-ultimate/
- Cnet Download: http://download.cnet.com/Pavtube-Video-Converter-Ultimate/3000-2194_4-75938564.html

Tips About : Upscaling Blu-ray Player, or 4K TV?

As mentioned earlier, upscaling can be handled by either a capable Blu-ray player, or by the television. The decision between buying a new Blu-ray player or 4K television depends on the media you watch more often.

DVDs are very popular, and Blu-ray discs are still a relatively niche market. If you want to upgrade, yet don’t want to scrap your DVDs and start your collection anew, upscaling Blu-ray players are tempting. After all, if you can’t see the difference between an upscaled picture and a HD one from a good distance (ie. one you’ll be comfortably watching television from), surely it’s worth doing. It’s a convincing argument, that’s for sure. Don’t be tricked by a player that boasts superior upscaling: in the end, your television is the limiting factor.

Some Blu-ray players can upscale to 4K (hence occasional ‘Mastered in 4K’ releases, capable of playing as standard and higher quality if used on a superior player), but in most cases, when playing a DVD for display on a 4K TV, the television will be responsible for making that leap to higher definition – indeed, it’s something it does with all signals. But even if a Blu-ray player is capable of upscaling to an impressive 4K, if your TV doesn’t support this, you’ll simply get the highest resolution your set is confined to, likely 1080p HD.

Before swapping your players, question whether a newer television set is more beneficial. Read our buying guide for more information on choosing a new HD TV.

If you mostly watch anything other than DVDs or Blu-ray media, then buying a new 4K TV would make sense. It would upscale all video input, including DVDs and even Blu-rays, to as near to 4K definition as possible.

Naturally, purchasing Blu-ray players will be the cheaper option. They’re typically below $200, while a 4K TV can cost a lot more. If you’re very invested in UHD TV and future-proofing your home entertainment, you’ll be tempted by a 4K television.

Source:http://www.makeuseof.com/tag/upscaling-how-does-it-work-and-is-it-worth-it/

Read More: 

Thursday, September 1, 2016

How to Move Blu-ray movies to iPad Air 3 with Highest Quality

Summary: The right place for you to get detailed info on iPad Air 3 videos and Blu-ray to iPad conversion. 


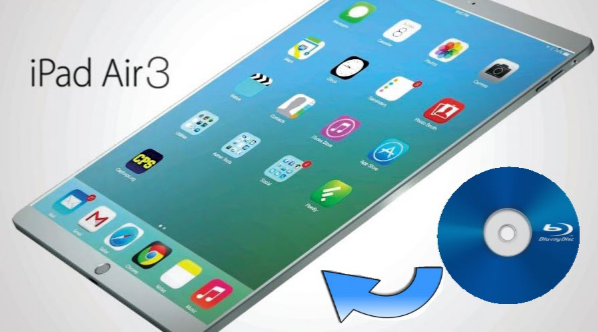
Many people would choose to stay at home and watch some blu-ray movies with family or friends, because Apple iPad Air 3 come with large and HD screen display, which makes it quite enjoyable for HD blu-ray movie watching. If you want to watch Blu-ray movies on iPad Air 3, you need a professional Blu-ray to iPad Air 3 converter that helps convert Blu-ray to iPad Air 3 videos with high quality and speed. This post would be the right place for you to get detailed info on iPad videos and Blu-ray to iPad video conversion.

Blu-Ray optical drive for iPad Air 3? The all-new Apple tablet – iPad Air 3, with a 9.7″ inch backlit display with 2048 X 1536 pixels of resolution, is a good choice for playing movies. However, iPad Air 3 only supports videos in MP4, MOV and M4V format. So if you have got a collection of Blu-ray movies and want to play them on iPad Air, you will get frustrated since Blu-ray videos are not compatible with iPad Air.

Fortunately, there is an easy and fast way to convert and put Blu-ray movies onto iPad Air. You can convert Blu-ray to iPad Air 3 supported video formats like MP4 for smoothly playback with a Blu-ray to iPad Air 3 converter. Pavtube ByteCopy is an intuitive Blu-ray converter that allows you to easily rip Blu-ray to iPad Air 3 MP4/MOV/M4V so that you can play any Blu-ray movies on your iPad Air 3 on the go. Besides, this Blu-ray to iPad Air 3 converting tool also provide some video editing tools to let you crop the Blu-ray movies black bars, trim the unnecessary part, etc. for better video watching experience. If you are a Mac user, you can turn to iPad Air Blu-ray Ripper for Mac, which can help you convert Blu-ray to iPad Air 3 on macOS Sierra/El Capitan.

Free download and install: 


Other Download:
- Pavtube old official address: http://www.pavtube.cn/bytecopy/
- Cnet Download: http://download.cnet.com/Pavtube-ByteCopy/3000-7970_4-76158512.html

The easy way to convert Blu-ray to iPad Air 3 compatible video formats 


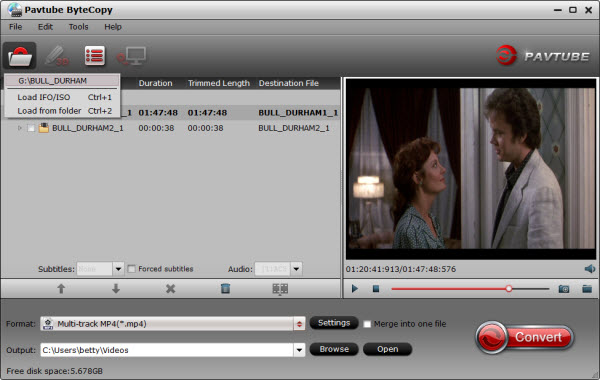
Step 1: Insert your Blu-ray disc into your drive, run the Blu-ray to iPad Air 3 Converter and click "Blu-raydisc" icon to load Blu-ray movies. You can also import movies from blu-ray folder, Blu-ray folder and ISO image files. 


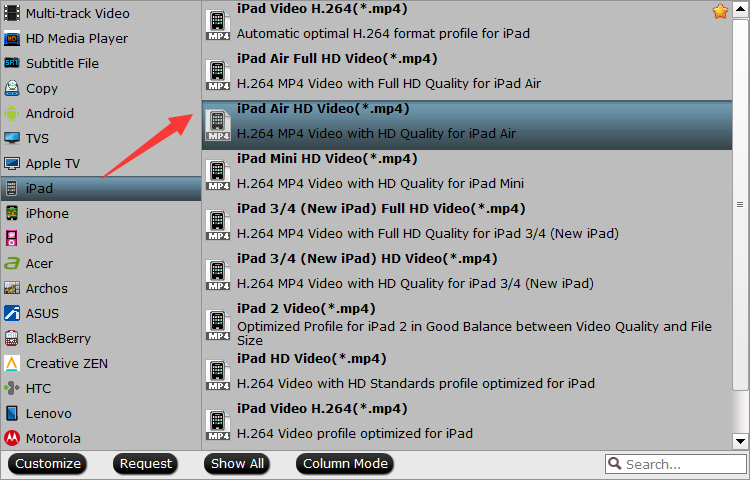
Step 2: Click the output format dropdown list; you'll get a lot of choices. For converting blu-ray to iPad Air, you can select "iPad > iPad Air HD Video (*.mp4)" as output format. If you rip Blu-ray to iPad Air, "iPad Air Full HD Video (*.mp4)" is a better choice.


Step 3: At last, click the Convert button to begin converting Blu-ray movies to iPad Air 3 immediately. After the ripping, you can click "Open " to locate the converted MP4 video files and just transfer them to your iPad Air without limitation!

Related Articles: