Showing posts with label DVD Backup. Show all posts

Monday, December 23, 2013

How to copy DVD movies to the Kindle Fire HD on Win/Mac

Wanna play your DVD movies on Kindle Fire HD? It is really difficult for us to find an effective player to resolve all our DVD videos. Actually, with the help of Pavtube DVD Ripper, we can easily deal with DVD playback issues.

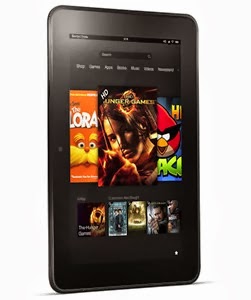
The Kindle Fire HD is the second generation of Amazon's Kindle Fire line of color touchscreen tablet computers. It features a new 1280×800 high definition LCD display that brings greater experience on movie watching. Recetly I got my Kindle for watching films or backing up my DVD Collection.


However, as we know, Kindle Fire HD can't play DVD directly because it can't have a DVD drive. Kindle Fire HD supports MPEG4, VP8, H.263 videos. To watch DVDs on my new Kindle Fire HD, I think I need to use a DVD ripping software to help you convert DVD to Kindle Fire HD supported video files such as MP4 format.

After trying a few free DVD converters, finallly I find Pavtube DVD Ripper, (Alternative Mac version) and purchased it so I can watch my DVD's on my new Kindle Fire HD. I chose Pavtube because the interface was very clear and the whole process seemed very straight- forward. It does a great job in ripping my DVD movies no matter from DVD discs, DVD movie folders, or DVD IFO/ISO image files to a common video for my Kindle Fire HD and a HTC cell phone too. Both the two programs are 30% off now.

How to convert DVD to Kindle Fire HD compatible videos files


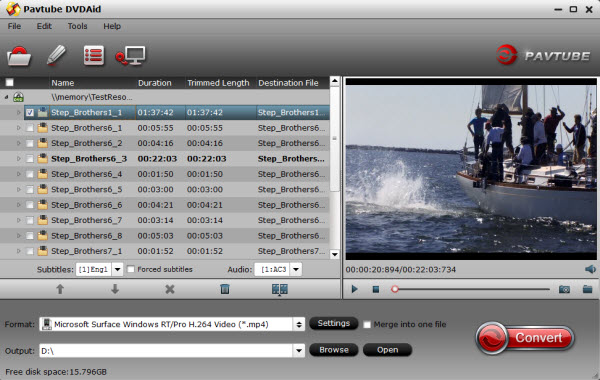
The below guide uses DVD Converter Windows (Windows 8 compatible) screenshots. The way to rip DVD files to your Kindle Fire HD on Mac is almost the same. Just make sure you ge the right version.

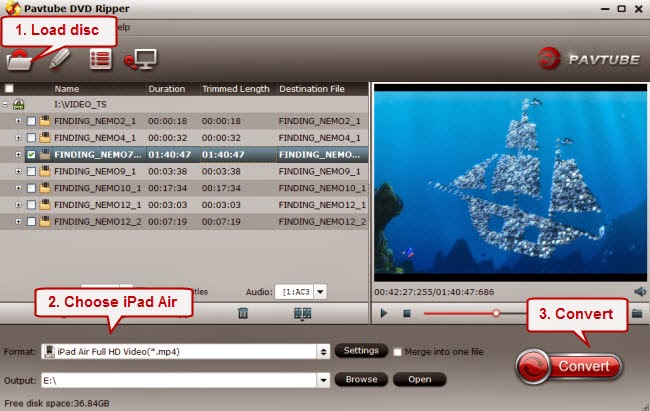
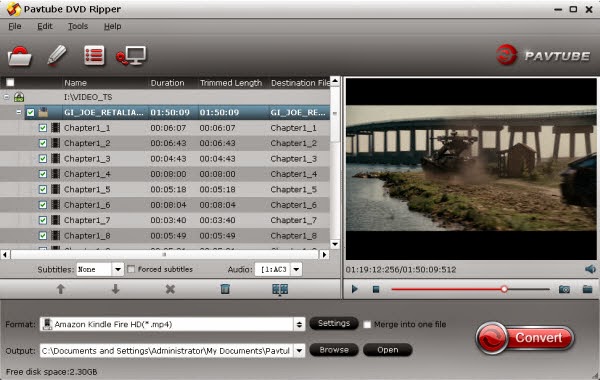
1. Add DVD files to the program

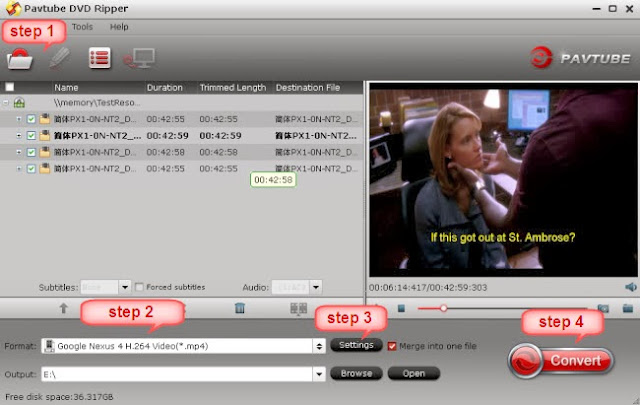
Insert DVD movies into your DVD drive, then click "Load file" button to navigate to DVD movies you want to convert. As you can see, added files can be previewed on the right viewing window. You can adjust the video volume and take snapshots of your favorite movie scenes.


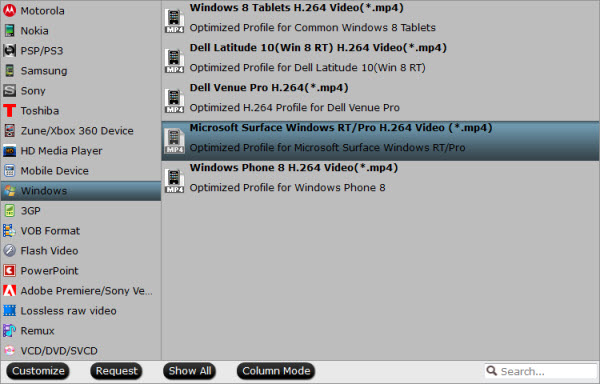
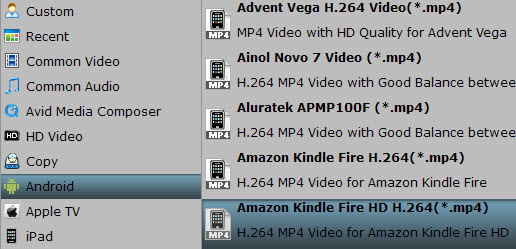
2. Set output options for Kindle Fire HD

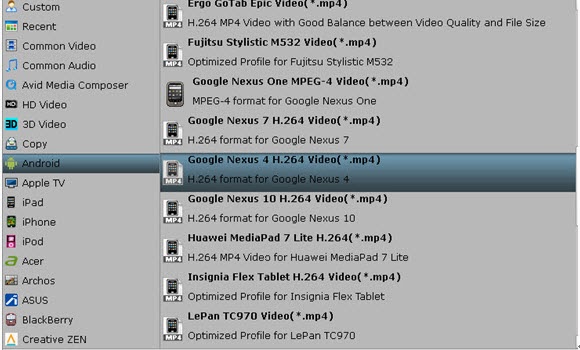
Now choose the output format for playback on your Kindle Fire HD. You can get optimized videos for Kindle Fire HD under Format > Android > Amazon Kindle Fire HD H.264(*.mp4). The output videos could fit on your device perfectly. And choose the destination folder to save the converted videos.


Tips:
1. If you want to keep multiple audio tracks and subtitle streams when ripping DVD to MKV, MP4 and MOV, you can try to use Pavtube ByteCopy for Windows or Mac.)

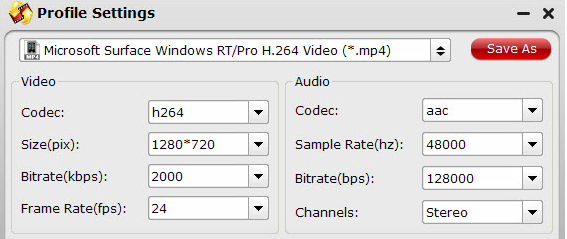
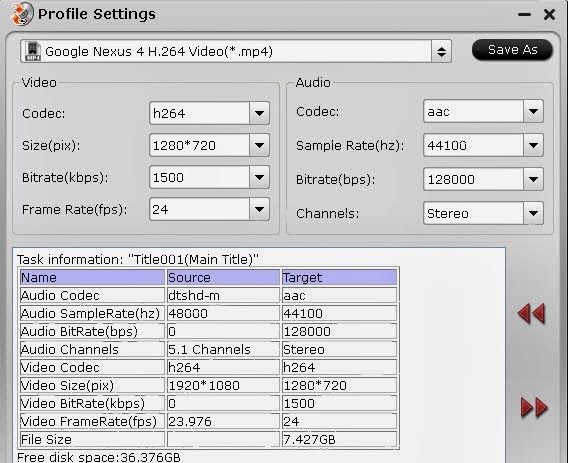
2. You can click “Settings” to tweak the detailed video and audio encoding settings. Or click “Edit” button to trim video into several segments by setting a specific output file size, append special effects, crop video screen area, add text/picture watermark.


3. Start DVD to Kindle Fire HD conversion

After all the above settings, simply click “Convert” button to start converting DVD files to Kindle Fire HD video. Just wait for the converting process to be done. After that, find the converted videos in your output folder and transfer them to your Kindle Fire HD. In this way, you can play DVD files on Kindle Fire HD and enjoy them on the go.

P.S. If you have no idea about Kindle Fire HD file transfer, you can check out the post Synchronizing Your Content files (Videos, Pictures, Music) to Kindle Fire HD to learn more.

Read More:

Kindle Fire HD Video Column
Top 10 Kindle Fire HD FAQs, Tips and Tricks
Top 10 Limitations of the Kindle Fire HD
How to sync iTunes movies, music to Kindle Fire HD
Transfer Digital Copy movies to Kindle Fire HD
Rip/Copy Blu-ray movies to Kindle Fire HD

From: http://1080p-video-tool.blogspot.com/2013/10/convert-dvd-to-kindle-fire-hd.html

Sunday, December 1, 2013

Play DVD ISO/IFO with iPad Air on Windows 8.1/Mac Mavericks

As we all know iPad air doesn't surpport to paly DVD ISO/IFO files, but if you have some DVD ISO/IFO files and want to load them to your newly purchased tablet iPad air for watching anywhere and anytime, what will you do? Have you ever thought of converting DVD ISO/IFO to a playbale format, like MP4, MOV, M4V, for viewing on iPad air? In fact, this method is completely feasible. If you want to lean more about the solution, please go on reading this article.


How to play DVD ISO/IFO with iPad Air on Windows 8.1/Mac Mavericks? 

First, pls select a great DVD Convert tool for help you converting DVD ISO/IFO. Here I recommend iPad Air DVD Ripper.I am using it , it’s easy to use and the conversion effect is pretty good. Following is the full guide of how to convert and sync DVD ISO/IFO files to iPad Air.  

Tips for Showing Best Video Formats Supported by iPad Air:

  • Video Format: .m4v, .mp4, .mov, MPEG-4, H.264, M-JPEG
  • Audio Format: AAC, Protected AAC, HE-AAC, MP3, AAX, AAX+m, Apple Lossless AIFF, WAV

Free download here:

Windows: iPad Air DVD Ripper  (including latest Windows 8.1)
Mac:  iPad Air DVD Ripper for Mac. (including latest 10.9 Mavericks).

1.Add DVD ISO/IFO files.

Launch the iPad Air DVD Ripper,then click "add ISO/IFO" icon to import ISO/IFO image files. You can also add DVD discs, DVD folder.


2.Choose output format for iPad Air.

Click "Format" drop-down list,choose iPad > iPad Air Full HD Video(*.mp4) as the compatible format with best video quality.
Tips: You can click "Settings" to change the video encoder, resolution, frame rate, etc. as you wish.


3.Start DVD ISO/IFO to iPad Air MP4 conversion.

Click the big "Convert" button to start converting DVD to iPad Air MP4 for playback. With the help of NVIDIA's CUDA/ATI Stream technology, the conversion speed is super fast

After the conversion, click "Open output folder" in the conversion window, or "Open" in main interface to quick locate the converted video,Then Sync the converted files to iPad Air for playing.

If you don’t know how to put and play video on new iPad Air , just follow the steps to realize it: 
Make sure you have install iTunes. If not, you must free download iTunes at first. then  launch the iTunes. 

1.Connect iPad Air to Mac/PC. 
2.Choose “File – > Add File to Library…”
3.Drag the .mp4 file you want to the iPad Air icon

Now you can play DVD ISO/IFO files on iPad Air at ease.

Related Articles:

Thursday, November 28, 2013

Playing DVD movies on Surface Pro 2 tablet

This DVD to Surface conversion guide will show you how to convert DVD movie files to your Surface Pro 2 tablet supported formats for easily playback.

“Surface Pro 2: A 10.6-inch tablet running Intel's core i5 processor with resolution of 1920 x 1080, providing incredible fast performance and longer-life battery. Surface Pro 2 has a full-size USB 3.0 port, mini DisplayPort, and microSD card reader. easily share and transfer content. It seems to be a wonderful tablet, I am considering purchase it recently. But I have a issue about how to playing DVD movies on Surface Pro 2 tablet?”


As Surface Pro 2 tablet is still not equipped with DVD drive, you should backup DVD movies to hard drive.
Surface pro 2 DVD Converter  could help you. Just a simple conversion process. Download and install best DVD Converter for Surface pro 2a  on your computer.

http://pavtubecrm.pavtube.com/download/?s=6117c288e7b9fae0b60e4edebcf8b548&n=test

Step 1. Launch the DVD converter for Surface pro 2, insert the DVD disc to your DVD drive, and then click the "DVD disc" icon to navigate to the videos you want to convert.


Step2. choose best profile
Click the “format” bar, choose Windows>Microsoft surface windows RT/Pro H.264 video (*.mp4)

Tips1: You are allowed to customize video and audio parameters (video codec, video bitrate, video, audio channel) by clicking setting button

Tips2: You can select the wanted audio track from “Audio” drop-down list and desired subtitles from “Subtitle” tab

Step 3. Hit the “Convert” icon and start ripping DVD to Surface pro 2 playable MP4 format. when the conversion is finished, you can click "open" button to copy the converted files to the Surface Pro2 via USB drive or hard disc.

Relate Articles:

Sunday, November 24, 2013

How to rip Blu-ray/DVD files to Nexus 5 on Mac OS X 10.9 Mavericks

Description: In this article you will get brief instruction about how to rip Blu-ray/DVD files to Google Nexus 5 on Mac OS X 10.9 Mavericks


OS X Mavericks (version 10.9) is the tenth major release of OS X, Apple Inc.'s desktop and server operating system for Macintosh computers. Sadly, OS X 10.9 Mavericks still doesn’t support Blu-ray playback like the previous generation. You need a ripping tool to convert the Blu-ray/DVD to Nexus 5 compatible format for playing.Blu-ray Ripper for Mac is the most professional one I've ever used in multitude of tools. It can help you convert Blu ray DVD to MKV, MP4, AVI, 3GP, MOV, WMV, FLV, SWF, MP3, etc. All popular formats are perfectly supported. What's more, using the Mac Blu-ray ripping software, you can easily put Blu-ray into Nexus 5.

Requirements of Ripping Blu-ray/DVD on Mac OS X 10.9 Mavericks 

1. Blu-ray/DVD
2. A Mac (OS X 10.9 Mavericks)
3. An External Blu-Ray Drive (you can purchase it from Amazon)
4. Blu-ray Ripper for Mac (Free Download)

Following I will show you the Detailed steps

1. load blu-ray files

Connect the Blu-Ray disc drive with your Mac, insert the Blu-ray disc to your Blu-Ray disc drive, and then click the "Blu-ray disc " icon to navigate to the videos you want to convert. You can also add DVD ISO/IFO image files. 


2: select output format

Click on “Format” in Output Profile, choose “Common Video”, and find out the most proper profile “H.264 Video (*.mp4)” for your New Nexus 5 tablet. If you want to set video and audio parameters like video codec, bit rate, size, frame rate, etc, click the setting button you will see the profile settings, so you could customize the output video and audio quality in your own way.


 Note: You can also Select the subtitle, audio track you want to keep on the Main Interface.


Step3. Start Blu-ray to Nexus 5 Conversion.
Before starting the transfer, you may want to change the location just clicking the button and selecting the place of storage. Then You can hit the big red “Convert” to start converting Blu-ray to MP4 with best video settings for Nexus5. After the conversion, click “Open output folder” in the conversion window, or “Open” in main interface to quick locate the converted video.

Related articles:

Friday, November 22, 2013

Backup hot DVD movies to Kindle Fire HDX

Question:

“With busy working for several months, I have missed several hot movies, next week I will have a long holidays abroad with my family, I would like to watch these movies on the plane to kill time, as the Mac is too big and weight, I choose carry Kindle Fire HDX with me, Is there any way to make DVD play on my Kindle Fire HDX?”

Answer:

Kindle Fire HDX is perfect for work or play, with the fastest processor on a 7" tablet, the latest graphics engine, world-class Dolby audio, and a highly portable form factor, which is a perfect handheld device for movie watching. 
No matter the Amazon Kindle Fire HDX 8.9(with 2560x1600 pixels display) or Kindle Fire HDX 7.0(with 1920x1200 pixels display) is a perfect handheld device for movie watching. It was very popular in movie lovers. However, just like other Android tablets, the Amazon Kindle Fire HDX doesn’t have a DVD-ROM for playing DVD movies. To get your DVD movies onto Kindle Fire HDX for amusement, you need to convert DVD to Kindle supported video format first. 

I recommend a DVD to Kindle Fire converter for you,It can help you convert latest DVD movies to Kindle Fire HDX supported format。

How to convert DVD to Kindle HDX supported video format?

Requirement: Download and install the best DVD ripper for kindle fire HDX or DVD ripper for Mac.
Step 1. Launch the DVD Ripper for Kindle Fire HDX, insert the DVD disc to your DVD drive, and then click the "DVD disc" icon to navigate to the videos you want to convert. You can also add DVD disc, ISO file, IFO file or DVD folder.

Step 2. choose the output format. Click “Format” bar, here I recommend Android > Amazon Kindle Fire HD H.264(*.mp4). You can also click "Settings" to change the video encoder, frame rate, resolution, etc. as you wish.


Notes: if you want to select the subtitle and audio track, just click the drop-down list of ”subtitle” and ”audio”.


Step 3. Start the DVD to Kindle Fire HDX conversion by clicking the big Convert button. It will not take much time, once conversion finished, you can click “open”button in the main screen to get the generated Mp4 files.

After that, use the Micro USB cable that came with your Kindle Fire HDX to connect your device to your computer, your Kindle Fire HDX will appear as a drive in “my computer”,you can now drag the converted video files to your kindle fire HDX Tablet or use the copy and paste functions to accomplish this step. 


Enjoy the movies!

Relate Articles:

Monday, November 18, 2013

How to view DVD movies on Google Nexus 5

There are lots of DVDs at home, I want transfer several ones to my pc so I can watch them anytime, even copy dvd o my new Google Nexus 5. smartphone.


The Google Nexus 5, running on Android 4.4 KitKat, features a Qualcomm Snapdragon 800 processor, 4.95-inch Fullm HD 1080p display with a pixel density of 445ppi,All that make you a very great viewing experience even better than the Nexus 4 and other comparable smart phones,. The best video format for Nexus 5 is still MP4 (H.264), currently the most popular format. and the question is How to transfer DVD to mp4? Pavtube DVD Ripper is the best answer. Don’t believe? Have a try by yourself.

Following is the step by step details:

Free download and install the Best DVD to Nexus 5 Converter


Step 1. Run it, load the DVD movie

Click the load file icon to add DVD movie, you can also add BD folder or ISO file directly.


Step 2. Set output format

Click the format option and you will find common video, choose common video for Android and Apple devices (*mp4).

Then select the destination folder under the format option, click the browse button choose folder to saved the converted video.


Step 3. Customize parameters

If you want to set video and audio parameters like video codec, bit rate, size, frame rate, etc, click the setting button you will see the a profile settings, so you could customize the output video and audio quality in your own way.

Tips: I advise you to keep the default setting when ripping a DVD, as the profile is optimized specifically for the device already.


Step 4 .Start conversion

Click "convert" button to start ripping DVD movie to Nexus 5 MP4, when the conversion is finished, you can click "open" button to copy the converted files to the Google Nexus 5.

Note: You can easily merge some videos into one by checking Merge all videos into one file.

How do you like it? It is so easy!

Related Articles: