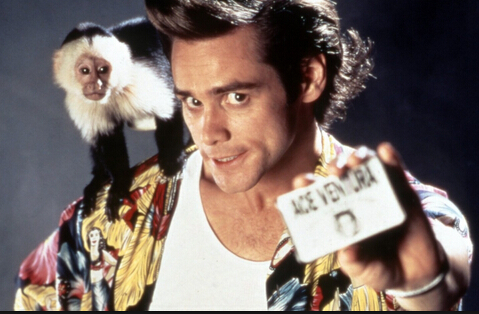
Jim Carrey is one of the biggest actors in Hollywood, but he's also an actor who seems to go through phases of manic activity and relative silence. Luckily, Carrey is coming back into the spotlight in a big way in 2013. We figured now was as good a time as any to take a look back at Carrey's long career and select his 14 best movies. From comedy classic like Ace Ventura and The Mask to more dramatic efforts like The Truman Show and Eternal Sunshine of the Spotless Mind, these are the films every Carrey fan needs to see.
See also: Leonardo DiCaprio Filmography and Movies
Top 14 Jim Carrey Worth Watching Movies
Horton Hears a Who!
Director: Jimmy Hayward, Steve Martino
Stars: Jim Carrey, Steve Carell, Carol Burnett, Will Arnett
Overview: Horton the Elephant struggles to protect a microscopic community from his neighbors who refuse to believe it exists.(86 mins.)
The Number 23
Director: Joel Schumacher
Stars: Jim Carrey, Virginia Madsen, Logan Lerman, Danny Huston
Overview: Walter Sparrow becomes obsessed with a novel that he believes was written about him. As his obsession increases, more and more similarities seem to arise. (101 mins.)
Fun with Dick and Jane
Director: Dean Parisot
Stars: Jim Carrey, Téa Leoni, Alec Baldwin, Richard Jenkins
Overview: When an affluent couple lose all their money following a series of blunders, they turn to a life of crime to make ends meet. (90 mins.)
Me, Myself & Irene
Director: Bobby Farrelly, Peter Farrelly
Stars: Jim Carrey, Renée Zellweger, Anthony Anderson, Mongo Brownlee
Overview: A nice-guy cop with dissociative identity disorder must protect a woman on the run from a corrupt ex-boyfriend and his associates. (116 mins.)
A Christmas Carol
Director: Robert Zemeckis
Stars: Jim Carrey, Gary Oldman, Colin Firth, Steve Valentine
Overview: An animated retelling of Charles Dickens' classic novel about a Victorian-era miser taken on a journey of self-redemption, courtesy of several mysterious Christmas apparitions. (96 mins.)
A Series of Unfortunate Events
Director: Brad Silberling
Stars: Jim Carrey, Jude Law, Meryl Streep, Liam Aiken
Overview: When a massive fire kills their parents, three children are delivered to the custody of cousin and stage actor Count Olaf, who is secretly plotting to steal their parents' vast fortune.(108 mins.)
Yes Man
Director: Peyton Reed
Stars: Jim Carrey, Zooey Deschanel, Bradley Cooper, John Michael Higgins
Overview: A guy challenges himself to say "yes" to everything for an entire year. (104 mins.)
The Truman Show
Director: Peter Weir
Stars: Jim Carrey, Ed Harris, Laura Linney, Noah Emmerich
Overview: An insurance salesman/adjuster discovers his entire life is actually a T.V. show. (103 mins.)
Eternal Sunshine of the Spotless Mind
Director: Michel Gondry
Stars: Jim Carrey, Kate Winslet, Tom Wilkinson, Gerry Robert Byrne
Overview: When their relationship turns sour, a couple undergoes a procedure to have each other erased from their memories. But it is only through the process of loss that they discover what they had to begin with. (108 mins.)
Dumb & Dumber
Director: Peter Farrelly
Stars: Jim Carrey, Jeff Daniels, Lauren Holly, Mike Starr
Overview: The cross-country adventures of two good-hearted but incredibly stupid friends. (107 mins.)
Man on the Moon
Director: Milos Forman
Stars: Jim Carrey, Danny DeVito, Gerry Becker, Greyson Erik Pendry
Overview: The life and career of a legendary comedian, Andy Kaufman.(118 mins.)
Bruce Almighty
Director: Tom Shadyac
Stars: Jim Carrey, Jennifer Aniston, Morgan Freeman, Philip Baker Hall
Overview: A guy who complains about God too often is given almighty powers to teach him how difficult it is to run the world. (101 mins.)
The Mask
Director: Charles Russell
Stars: Jim Carrey, Cameron Diaz, Peter Riegert, Peter Greene
Overview: Bank clerk Stanley Ipkiss is transformed into a manic super-hero when he wears a mysterious mask. (101 mins.)
Ace Ventura: Pet Detective
Director: Tom Shadyac
Stars: Jim Carrey, Courteney Cox, Sean Young, Tone Loc
Overview: A goofy detective specializing in animals goes in search of a missing dolphin mascot of a football team. (86 mins.)
How to Backup Jim Carrey Blu-ray/DVD movies?
The best way to respect an actor is to purchase his movies on Blu-ray/DVD discs. So if you love Jim Carrey, you may collect his best movies Blu-ray/DVD version. After bought the Blu-ray/DVD discs, many people like to backup Blu-ray/DVD discs to NAS, External Hard Drive, FreeNAS Home Server and other centralized location to broadcast the movies without using the discs in order to protect the physical discs.
Pavtube BDMagic (Mac version) is designed for the initial Blu-ray/DVD rip. It is about the simplest Blu-ray/DVD ripper on the market. It can backup your Blu-ray/DVD Jim Carrey movies to hard drive for streaming without limitation in a high video quality. It provides three methods of copying Blu-ray/DVD movies to External Hard Drive: full disc copy, main title copy and backup Blu-ray/DVD to common diginal formats. You can get various output format profile, like MP4, H.265, M3U8, AVI, MOV, MKV, M4V, etc so that you can play Blu-ray on portable devices and edit Blu-ray iniMovie, FCP.
Learn >> the top 5 Blu-ray rippers for Win/Mac
Free download and install Windows version:
Free download and install Mac version:
Related Articles:
I will show you some classic movie review ,upcoming movie,newest digital device,Interesting video, etc.
Thursday, March 3, 2016
Monday, February 29, 2016
Backup Bluray/DVD Goosebumps to External 4TB WD My Book
Goosebumps is a 2015 American 3D live-action/computer-animated fantasy horror comedy film based on the children's book series of the same name by R.L. Stine. Now, Goosebumps is available on Blu-ray/DVD discs. For those who missed the movie in theater, get Goosebumps Blu-ray/DVD discs to watch is a nice idea. To protect your Blu-ray/DVD discs, before playing the movie, I suggest you to backup your Blu-ray/DVD Goosebumps to External 4TB WD My Book.
If you were to buy an external desktop hard drive today, I recommend you the 4 TB WD My Book. After more than 40 hours of research and testing, we determined that the WD My Book is the best desktop hard drive for backing up data because of its reliability, fast speeds, and two-year warranty. So when you get the Blu-ray/DVD Goosebumps and want to keep the discs safe, the most ideal way is to backup the Goosebumps on Blu-ray/DVD to External 4TB WD My Book.
WD's Windows 8 app makes it easy to discover the Blu-ray/DVD Goosebumps stored on your 4TB My Book drive with your Windows 8 computer. Your movie is automatically displayed and organized so you can easily locate and enjoy your Blu-ray/DVD Goosebumps without using the physical discs again.
How to Backup Blu-ray/DVD Goosebumps to External 4TB WD My Book?
When speaking of backing up Blu-ray/DVD, it must come to Blu-ray/DVD Ripper. After read several top Blu-ray/DVD Ripper reviews on top ten review site, we finally choose Pavtube BDMagic <Mac version>.
This software can rip and backup copy & region protected Blu-ray/DVD Goosebumps to External 4TB WD My Book with original video quality. It can convert Blu-ray/DVD Goosebumps to External 4TB WD My Book in 3D MP4/MOV/WMV/AVI/MKV and 2D H.265, M3U8, MP4, MOV, MKV, 3GP, etc. To suitable for your screen, this program can adjust your movie aspect ratio in Blu-ray/DVD to WD MY Book conversion process. What’s more, A/V codec, bitrate, frame rate, sample rate and size can also be adjusted in this app.
Free download and install:
Other Download:
- Pavtube old official address: http://www.pavtube.cn/blu-ray-ripper/
- Cnet Download: http://download.cnet.com/Pavtube-BDMagic/3000-7970_4-75922877.html
Steps to Backup Blu-ray/DVD Goosebumps to External 4TB WD My Book
Step 1: Import Blu-ray/DVD Goosebumps
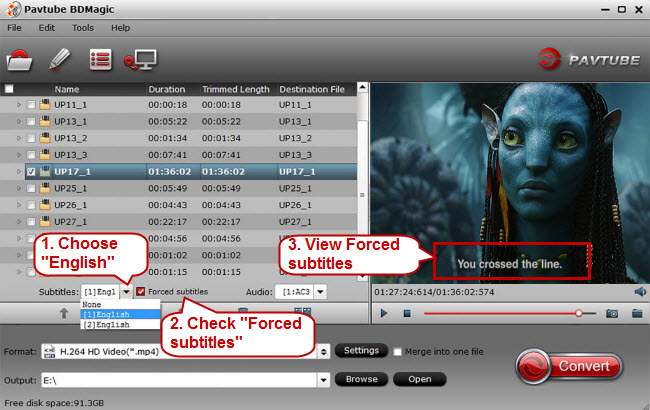
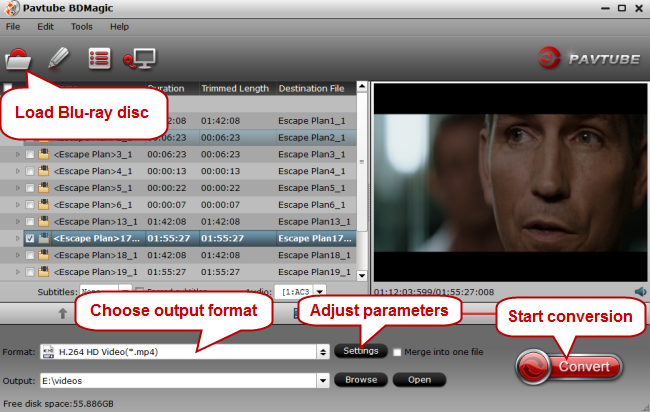
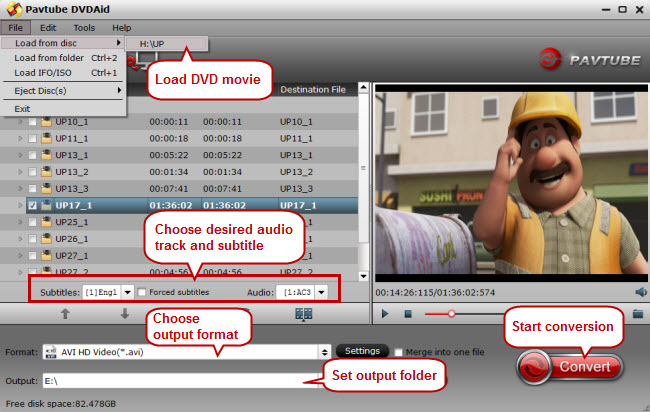
Click “File” > “Load from Disc” to load Goosebumps on Blu-ray/DVD to the app. You can choose your wanted subtitle/audio track in “Subtitle” and “Audio” under the chapter list. Or you can choose “Forced Subtitle”.
Step 2: Choose format for WD My Book
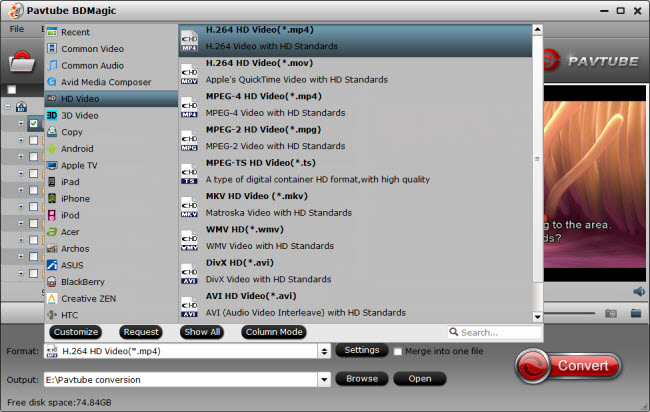
Simply, HD MP4 is suggested in “HD Video” because MP4 is supported by nearly all multimedia devices and media players, including iPhone 7, Samsung Galaxy S7, PS4, Quicktime, WMP, etc so that you can play your Blu-ray/DVD Goosebumps movie on Windows or Mac via WD My Book.
Tip:
1. Click “Settings”, you can adjust A/V parameter of your original Blu-ray/DVD movies, bitrate, resolution, codec, frame rate, sample rate, etc. And you can preview the output video size in the chart.
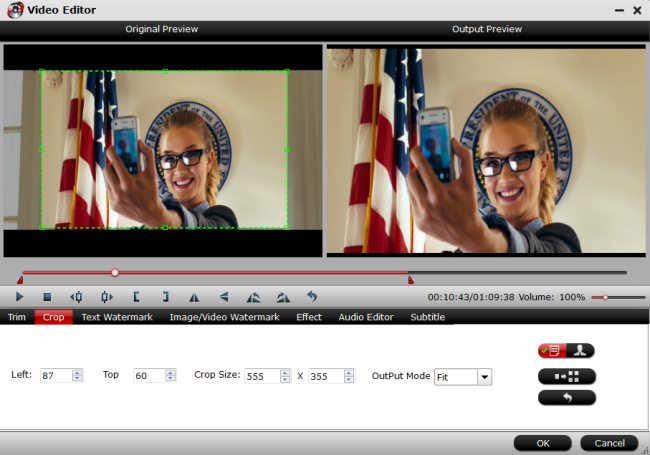
2. If your original Blu-ray/DVD Goosebumps movie has black area and you want to crop it.Click “Video Editor” icon on the main interface to open video editing window, switch to “Crop” tab. Get rid of the black edges: simply move your mouse cursor to drag and adjust the green frame to desired position to remove the black bar.
Step 3: Start to backup Blu-ray/DVD Goosebumps to External 4TB WD My Book
Go back to the main interface to initiate the final conversion process from Blu-ray/DVD Goosebumps to External 4TB WD My Book by tapping the right-bottom “convert” icon.
Gain peace of mind knowing that your Blu-ray/DVD Goosebumps movie is protected from unauthorized access with password protection and hardware encryption on External 4TB WD My Book.
Goosebumps Plot Synopsis
Upset about moving from the big city to a small town, young Zach Cooper (Dylan Minnette) finds a silver lining when he meets his beautiful neighbor Hannah (Odeya Rush). The teen is surprised to learn that Hannah's mysterious father is R.L. Stine (Jack Black), the famous author of the best-selling "Goosebumps" series. When Zach accidentally unleashes the monsters from the fantastic tales, it's up to Stine, his daughter and Cooper to return the beasts back to the books where they belong.
Related Articles:
Friday, February 26, 2016
Rip Steve Jobs Blu-ray to My Cloud DL2100 for Plex Media Server
With Fassbender and Winslet both nominated for Best Actor and Best Supporting Actress, respectively, at the 88th Academy Awards, the Steve Jobs movie get popular. And now it is available on Blu-ray. So if you still doesn’t watch it, just get the Blu-ray disc. After you get the Steve Jobs Blu-ray disc, you may want to backup it to My Cloud DL2100 so that you can stream Steve Jobs movie with Plex on HD TV. So how to rip Steve Jobs Blu-ray to My Cloud DL2100 for Plex Media Server? Here offers you the best solution.
Get prepared
A computer
External Blu-ray drive if your computer doesn’t have one
Your Steve Jobs Blu-ray discs
A Blu-ray Ripper >> Learn Blu-ray Ripper Software vs. Blu-ray Copier Software
Before start to rip Steve Jobs Blu-ray to My Cloud DL2100 for Plex
Since Blu-ray Ripper is not a frequently-used tool, many people maybe don’t have one until they need to rip Steve Jobs Blu-ray to Plex for WD My Cloud DL2100 today. I recommend top-ranked one to you - Pavtube BDMagic with the below function:
- Convert commercial Steve Jobs Blu-ray disc, Blu-ray ISO, Blu-ray folder to Plex supported format to store in WD My Cloud DL2100.
- Backup any Blu-ray disc, Blu-ray ISO, Blu-ray folder to FreeNAS, QNAP NAS, Synology NAS and other Plex compatible NAS.
- Adjust A/V size, codec, bitrate, channel, etc and display aspect ratio.
- Built-in editor to trim/crop video, add subtitle/watermark, remove audio, deinterlace video, etc.
- Batch conversion and GPU acceleration
Learn other choices >> 2016 Top 3 Blu-ray to NAS Ripper/Copier Reviews
Free download and install:
Start to Rip Steve Jobs Blu-ray to My Cloud DL2100 for Plex
Step 1: Download and install Blu-ray to Plex/MY Cloud DL2100 converter and launch it. Click “File” to add Blu-ray movie to the software. You can select your desired subtitle/audio track below chapter list.
Step 2: Tap on the "Format" bar, from its drop-down list, select "Plex" best playable file format by following "HD Video" > "H.264 HD Video".
Tip: To get satisfying video playback effect with Plex Media Server, you can adjust the output profile parameters such as video codec, size, bit rate, frame rate and audio codec, bit rate, sample rate and channels.
Step 3: Go back to the main interface, hit right-bottom "Convert" button to start to backup Blu-ray for playing with Plex via My Cloud DL2100.
Installing the Plex App on WD My Cloud DL2100
1. From the main page of the Dashboard, click the Apps button of the Navigation bar. For assistance accessing the Dashboard, please see Answer ID 10420: How to access the Dashboard on a My Cloud.
2. Under the left-side panel, click the Add App icon.
3. From the list of available Apps for the unit, scroll down and select Plex by checking the check-box to the left of it, then click on Install.
4. Plex will download and install. This process may take a few seconds.
5.Once Plex has been installed on the Cloud Storage or Network Attached Storage, click on Plex Media Server and then Configure.
6. Sign in or sign up to set up your Plex Media Server.
Configuring the Plex App on My Cloud DL2100
1. Once Plex is ON, the Configure button will be displayed. Click on it to access the application's interface.
2.Once inside the app's interface, Sign Inif you have an account already or Sign Up to create a new account.
3. After login in to your account, you should see either several media files if the account was set up previously set up or no media files if recently created. To add media files to the account, click on the + icon towards the left (next to the name of the drive).
4. Then select the library type, give your library a name, and choose your language. Once done, click Next to continue the setup.
5. Click on Browse For Media Folder to select the folder in which the media content is located.
On the list to the right, select the Shares folder.
6. On the list to the right, select the Shares folder.
7. Here is where the default (such as the Public, Smartware, and TimeMachineBackup shares) and the created shares are located. Locate the share where the media content is found and click Add.
8. You can add another share location by clicking on Browse For Media Folder again and selecting the share. Once finished, click on Add Library and the Plex media server will start to populate the media content.
Note: When populating, depending on how many media files are located on the chosen shares, it may take several minutes to several hours.
Playing Media Content
1.Once the media content has populated, you can view a list and select which file you would like to play.
2.When selecting a media content, click on the play button above the name of the file when hovering your mouse over the picture or black rectangle.
3. You should now be able to see the content playing once it has loaded.
Applied Products:
My Cloud Mirror
My Cloud EX4
My Cloud EX2
My Cloud DL4100
My Cloud DL2100
My Cloud EX2100
My Cloud DL2100100
Related Articles:
Wednesday, February 24, 2016
The Best Way to Copy and Convert DVD “Mad Max: Fury Road”
Mad Max: Fury Road must be in the list of top 10 worth watching Oscar movies. If you're looking for a film that keeps you on the edge of your seat, this is it. It deserves you to watch agian and again. Just get the DVD version if you do plan this. But when you get the DVD “Mad Max: Fury Road”, I do suggest you to backup “Mad Max: Fury Road” DVD discs because DVD is easy to sratched which will make your expensive disc be a gloried coaster.
Creating a digital version of DVD “Mad Max: Fury Road” enables you to watch the movie on your Vizio TV or Samsung TV with DVD Player via external HDD or media player without using the physical disc again. Converting DVD “Mad Max: Fury Road” to MP4 can allow you to play the movie on your iPhone 6S, Galaxy S6, iPad Pro via WD My Cloud, Seagate Wireless Plus freely at anytime and anywhere.
Facing with plenty of benefits, how can you copy and convert DVD “Mad Max: Fury Road”? Which way is the best way to backup DVD “Mad Max: Fury Road”? Read on to find the answer.
Best DVD Ripper to Rip and Copy DVD “Mad Max: Fury Road”
Copying DVD “Mad Max: Fury Road” needs a DVD Ripper or DVD Copier<DVD Ripper Software vs. DVD Copier Software>. There are so many DVD ripping tools in the market that has you confused which one should choose. After read servel reviews and comparison, I finally decide Pavtube DVDAid.
It can remove the copy & region protection on “Mad Max: Fury Road” DVD disc and save the content to digital file with original video quality. You can read the detailed reason why I chose it, if you just want to know the steps to backup “Mad Max: Fury Road” DVD, you can ignore the reasons below and just jump to the steps guide.
Reasons That I Choose Pavtube DVDAid to Copy DVD “Mad Max: Fury Road”
1. Full disc copy and Main title copy
On the hand, it can copy your DVD disc with all information with audio streams and subtitle tracks. And on the other hand, it can backup the main movie content out of DVD disc with smaller size.
2. Conversion acceleration
With technology of NVIDIA CUDA and AMD APP, you can accelerate conversion process by using H.264 codec.
3. Built-in video editor
Pavtube DVDAid supports to add *.SRT and *.ASS subtitles into DVD video with built-in editing tool and enables to trim, crop, split, merge video. Adding watermark is also supported.
4. Wide range of output formats
Except for common video formats, like MP4, MOV, H.264, AVI, M4V, etc, this professional DVD Ripper supports to output M3U8 and H.265 video.
5. Support converting 2D to 3D
With Pavtube DVDAid, you can convert your 3D DVD movies to Side-by-Side(SBS), Top-Bottom, or Anaglyph 3D in MKV/MP4/MOV/WMV/AVI format and enjoy them on your 3D TV or Media Players.
6. Customize DVD video
It allows you to adjust video size, codec, frame rate, bitrate and audio codec, channel, bitrate, sample rate. It can make you adjust display aspect ratio to 16:10, 16:9, 5:4, 4:3, 3:2, 2:1. It even has deinterlacing video function.
7. Lifetime free update
Pavtube DVDAid provides customers lifetime free upgrade of product and technical support. Users can contact the support staff via email for help and suggestion.
Free download and install:
Other Download:
- Pavtube old official address: http://www.pavtube.cn/dvd_ripper/
- Cnet Download: http://download.cnet.com/Pavtube-DVDAid/3000-7970_4-76158510.html
How to Backup DVD “Mad Max: Fury Road” on Windows 10/8?
Step 1: Import DVD movie
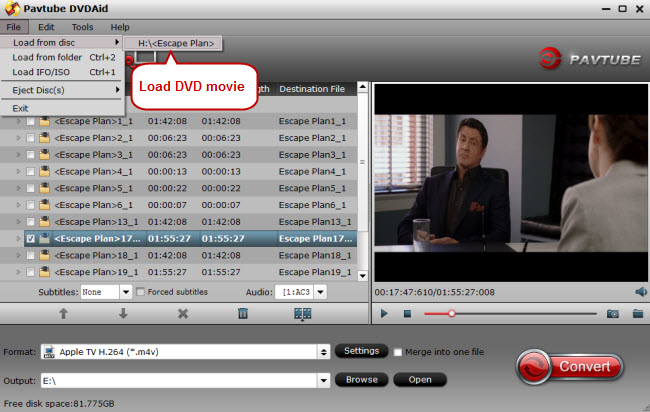
Insert your Mad Max: Fury Road DVD disc into your computer's disc drive. Click "File" in top left corner and then follow "Load from disc" to import the disc or choose "Add video" to import the ISO image file. No need to run virtual drive to mount ISO firstly. You can choose desired subtitle/audio track and forced subtitle below the chapter list.
Step 2: Choose output format
You can choose to entire copy DVD or directly copy DVD “Mad Max: Fury Road”. But for the best compatibility with iPhone, iPad, Android tablet/phone, PS4, HD TV, NAS, Media Server, Cloud Storage, you’d better choose MP4.Click the format bar to follow "Common Video" > "H.264 High Profile Video(*.mp4)."
Tips:
You can go "Settings" to make advanced settings. With the right settings you can retain the quality of the original files while also saving space. This is particularly helpful when streaming over your network. Check the Audio Codec, always there is problem in playing AAC, you can try to change to AC3.
Step 3. Start to backup DVD “Mad Max: Fury Road”
Hit "Convert" in bottom right corner to start ripping DVD “Mad Max: Fury Road” to MP4. You can locate the generated MP4 file in the output folder.
When copy DVD “Mad Max: Fury Road” to MP4, you can put and store the movie on My Cloud OS 3 NAS Storage,External Hard Drive, FreeNAS Home Server and other centralized location. Or you can transfer DVD “Mad Max: Fury Road” movie to iPhone 5se, Galaxy S7, Surface Pro 4, Samsung Galaxy Tab S2 to playing.
Related Articles:
Monday, February 22, 2016
Backup “Star Wars: The Force Awakens” DVD to Samsung Galaxy S7 for Watching
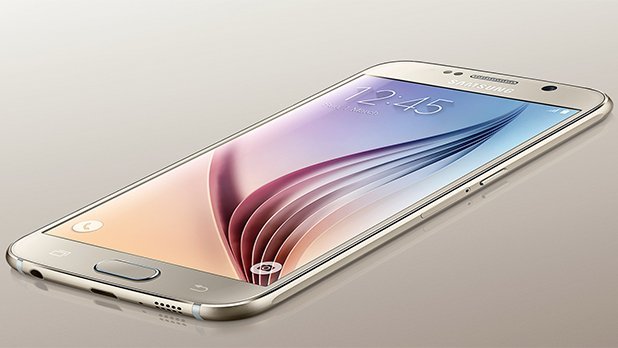
The 29th Mobile World Congress has kicked off in sunny Barcelona this weekend. To kick off the major mobile phone announcements, Samsung is announcing the Galaxy S7 at a glitzy show. Samsung Galaxy S7 has the makings to be of one of the year's best phones, and features such as wireless charging and expandable storage. If you watch movies like Star Wars: The Force Awakens on Galaxy S7, you won't need to worry the power.
Still, year-to-year sameness is a problem that Samsung in particular has to face: If your Star Wars: The Force Awakens is on DVD, your Samsung Galaxy S7 won't be able to play your DVD Star Wars: The Force Awakens directly. To play DVD Star Wars: The Force Awakens on Galaxy S7, you need to rip and convert DVD Star Wars: The Force Awakens to Galaxy S7 supported format with a DVD Ripper.
Learn >> Comparison of All DVD Ripper Softwares in the market
Here I recommend you with Pavtube DVDAid, as it is a professional and easy-to-use DVD ripper which can remove DVD copy protection and convert Star Wars: The Force Awakens to Samsung Galaxy S7 compatible MP4 format. Besides, it provides optimized preset format for Samsung Galaxy S7, so you can get the best DVD Star Wars: The Force Awakens playback on Samsung Galaxy S7with no need to adjust video or audio parameters. Furthermore, this app enables to rip DVD movies to other Android devices including Samsung Galaxy Tab 4, Galaxy Note 5, HTC One M10, LG G5, Sony Xperia Z6 etc.
Free download and install:
Other Download:
- Pavtube old official address: http://www.pavtube.cn/dvd_ripper/
- Cnet Download: http://download.cnet.com/Pavtube-DVDAid/3000-7970_4-76158510.html
Steps to Play Star Wars: The Force Awakens DVD on Samsung Galaxy S7
Step 1. Load Oscar Star Wars: The Force Awakens DVD
Download and install Pavtube DVDAid. Insert Oscar “Carol” DVD into DVD drive, launch the software, and import the source DVD by clicking "Load from Disc" button.
Tip: On the software UI, choose optimized language from Audio and Subtitle drop-down boxes for display in saved movie and check the playback in the preview window.
Step 2: Set output format
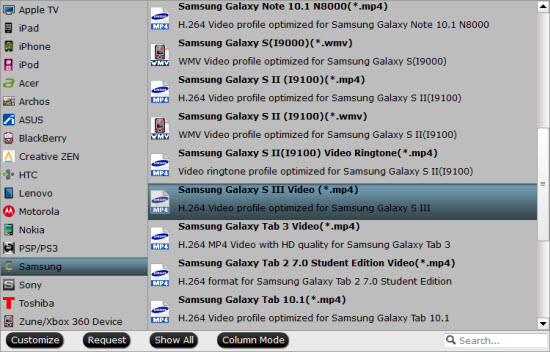
Find the optimized format for Galaxy S7 from "Format" menu. Follow “Samsung Galaxy S III Video(*.mp4)” as the best format for Samsung Galaxy S7.
Step 3: Start to convert
Start ripping Oscar Star Wars: The Force Awakens DVD for Samsung Galaxy S7 by clicking "Convert" button.
When Oscar Star Wars: The Force Awakens DVD to Samsung Galaxy S7 conversion is done, you now can transfer the ripped Star Wars: The Force Awakens DVD to Samsung Galaxy S7 for watching on the go.
How to Transfer Star Wars: The Force Awakens movie to Samsung Galaxy S7e?
Method one: Sync music and videos files with Samsung Kies.
Just connect your Samsung Galaxy S7 with Samsung Kies, you will be able to synchronize data from Kies to Galaxy S7.
Method two: Move music, video to Galaxy S7 via USB cable
Step 1: Connect the USB cable with the slot on your Samsung Galaxy S7 and the USB slot on your PC.
Step 2: Open the notification panel and you should see a notification with "Connected as a media device".
Step 3: Open this entry and activate "Connect as" and "Media device (MTP)".
Step 4: Now switch to your PC and open the file manager or Windows Explorer.
Step 5: Now you should see the entry "Galaxy S7/S7 Edge".
Step 6: Open this entry and you see the folders like "music", "videos" or "download". Now just drop your files in the folders and you're done.
Method three: Transfer with Windows Media Player
Step 1. Connect Samsung Galaxy S7 to PC with the USB cable that comes with the Galaxy S7.
Step 2. Launch Windows Media Player on PC, and on the left side bar of Windows Media Player, you'll find the Galaxy S7 icon.
Step 3. Click on the "Sync" button in top right corner. Drag music, videos, and photos to the "Sync list" area. Here you can drag music, videos, and photos from both the Windows Media Library and your PC folders.
Step 4. When you have dragged all the music, video, and photo files you want to watch on the Galaxy S7, click "Start sync."
Step 5. Move to the left side bar to click "Sync status" under your Galaxy S7/S7 Edge option to check whether the videos, music and photos have been copied and transferred to your Samsung Galaxy S7.
If you love Star Wars: The Force Awakens, you may love other Oscars 2016 Nominations Best Movies, like The Martian, The Walk, The Revenant, Spotlight, Inside Out, The Look of Silence, etc. If so, read the The 88th Academy Award Nomination Contenders and Categories.
Note: To help you make your Oscars movies fly to your various devices, Pavtube will give you Pavtube Video Converter Ultimate at 50% discount on Facebook.
Related Articles:
Friday, February 19, 2016
Backup The Look of Silence DVD for Apple TV 4 Playback
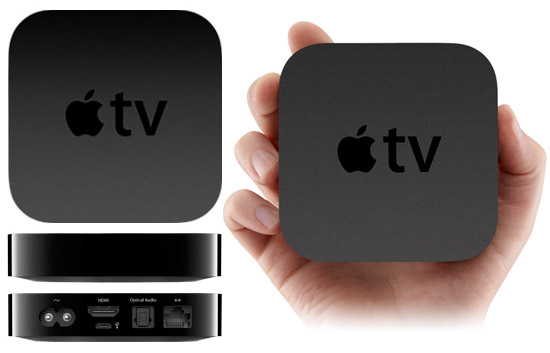
Apple TV 4 has become the most popular TV box on the market. More and more people use Apple TV 4 to watch DVD movies on HD TV instead of a DVD player. Due to the popularity of the 2016 Oscar, many people want to watch 2016 Oscar DVD movies via Apple TV 4. Among the 2016 Oscar movies, “The Look of Silence” is the one which you should not miss. So, here I want to show you how to backup The Look of Silence DVD for Apple TV 4 playback.
Apple TV 4 supports limited video formats, and DVD is not in the Apple TV supported formats. To be able to play The Look of Silence DVD on Apple TV 4, you have to rip DVD to Apple TV 4 supported video format. So, let see Apple TV 4 supported file formats firstly, then fix the problem of backing up The Look of Silevce DVD for Apple TV 4 playback.
Part One: Apple TV 4 Supported File Formats:
Audio formats:
HE-AAC (V1), AAC (16 to 320 Kbps), protected AAC (from iTunes Store), MP3 (16 to 320 Kbps), MP3 VBR, Audible (formats 2, 3, and 4), Apple Lossless, AIFF, and WAV; Dolby Digital 5.1 surround sound pass-throug
Video formats:
H.264 video up to 1080p, 30 frames per second, High or Main Profile level 4.0 or lower, Baseline profile level 3.0 or lower with AAC-LC audio up to 160 Kbps per channel, 48kHz, stereo audio in .m4v, .mp4, and .mov file formats
MPEG-4 video up to 2.5 Mbps, 640 by 480 pixels, 30 frames per second, Simple Profile with AAC-LC audio up to 160 Kbps, 48kHz, stereo audio in .m4v, .mp4, and .mov file formats
Motion JPEG (M-JPEG) up to 35 Mbps, 1280 by 720 pixels, 30 frames per second, audio in ulaw, PCM stereo audio in .avi file format
Part Two: How to Rip The Look of Silence DVD for Apple TV 4 Playback?
According to part one, you can know that Apple TV 4 support H.264 MP4 format best, so as long as you can rip DVD to H.264 MP4 format, you can watch The Look of Silence DVD movie on HDTV via Apple TV 4. Here, I recommend you to usePavtube ByteCopy for Mac. It can rip DVD with the latest copy protections and region code to Apple TV 4 best H.264 MP4 format. Besides, it provides optimized preset format for Apple TV 4, so that you can get the best The Look of Silence DVD playback on your Apple TV 4. Moreover, if there are several language subtitles in your DVD movie, you can select the language subtitle you want to show in your movie.
Free download and install:
Other Download:
- Pavtube old official address: http://www.pavtube.cn/bytecopy-mac/
- Cnet Download: http://download.cnet.com/Pavtube-ByteCopy/3000-7970_4-76177783.html
Steps to Backup The Look of Silence DVD for Apple TV 4 Playback
Step 1. Load The Look of Silence DVD disc
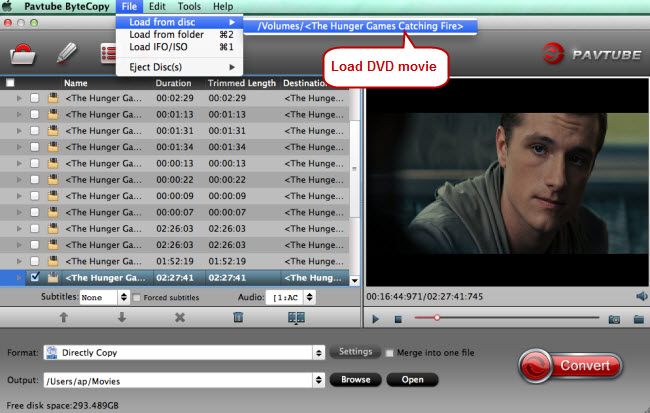
Run the DVD to Apple TV ripper on Mac and click "File" > "Load from disc" to import the DVD movie.
Tip: Subtitles in the DVD video are not hardcoded, so you can choose the subtitles which you want to keep. Just click the drop down menu after "Subtitles", force subtitle can be checked for output so as to help you to read the unknown language and fully enjoy the DVD movies.
Step 2: Set output format
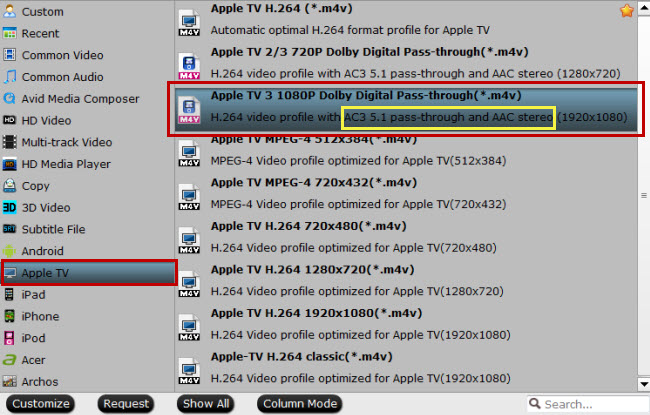
What this program amazes you is that it can output optimized preset format for Apple TV 4. Just follow "Apple TV" > "Apple TV 3 1080P Dolby Digital Pass-through (*.m4v)." as the best format for Apple TV 4.
Step 3: Start to convert
Hit the "Convert" button to start ripping DVD movie to Apple TV 4 with both Dolby Digital 5.1 and AAC stereo preserved.
After finishing conversion, you can stream the converted The Look of Silence DVD movie from Mac to Apple TV via HDMI cable, iCloud in iTunes, or Air Playit.
For more Apple TV related topics such as Apple TV supported file formats, Apple TV related hot issues, Apple TV video/audio playback solution, please visit our Apple TV page.
Related Articles:
- No 5.1 Surround Sound from Apple TV? Solved!
- How to Play 2D/3D Blu-ray Movies via Apple TV 4 on 3D TV?
- How to Play 4K Video Content via Apple TV 4
- How to Stream and Watch Blu-ray Movies on Apple TV 4 Mac OS X?
- Transfer and Stream Tivo Recordings to Apple TV 4 on Mac OS X
- Stream Local 4K Video to Apple TV from Mac
Subscribe to:
Posts (Atom)