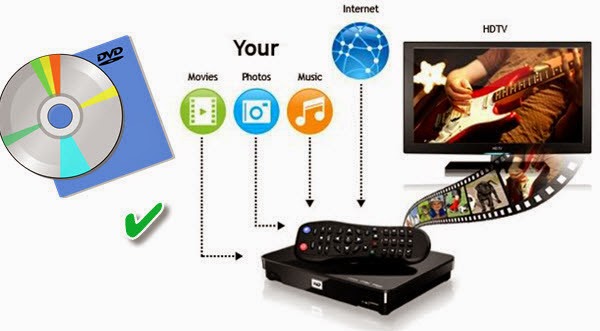
Summary: Follow this tutorial to learn how to rip and convert DVD to Google new Nexus 7 supported video formats so that you can play DVD movies on new Nexus 7 anytime, anywhere as you like. 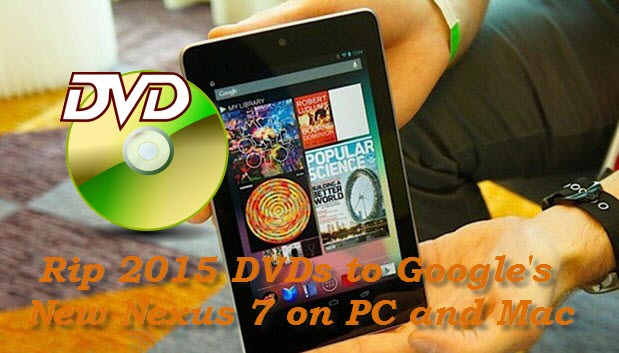 Google NEW Nexus 7 is currently the most popular Android tablet I think, because of its ultra-high configuration and cost-effective. The Nexus 7 (2013) display is the showstopper with a 1920 x 1200 resolution that translates into about 323 pixels per inch. Want to take your favorite DVD movies with this new device for watching on the go? However, you can't transfer DVD movies on Google new Nexus 7 directly unless you convert DVD to new Nexus 7 supported video formats. The article here mainly shows you how to download and put DVD movies on Google new Nexus 7 for smooth playing while keeping the best HD video quality. It's easy to do this with some help from a third-party DVD to new Nexus 7 Converter. DVD DVD Ripping Software varies. You may confused about choosing a most suitable tool. If so, i highly recommend you try Pavtube DVDAid. It is easy to use for editing and conversion and makes great quality copies of my DVDs. To be honest, the program can help you rip DVD to new Nexus 7 highly supported MP4 video files with high output video quality and fast ripping speed. The audio/video synchronization is very good, the size of the subtitles too. The equivalent Mac version is DVDAid for Mac. Read the Top DVD Ripper for Android. Just download it now and follow the steps below to copy DVD movies to Google new Nexus 7 for smoothly playing in just a few mouse clicks! FYI: If you want to keep all the audio tracks (language) and soft subtitles, here's another choice for you: DVD Converter Pro. How to Convert DVD to new Nexus 7 supported video formats The quick start guide below uses DVD Ripper Windows (Windows 8.1/8/7 included) screenshots. The way to rip DVD movies to new Nexus 7 on Mac is almost the same. Just make sure you get the right version according to your computer operating system. 1. Add DVD movies Launch the top DVD Ripper for Nexus, add your DVD files from your computer's hard drive by clickinig the "DVD disc" icon. ISO/IFO image files and DVD folders are also supported.
 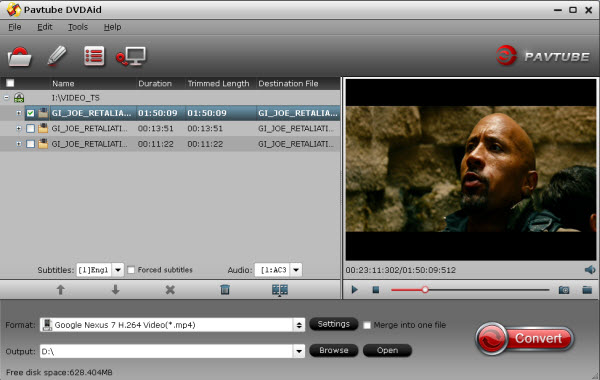 2. Select the suitable output video format Here I recommend you choose "Google Nexus 7 H.264 Video (* mp4)" from "Android" category. The profile is specially designed for new Nexus 7 and supplies full-screen playback. If you like, you can click "Settings" to change the video encoder, resolution, frame rate, etc. as you wish.
 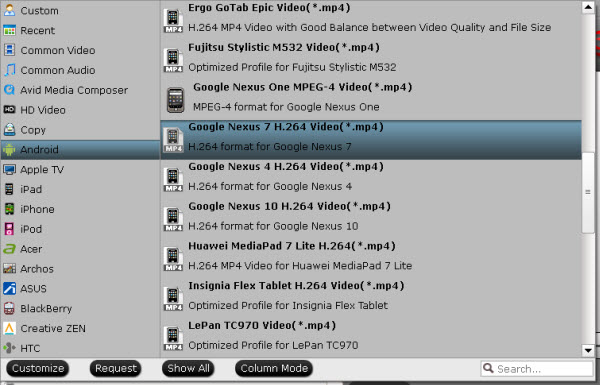 3. Start to rip DVD videos to new Nexus 7 MP4 The last step is to press the big "Convert" button on the right to start converting DVD to new Nexus 7. The conversion takes a few minutes, if you don't have time to wait, you can choose "Shut down computer after conversion". Then your computer will be turned off automatically after the conversion is finished. After conversion, you can click "Open" to locate the output videos. Then you can transfer videos to your tablet through a USB and enjoy DVD movies on Google new Nexus 7 wherever you are. More Useful Tips for you Enjoying movies on Google Nexus Tablets:
Summary: This article is very useful for WD TV Live (Plus, Hub) users who wanna rip and play their DVD movies with WD TV HD media players via Synology.
WD TV Live is really a gorgeous HD media player. With it, you can easily play your personal and Internet media files on your TV's big screen.Want to watch DVD movies on your HDTV via WD TV Live (Plus, Hub) but only to find that DVD movies or DVD folders are not directly supported by WD TV Live? Looking for ways to fix this issue? Consider it done! In order to watch 300+ DVD movies on WD TV media player, you need to rip DVD to WD TV Live supported video formats like MP4. Which is the professional DVD ripper for ripping discs 300+ to Synology for being able to see on network Synology at anytime? The answer is Pavtube DVDAid - which is highly recommended to help your rip DVD movies (including protected commercial DVD movies) to WD TV Live for a delightful experience. What's more, this program comes with a built-in video editor that allows you to edit your DVD movies by trimming, cropping, adjusting video effects, etc. If you are using a Mac, you can go to Pavtube DVDAid for Mac. Now download this tool and follow the instructions to convert DVD movies to videos for WD TV Live.How to convert 300+ DVDs for playing on WD TV Live(Plus, Hub) through SynologyStep 1. Insert your DVD disc to the drive, then launch the DVD ripping software and click the “Load Disc” button to have the DVD content imported. You can also add VIDEO_TS folder, DVD ISO files are the source files for converting. 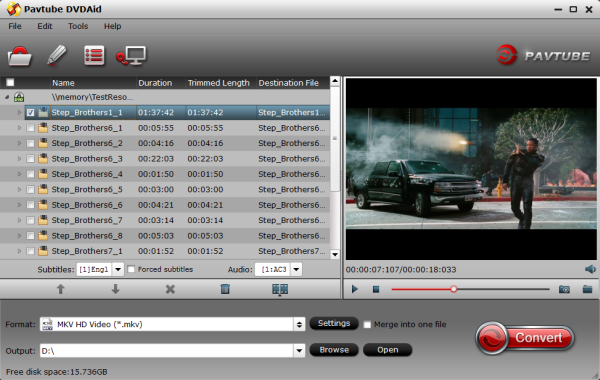 Step 2. WD TV Live supports a wide range of video formats, including AVI, VOB, MKV, MP4, MOV, WMV, FLV, etc. Click the "Profile" frame to select output profile for your WDTV-live box, say "H.264 HD Video(*.mp4)" or "MKV HD Video(*.mkv)" from "HD Video".
 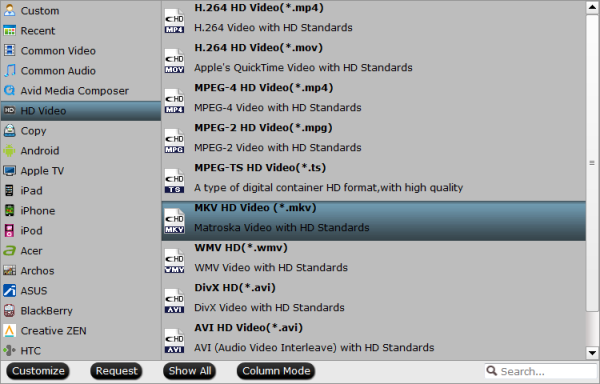 Tip: If you like, you can click “Settings” to change the video encoder, resolution, frame rate, etc. as you wish. Keep in mind the file size and video quality is based more on bitrate than resolution which means bitrate higher results in big file size, and lower visible quality loss, and vice versa. Step 3. Finally, hit the “Convert” button at the bottom of the main interface to start the conversion. Once the conversion is finished, click “Open” to quickly find the converted movies. Then, transfer the converted videos to Synology for WD TV Live (Plus and Hub) on HDTV playback. Now it will be a delightful experience to enjoy your 300+ DVD movies via Synology on your HDTV via WD TV Live. See Also:
Summary: This tutorial will show you how to stop VLC Media Player from stuttering or jumping when you are playing HD MKV files via Plex. 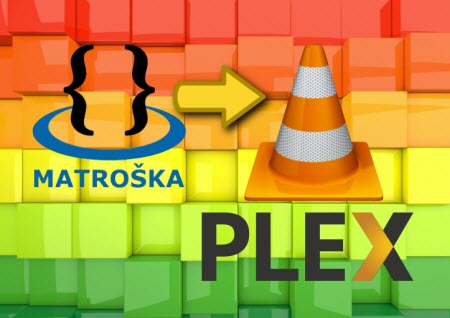 An MKV file is a Matroska file. Matroska is an open source container format. It is an alternative to the popular AVI and MP4 formats and it also surpasses them in many areas. When you want to play your MKV file by downloading a movie torrent online, you may failed. Because that MKV files cannot be played by system media players without a compatible matroska decoder installed. Does VLC play MKV? Actually, VLC can easily open MKV files but you may encounter the following problems, no sound and external subtitle not loaded error. If you want to play MKV with VLC smoothly, you need to obtain some great solutions to fix VLC play MKV error. Solution 1: Play MKV Smoothly with Best VLC Alternative - DivX Plus PlayerYou may be suggested to search for a VLC alternative to play MKV when asking the question "Dose VLC play MKV?" because of VLC playing errors. There are too many MKV players in the market, but the best VLC alternative should accord with some points. DivX Plus Player not just play MKV video files back, but play it in a good way. There are some enhanced MKV playback features to DivX Plus Player like: supports up to 8 MKV multiple subtitles and audio tracks, offers smooth fast-forward and rewind MKV playing process and auto-generated MKV chapters. Solution 2: Convert MKV for Playing MKV with VLC via Plex on PC/Mac Pavtube Video Converter Ultimate is the utility for you. With it, you can fast convert MKV to AVI that can be easily played in VLC via Plex. Besides, this video convert app can allow you to convert any other popular video and audio format like MP4, MOV, AVI, WMV, FLV, 3GP, VOB, AC3, MP3... with ultra-fast speed and zero quality loss. If you are Mac users, please turn to the equivalent Mac version named Pavtube iMedia Converter for Mac to transcode .mkv files to VLC on Mac OS X (Yosemite 10.10 included). Once you download and install the video converter program, follow the steps below:Step 1. Click the "Add Files" or "Add From Folder" button to load MKV videos for converting.
 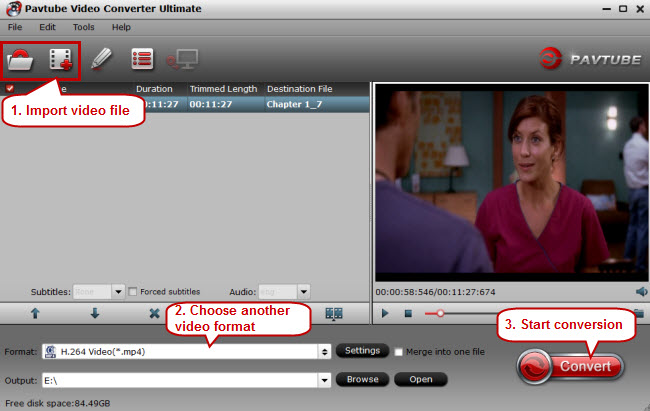 Step 2. As MP4 is a universally used video format, sure it can be supported by most devices (e.g. mobile devices, TVs, and streaming media players). Click the format bar to find “Common Video” > “H.264 Video (*.mp4).”
 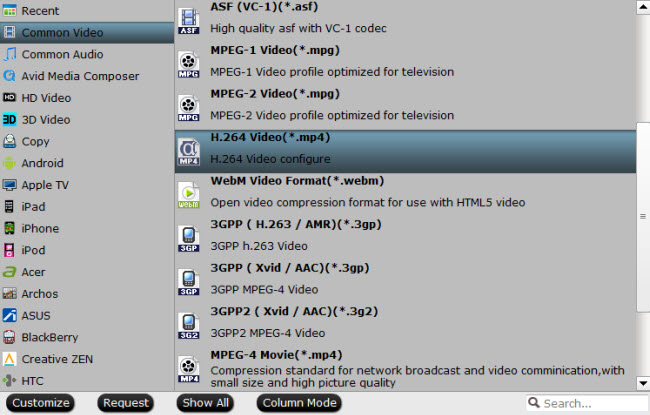 Step 3. Convert MKV files to MP4, on the main UI there is a big red button “Convert”, and click it to get down to converting VLC videos to MP4 format. No matter which method you’d like to prefer, you’ll get MP4 videos compatible with a plenty of devices. Then,stream converted videos to VLC via Plex. See Also:
Summary This is a simple tutorial to show you how to rip and convert DVD to Google Nexus 10 supported video formats on Mac and Windows with perfect audio and video synchronization.Google Nexus 10 is superior design and swift performance make it one of the best Android tablets to date. With a dazzling 2560-by-1600 (300ppi) display and ultra-powerful graphics processor, Nexus 10 turns out to be an ideal multimedia tool. After got the Nexus 10, you may have a question: Can I enjoy more movies, like DVD movies on this amazing Nexus screen? 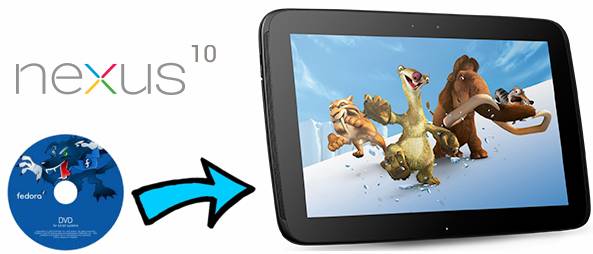 Obviously, DVD discs can’t be played by tablets directly, even if the DVD backup ISO or IFO image files. If you want to watch DVD movies on Google Nexus 10, you'll need to convert DVD to Nexus 10 supported video formats first and then transfer the converted video files to your Nexus 10. The article here mainly shows you how to download and put DVD movies on Google Nexus 10 for smooth playing while keeping the best HD video quality. Here, I suggest you selecting a professional DVD ripping software. Pavtube DVDAid is highly recommended here. Fast conversion speed, perfect output video quality and optimized Nexus 10 profile is just the reason why it is recommended. Now, share my own steps to rip DVD movies to Nexus 10. Tips: For Mac users, you can try to Pavtube DVDAid for Mac – as the top DVD ripper for Nexu 10. If you want to know anything about Nexus 7, here is the all of Nexus 7 solutions. Step-by-step: How to Convert DVD for playback with Nexus 10The quick start guide below uses DVD Ripper Windows(Windows 8.1 included) screenshots. The way to rip DVD movies to Nexus 10 on Mac is almost the same. Just make sure you get the right version according to your computer operating system. Step 1. Install and launch the free trail of DVD to Nexus 10 converter, load movie from DVD disc, DVD folder, or DVD ISO/IFO image.
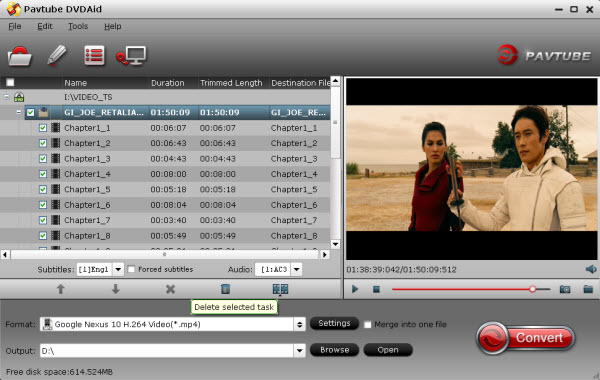 Step 2. When the DVD disc/folder/ISO is loaded, you can select subtitles and audio track (English, French, German, Spanish…) for each chapter. Expand the DVD folder to check movie chapters.
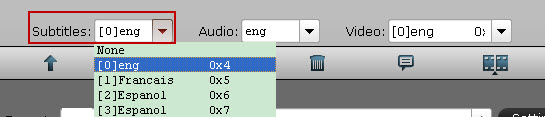 Step 3. Set compatible format for ripping DVD folder/ISO to Google Nexus 10 compatible videos. Click the “Format” bar, and choose “Google Nexus 10 H.264 Video (*.mp4) under “Android” column.
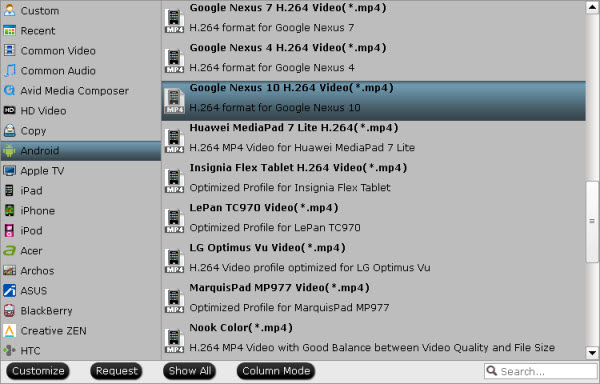 Step 4. Start converting DVD to Google Nexus 10 playable videos. Click the “Convert” button at bottom right to get the DVD Ripper works. After conversion you can click the “Open” button to find the converted files.When DVD movie is converted into H.264 video, you can stream the media file to Google Nexus 10 via USB cable. Hope this guide is really helpful for you to watch DVD movies on Google Nexus 10. New Nexus 7 Related guides:
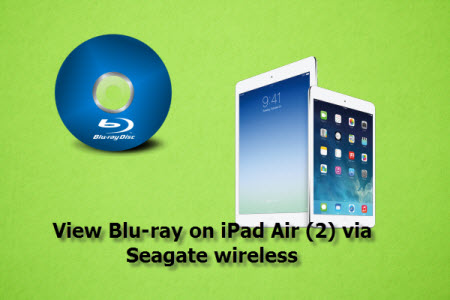
Summary: This tutorial is about an easiest way that lets you rip, convert and copy Blu-ray/DVD movies to iPad Air (2) via Seagate wireless with ultra-fast speed.
 iPad Air (2) has turned into a great wave of excitement that swept across Apple enthusiasts and movie lovers in spades. It is great to watch Blu-ray movies on iPad Air (2) via Seagate wireless with its nice full HD screen. Those movie lovers who have collected piled up movie Blu-ray discs would say: "If only my favorite Blu-ray disc could be played on iPad Air 2!" Pavtube BDMagic would let it happen immediately!
Why need this top Blu-ray to iPad Air (2) Ripper?
However, same as the other model of iPad, one of the few drawbacks is that the iPad Air is not designed with a built-in Blu-ray player or Blu-ray -ROM, which means that you cannot play your Blu-ray movies directly. If you have movies on Blu-ray discs and you want to get them on your iPad Air (2) for amusement while on the go, you will need This top Blu-ray to iPad Air (2) Ripper is able to convert any Blu-ray movie on iPad Air (2) via Seagate wireless with suitable formats. For Mac users, you can choose Pavtube BDMagic for Mac.
Why choose this Blu-ray to iPad Air (2) Ripper ?
Pavtube BDMagic - which supports all sorts of iPad devices and is easy to use and the output quality is outstanding. It features great ability to handle the latest Blu-ray, DVD releases movies with optimized format for the iPad Air (2) to generate best videos suitable for viewing on iPad Air (2) via Seagate wireless. If you are not satisfied with the quality, you could even tweak the video, audio settings. Read the Review:Top 5 reason to choose Blu-ray Ripper for iPad Air 2.
The easy way to convert Blu-ray to iPad Air (2) compatible video formats
Step 1: Insert your Blu-ray disc into your BD drive, run the Blu-ray to iPad Air (2) Converter and click "BD/DVD disc" icon to load Blu-ray and DVD movies. You can also import movies from Blu-ray folder, Blu-ray folder and ISO image files.
iPad Air (2) has turned into a great wave of excitement that swept across Apple enthusiasts and movie lovers in spades. It is great to watch Blu-ray movies on iPad Air (2) via Seagate wireless with its nice full HD screen. Those movie lovers who have collected piled up movie Blu-ray discs would say: "If only my favorite Blu-ray disc could be played on iPad Air 2!" Pavtube BDMagic would let it happen immediately!
Why need this top Blu-ray to iPad Air (2) Ripper?
However, same as the other model of iPad, one of the few drawbacks is that the iPad Air is not designed with a built-in Blu-ray player or Blu-ray -ROM, which means that you cannot play your Blu-ray movies directly. If you have movies on Blu-ray discs and you want to get them on your iPad Air (2) for amusement while on the go, you will need This top Blu-ray to iPad Air (2) Ripper is able to convert any Blu-ray movie on iPad Air (2) via Seagate wireless with suitable formats. For Mac users, you can choose Pavtube BDMagic for Mac.
Why choose this Blu-ray to iPad Air (2) Ripper ?
Pavtube BDMagic - which supports all sorts of iPad devices and is easy to use and the output quality is outstanding. It features great ability to handle the latest Blu-ray, DVD releases movies with optimized format for the iPad Air (2) to generate best videos suitable for viewing on iPad Air (2) via Seagate wireless. If you are not satisfied with the quality, you could even tweak the video, audio settings. Read the Review:Top 5 reason to choose Blu-ray Ripper for iPad Air 2.
The easy way to convert Blu-ray to iPad Air (2) compatible video formats
Step 1: Insert your Blu-ray disc into your BD drive, run the Blu-ray to iPad Air (2) Converter and click "BD/DVD disc" icon to load Blu-ray and DVD movies. You can also import movies from Blu-ray folder, Blu-ray folder and ISO image files.
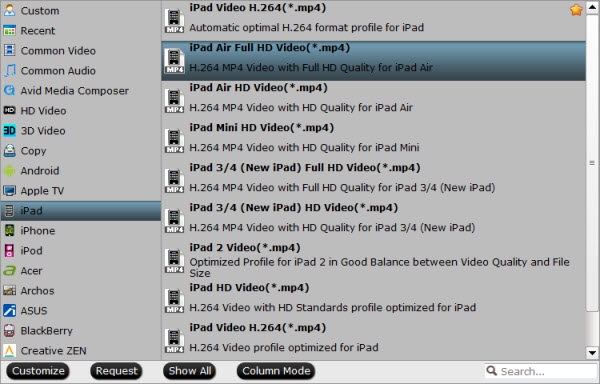
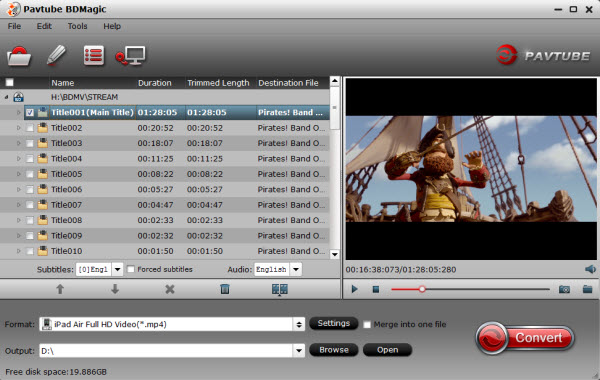 Step 2: Click the output format dropdown list; you'll get a lot of choices. For converting Blu-ray to iPad Air (2), "iPad Air Full HD Video (*.mp4)" as output format.
 Step 3: At last, click the Convert button to begin converting Blu-ray movies to iPad Air (2) immediately. After the ripping, you can click "Open " to locate the converted MP4 video files and just transfer them to your iPad Air (2)via Seagate wireless without limitation!
Read More:
Step 3: At last, click the Convert button to begin converting Blu-ray movies to iPad Air (2) immediately. After the ripping, you can click "Open " to locate the converted MP4 video files and just transfer them to your iPad Air (2)via Seagate wireless without limitation!
Read More:
Summary: If you want to get your movies off of DVD discs and onto Xperia Z3 for amusement on the go, you’ve come to the right place.
As long as we glance at the smartphones world, Sony Xperia Z3 is a good choice. Do you have problems to copy DVD to Xperia Z3? In this article you will get the best DVD Ripper software which can help you to rip DVD to Xperia Z3 supported format, and then you can play DVD on Xperia Z3 freely.
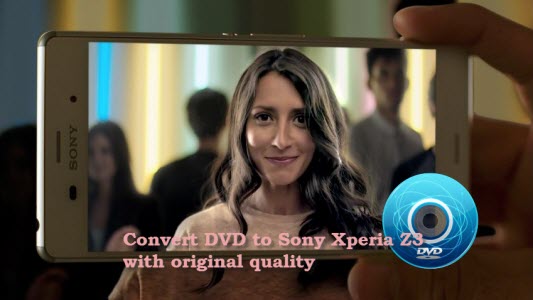 Sony Xperia Z3 is the premium smartphone that does more and goes further, which is equipped with 5.2-inch screen size, 2.5 GHz Quad-Core processor, 20.70 million pixels meaning to go along with you everywhere to capture the most unforgettable moments and let you enjoy time-duration you want. However, for some movie fans like you, there exist some troubles for the Z3 doesn't have a DVD drive for DVD movie playback while you have a large DVD collection.
Here, What you need is to convert DVD to Xperia Z3 supported video formats like MP4. And Pavtube DVDAid is just an ideal tool to get that done in clicks. It has Xperia Z3 -ready output modes, which means that you can effortlessly get DVD movies playable on Xperia Z3 in several clicks with fast ripping speed and high output video quality. It also has outputs for all the other Sony Xperia models, as well as the Z2, M, Z1S. What's more, you can use this DVD converter to crop the black bars, add special video effects, split or merge video, etc. And the conversion speed is very fast. Don't hesitate any more. With it, you can make your videos more interesting.
Tips: If you’re using a Mac, you can turn to it equivalent Mac version Sony Xperia Z3 DVD Ripper for Mac. Now, Just download the right version and follow the step-by-step guides to achieve your goal smoothly.
Step-by-Step: Convert DVD movies to Sony Xpeira Z3 MP4
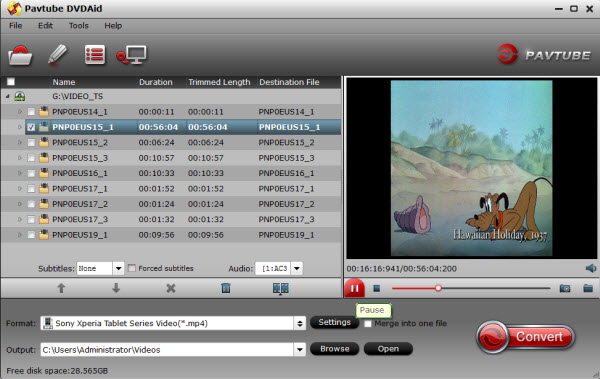
Step 1. Load DVD movies
Run this best DVD Ripper for Sony Xpeira Z3, please click “Load Disc” button on the top left corner to import the DVD disc, DVD ISO file, DVD folder.
Sony Xperia Z3 is the premium smartphone that does more and goes further, which is equipped with 5.2-inch screen size, 2.5 GHz Quad-Core processor, 20.70 million pixels meaning to go along with you everywhere to capture the most unforgettable moments and let you enjoy time-duration you want. However, for some movie fans like you, there exist some troubles for the Z3 doesn't have a DVD drive for DVD movie playback while you have a large DVD collection.
Here, What you need is to convert DVD to Xperia Z3 supported video formats like MP4. And Pavtube DVDAid is just an ideal tool to get that done in clicks. It has Xperia Z3 -ready output modes, which means that you can effortlessly get DVD movies playable on Xperia Z3 in several clicks with fast ripping speed and high output video quality. It also has outputs for all the other Sony Xperia models, as well as the Z2, M, Z1S. What's more, you can use this DVD converter to crop the black bars, add special video effects, split or merge video, etc. And the conversion speed is very fast. Don't hesitate any more. With it, you can make your videos more interesting.
Tips: If you’re using a Mac, you can turn to it equivalent Mac version Sony Xperia Z3 DVD Ripper for Mac. Now, Just download the right version and follow the step-by-step guides to achieve your goal smoothly.
Step-by-Step: Convert DVD movies to Sony Xpeira Z3 MP4
Step 1. Load DVD movies
Run this best DVD Ripper for Sony Xpeira Z3, please click “Load Disc” button on the top left corner to import the DVD disc, DVD ISO file, DVD folder.
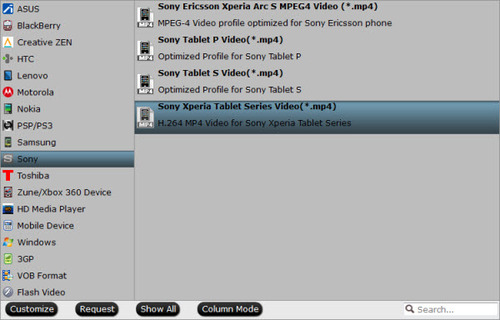
 Step 2. Choose suitable format for Sony Xperia Z3
Choose Output Video Format Since you need to rip DVD to Sony Xperia Z3, choose “Sony Xperia Tablet Series Video(*.mp4)” under “Sony” button as your output video format.
Step 2. Choose suitable format for Sony Xperia Z3
Choose Output Video Format Since you need to rip DVD to Sony Xperia Z3, choose “Sony Xperia Tablet Series Video(*.mp4)” under “Sony” button as your output video format.
 Tips:
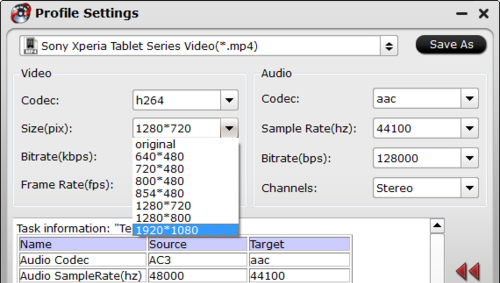
1. Click “Settings” button to adjust video and audio parameters like bitrate, size, audio channels, etc to meet your requirement.To get 1080p resolution playback on Sony Xperia Z3, you can set output size at “1920*1080”.
Tips:
1. Click “Settings” button to adjust video and audio parameters like bitrate, size, audio channels, etc to meet your requirement.To get 1080p resolution playback on Sony Xperia Z3, you can set output size at “1920*1080”.
 2. To rip DVD movies with your preferred subtitle or audio track, you can select any subtitle or soundtrack from your source BD files with the options “Subtitle” and “Audio”
Step 3. Start DVD to Xperia Z3 Conversion
Hit the big “Convert” button to start converting DVD for Sony Xperia Z3 and if you do not remember the location of generated files, click “Open” button to find it quickly and transfer to Xperia Z3. Just enjoy it!
Now, get entertainment and take your favorite DVD movies anytime and everywhere you want with this great device - Sony Xperia Z3.
See Also:
2. To rip DVD movies with your preferred subtitle or audio track, you can select any subtitle or soundtrack from your source BD files with the options “Subtitle” and “Audio”
Step 3. Start DVD to Xperia Z3 Conversion
Hit the big “Convert” button to start converting DVD for Sony Xperia Z3 and if you do not remember the location of generated files, click “Open” button to find it quickly and transfer to Xperia Z3. Just enjoy it!
Now, get entertainment and take your favorite DVD movies anytime and everywhere you want with this great device - Sony Xperia Z3.
See Also: