Showing posts with label Backup. Show all posts

Saturday, December 20, 2014

Copying Blu Ray/DVD collection to NAS for sharing on home theatre system

This article shows you an easy way rip and convert Blu Ray/DVD collection to NAS supported video for widely sharing and playback on home theatre system.

Sitting on a pile of Blu Ray and DVD movies and don't know what to do with them? Well, you are certainly not alone. Many people try to digitize their DVDs or Blu-ray’s because it is simply more practical to have them stored in a digital format on your NAS server. That way, you can easily access your Blu-ray and DVD movies while you are traveling or when you're just not in mood switch on your TV.
Copying Blu Ray/DVD collection to NAS

In this article will show you step-by-step how to get your Blu Ray/DVD collection both movies and music discs to a NAS to be played on home theatre system.
.
First download and install Pavtube BDMagic

As you know, NAS can support a wide range of format like MP4, MKV, AVI. To achieve this goal, an easy-to-use Blu-ray/DVD Converter is the key. The recommended Pavtube BDMagic is capable of ripping Blu-ray and DVD to MP4, AVI, MKV for NAS streaming with no quality loss; it also enables you to copy BD/DVD main movies for backup onto NAS in m2ts or vob format. (Read the review) If you are running on Mac OS X, turn to BDMagic for Mac. Now let’s learn how to do it.

Rip and copy Blu Ray/DVD collection to NAS friendly video for home theatre system

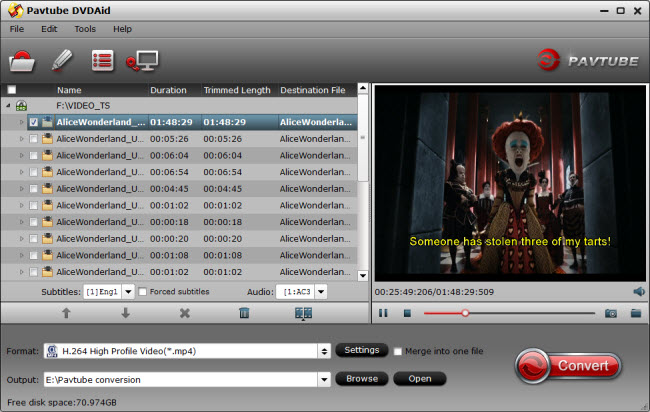
Step 1: Load Blu-ray/DVD movies

Run Blu-ray Ripper for NAS and click disc icon to load Blu-ray/DVD movies for converting. Set your wanted subtitles and audio track from the drop-down box of "Subtitles" and "Audio" tab.

Blu-ray Ripper for NAS

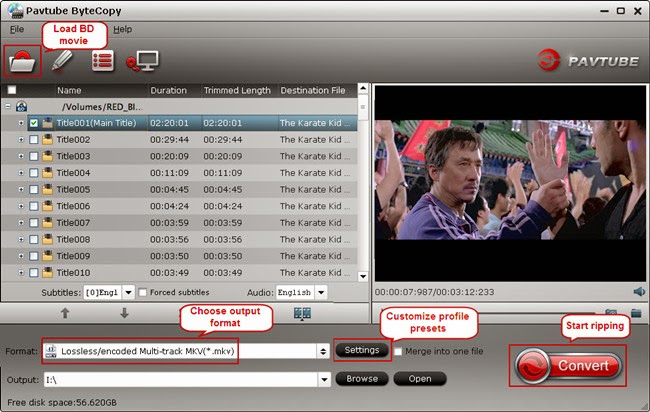
Step 2: Choose output format

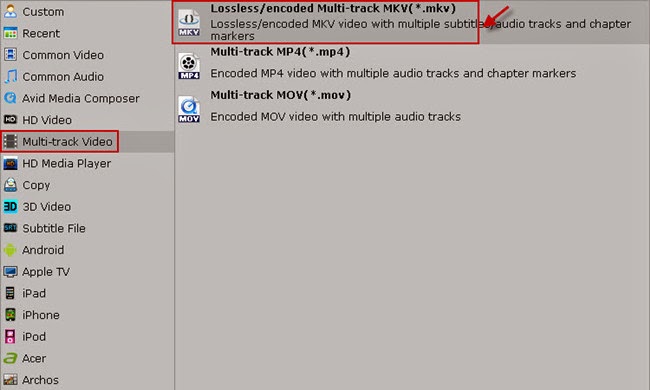
As NAS is powerful enough to almost all kinds of formats, you can choose the format according to your own needs like MP4, AVI, MKV, etc. If you would like to enjoy movies from physical discs to your mobile phone and tablet, you can select a decent format like "iPad > iPad HD Video(*.mp4)" from the profile list comes with the software.

NAS video format

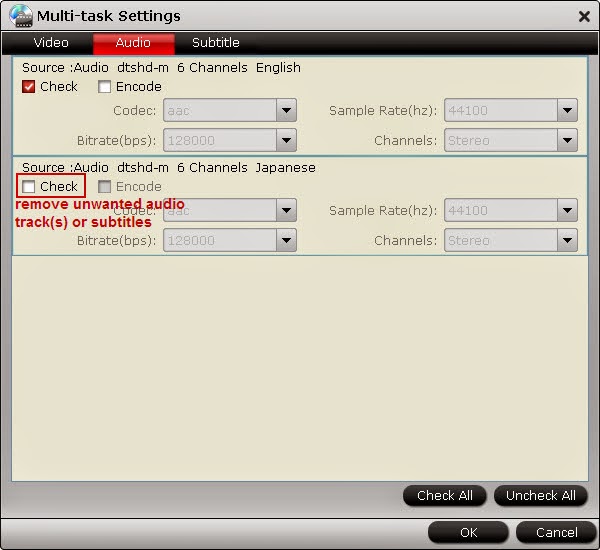
Tip: Click Settings bar, you can adjust the level of compression to suit the quality you want.

Step 3: Rip Blu-ray/DVD to NAS

Finally, click convert button to rip/convert Blu-ray/DVD to optimized format for NAS. When the conversion finishes, click Open button to find the output files and you can do the movie sharing with your NAS on home theatre system. What's more, you can also copy your Blu-ray, DVD to computer HDDPlex Media Server and Mac Mini HTPC Media Library.

Monday, December 8, 2014

Backup all of our DVD and BluRay Disc to Computer HDD for Playback Flexibly

Ever dream of enjoying Blu-ray, DVD movies without ever having to get off your couch to drop a disc in player? Now start to rescue you from barrier by copying all Blu-rays/DVDs to HDD.

Blu-ray and DVD video offers high video/audio quality for users, but with a lot of restrictions. Once you backup the Blu-ray, DVD movie on hard disk drive, you are set free to all kinds of other neat stuff with it, such as transcode Blu-ray, DVD to MKV, MP4 and other format so you can watch it on a handheld digital media player, or delete those annoying messages from the FBI and Interpol messages warning you of the penalties for doing what you want to do.

Backup all of our DVD and BluRay Disc to HDD

Why do we Need to Copy Blu-ray, DVD to hard disk drive

1. Creating digital backup of your disc from being scratched, cracked and other physical damages even lost.

2. 1:1 copy Blu-ray, DVD to HDD enables you to keep original all subtitle tracks, audio streams, and chapters.

3. After remove disc protection and backup Blu-ray, DVD to HDD, you can play and enjoy BD/DVD movies on your computer whenever wherever you please.

To copy a Blu-ray or DVD disc or convert them to particular format you need without quality loss, the best recommend is Pavtube BDMagic. With this app, you can help you remove the Blu-ray/DVD disc protection with ease.

With its clean interface, fast converting speed and good video quality, converting Blu-ray/DVD to AVI for majority of media players, ripping Blu-ray/DVD to MP4 for
 multimedia portable devices and transcoding BD/DVD to iPad, iPhone, Galaxy Tab, PSP will be simply finished within a few clicks. Besides, you can copy source disc to computer hard disk drive with same structure preserved. Or backup main Blu-ray into M2TS and copy DVD to VOB file. Refer to the guide below to learn how to.
The app is also available for Mac OS – Get BDMagic for Mac if you work with OS X 10.5/10.6/10.7/10.8/10.9/10.10.

FYI: If you need to keep all the audio tracks (language) and soft subtitles, here's another choice for you: Pavtube ByteCopy.

Backup all of our DVD and BluRay Disc to HDD for Playback Flexibly

1. Launch the highly recommended Blu-ray/DVD Copier. Insert your Blu-ray and DVD movie to disc drive, and click “Load Disc” button on Pavtube BDMagic interface to load your discs.

Blu-ray/DVD Copier

2. Select the main title and set subtitles/audio language you'd like to preserve.

3. Select a format for conversion. You are suggested to choose “Common Video -> H.264 MP4 Video (*.mp4)” for putting Blu-ray, DVD to hard disk drive for playback. 


4. Start ripping Blu-ray, DVD movies. After conversion completes, press "Open" to locate resulted mp4 files and get them onto media players or portable devices for playback flexibly.

Tips:

a. If you are not satisfied with the default video/audio specs, click "Settings" to adjust video seize(pixel), frame rate, bitrate (the higher bitrate, the larger file size and better video quality), or audio settings.

mp4 settings

b. To 1:1 copy your Blu-ray and DVD full movie, you can hit the Copy the entire disc icon on BDMagic main interface and start Blu-ray, DVD backing up process.

c. If you’d like to copy only movie content and leave out the extras and commentary, the Directly Copy is exactly what you need, which copies intact .M2TS/VOB main movie from original BD/DVD disc without extras.

Other copy solutions: 

Wednesday, December 3, 2014

How to remove DRM from iTunes movies on Windows 7/Vista/XP/8/8.1

Looking for an easy way to remove DRM from iTunes movies? Here's how to rip out the DRM and turn that copy-protected M4V file into a regular DRM-free video on Windows 7/Vista/XP/8/8.1.

Q1: We can play iTunes music and movies on iPad and iPhone, but what about Galaxy Tab 3? Can you play your iTunes purchased “World War Z” and “Superman: The Man of Steelon” on Galaxy Tab 3?

Q2:
I transfered iTunes movies to Nook HD, but the tablet can’t play iTunes videss. Why? Who can help me put and play iTunes movies on Nook HD?
remove DRM from iTunes movies on Windows 7/Vista/XP/8/8.1

As we all know, movies and TV shows downloaded or rented from iTunes Store are in M4V format which are encrypted with DRM protection. You cannot transfer them onto an an Android/Windows based device or common video player for playing. Are you looking for a special tool to strip the DRM protection from iTunes movies on Windows 7/Vista/XP/8/8.1? But don't know where to start?

Don't worry. What you need it turn to expert- a piece of iTunes DRM Removal software called Pavtube ChewTune, which will let you convert your iTunes video rentals and purchases to another DRM-free format as an efficiant combination of iTunes M4V DRM protection removal, video recorder and converter. In additon to movies downloaded from iTunes, you can also unlock DRM protection from movies like Blu-ray/DVD Digital Copy, Amazon Instant Videos, BBC iPlayer, Zune Marketplace, Nokia Music Store and more.
Here's how it works: Remove DRM from iTunes videos and convert them to drm-free format Step by step

To make the magic happen, all you need to do is download and install ChewTune with the audio driver allowed to be installed.

the audio driver allowed to be installed

Run Pavtube DRM Media Converter with iTunes closed when converting and click "Add Video" or "Add from folder" button and browse files from your computer. Also you can directly drag and drop the source DRM video to ChewTune.
 DRM Removal

Next, select the output profile for the type of video you want to create by choosing from "Format" bar.

MP4 video format

Click the Convert icon to begin converting iTunes video files to DRM-free videos. Wait for the conversion to finish, during which you will not be able to use iTunes.

This process works very well and is really easy, but the conversion will take the length of the movie since Pavtube ChewTune records DRM videos in 1:1 video and audio quality, and it's something you can set your computer to do while you're away. If it records too much, you can always trim it off later.

After that, you can transfer the converted DRM-free movies to any devices and media player for playback.

Additional Tip:

Get Pavtube ChewTune in bundle package: 
Video Converter Ultimate($65) + ChewTune($29) with Only $74.9 which can save you $19.1, then you can enjoy any DRM or common movies freely on Windows 7/Vista/XP/8/8.1.

Thursday, November 20, 2014

How to Backup "How to Train Your Dragon 2" Blu-ray disc on PC/Mac

In order to make the most of your time, the following article will show you a way to make your "How to Train Your Dragon 2" Blu-ray copy fast and easy on PC/Mac for watching perfectly.

If you liked How To Train Your Dragon, you’ll love How To Train Your Dragon 2! My family and I were invited out to watch How To Train Your Dragon 2 in 3D earlier this week. We were so excited, as big fans of this movie, I plan to buy a How to Train Your Dragon 2 Blu-ray disc and backup them for much more futuring viewing. 
Make "How to Train Your Dragon 2" Blu-ray copy
In fact, making a backup for Blu-ray disc can never be a difficulty if you get the right way. As long as you got an external Blu-ray drive and Pavtube BDMagic- a professional and ultra-fast Blu-ray Copy and Ripping software, you can back up Blu-rays on your computer easily. In this article, we will quickly walk you through how to do "How to Train Your Dragon 2" Blu-ray backup on PC/Mac without quality loss.

Overall, Pavtube BDMagic takes everything from the Blu-ray, including the chapters, extras, and subtitles and it is capable of making copies of Blu-rays, so you can back up Blu-rays on your computer without quality loss. With the Directly Copy feature, you can backup main movie only from Blu-ray leaving out extras. While with the Full Disc Copy feature, you can copy Blu-ray disc with original structures to hard drive if you want. With decent decrypting capability, high quality video output, considerate backup solution and specific format templates for versatile PMP devices (iPad, iPhone, Apple TV, Xbox, PS4, Android. Windows tablets and phones, etc), Pavtube BDMagic ranks top on the Blu-ray ripping application list. Mac version is here.

(Read Top 5 Best Selling Windows/Mac Blu-ray Rippers Review)

Backup and convert "How to Train Your Dragon 2" Blu-ray in Windows 10/8.1 with best video quality

1. Run Best Windows 10/8.1 Blu-ray Copy and Ripper and import disc.

Click "Load Disc" icon to load your inserted Blu-ray disc from BD drive, IFO or folder. I also noticed if you have a ISO file to import, it will recognize the ISO file automatically with no need to run virtual driver and mount ISO files firstly. Good design.

Windows 10/8.1 Blu-ray Copy

Click the “Browse” button to set output folder where you want to save the copied Blu-ray movies. Click "Format" drop-down list and choose proper format for different using.


Here are mainly two choices for you to bacup your Blu-ray disc: Full Disc copy or Directly Copy.

1. Click the "computer" icon on the top to output 1:1 Blu-ray file exactly the same as original.
Full Disc copy

2. Select "Copy>Directly Copy" in format list to output an intact m2ts file of the main title.
Directly Copy

Alternatively, you are suggested to choose “Common Video -> H.264 MP4 Video (*.mp4)” for putting Blu-ray to hard drive for playback. 

If you are not satisfied with default specs, then click "Settings" to enter Profiles Settings windows. You can customize video frame rate, bitrate, size and other settings freely.

Step 4. Start copying or converting

Click the big red "Convert" to start backing up or copying your "How to Train Your Dragon 2" Blu-ray disc on Windows 10/8.1. Usually backup will be quicker because it does not need to do trancoding.

After the conversion, click "Open output folder" to quick locate converted files for further watching.

In this way, you can have copied "How to Train Your Dragon 2" Blu-ray movie, and totally get rid of any loss brought by Blu-ray damage and manage Blu-ray movies in a more convenient way.

Also learn how to copy a 3D Blu-ray and DVD to hard drive or store a Blu-ray on iMac.

  • I used another Pavtube program called ByteCopy to backup my Blu-rays without quality loss. Meanwhile, several audio tracks and subtitles are preserved so I can switch language when watching movies. You can also have a try! (Learn Top 5 Best Multi-track Blu-ray Ripper Review)
Read More:


Monday, November 10, 2014

Rip and Copy a DVD or CD to a USB Flash Drive

Wanna keep CD/DVD movies stored on USB Flash Drive for easier manage or playback. This article mainly tells you how to copy your CD and DVD to USB Flash Drive.

copy CD and DVD to USB Flash Drive

Question: I have a CD or DVD on environmental training aids/safety products, etc. and would like to copy it to a PNY 16GB flash drive. My laptop is a Compaq Presario CQ56 running Windows 7. I need your help here. Thank you.

Do you want to backup your CD or DVD disc to USB Flash Drive for safe storage and further playback on any devices like HDTV, tablets and laptop? Then a powerful third-party software for copying CD/DVD to USB Flash Drive is what you need.

It is not a big deal. Here Pavtube DVDAid (Read review) is right for you. Workflow is easy and a mass of preset formats are built for output. And CUDA acceleration will bring you fast conversion speed. It is capable of converting CD and DVD to digital copy with various playable video formats, and moreover, it also can support to backup CD/DVD without any quality loss. Now let's learn how to do it. 

The app is also available for Mac OS – Get Pavtube DVDAid for Mac if you work with OS X 0.5/10.6/10.7/10.8/10.9/10.10.


Great News! To thanks for your continued support all along our previous site and the new www.multipelife.com, we are holding a '2016 Easter Special' with fantastic discounts up to 40% off, pay less to get more powerful Pavtube Blu-ray/DVD backup tools!Like us to get 50% off BDMagic, 50% off ByteCopy, 50% off DVDAid and 50% off Video Converter Ultimate on Windows/Mac platform, Last 2 ways!https://www.facebook.com/pavtubefans/app/198826126804423/


Part I: Guide on How to rip CD/DVD to USB Flash Drive for various purposes

1. Launch the highly recommended DVD Ripper. Insert your cd/dvd movie to DVD-ROM, and click "Load Disc" button on Pavtube DVDAid interface to load CD/DVD disc; it also support importing DVD ISO/IFO and DVD folder.

Load DVD ISO

2. Select the main title and set subtitles/audio language you'd like to preserve.

3. Click "Format", you can find many video formats in the dropdown list, you can choose the one you need like "H.264 Video(*.mp4)" or "DivX AVI - Audio Video Interleaved(DivX)(*.avi)" or "WMV3 (WMV9)(*.wmv)" from "Common Video" option.
Choose format for Roku 3

4. Change target video/audio specs (Optional)

If you are not satisfied with the default video/audio specs, click "Settings" to adjust video seize(pixel), frame rate, bitrate (the higher bitrate, the larger file size and better video quality), or audio settings.

5. Start Conversion.

Click the big "Convert" to start converting CD/DVD to USB Flash Drive as AVI, MP4, FLV, WMV, MOV, etc.. After conversion, you can click "Open" to find the converted files.

Now you can successfully rip and backup Copy Protected CD/DVD to USB Flash Drive Up to the format you wish.

This DVD Converter can convert your CD/DVD to all formats to USB Flash Drive, here is more method to backup your DVD movies:
  • 1. You can hit the Copy the entire disc icon on DVDAid main interface and start CD/DVD backing up process.
  • 2. If you'd like to copy only movie content and leave out the extras and commentary, the Directly Copy is exactly what you need, which copies intact .VOB main movie from original CD/DVD disc without extras.
Part II: Transfer ripped CD/DVD to USB Flash Drive

Insert the USB flash drive into one of your computer’s USB ports.
  • For Windows: Open the ripped movie and choose "Save as" and then set the USB drive as location and click "Save".
  • For Mac users: Simply drag the movie onto the USB drive's icon on Mac desktop.
Now, you can play CD/DVD via USB Flash Drive on computer/Smart TV etc. Hope this article will be useful. 

See also:

Saturday, November 8, 2014

Rip Blu-ray Indian movie Collection to iMac for watching

Collected a pile of Indian movie Blu-rays? It’s time to learn how to rip these Blu-ray discs on iMac for freely using in this article.

Do you like Indian movies? It's sometime not easy to download from the Internet, so you need to purchase Blu-ray discs. And keeping them on you iMac for playing later is a great idea, as you may travel with a tablet, or take on a bus with a smartphone, meanwhile wanna to watch your beloved Indian movies on the move. If it's the case, then you're right being here. In this article, we'll show you a free way to rip Indian Blu-ray discs on iMac (Mavericks and Yosemite included) at ease.

Rip Blu-ray Indian movie Collection to iMac

If you are looking for a freeware, MakeMKV may be your first choice which can aid you copy a Blu-ray disc and save whatever parts you want (if you don’t need the 7.1-channel audio mix, for example, just uncheck it) into an MKV container for playing with VLC or other software. Here are the steps:
  • 1. Launch MakeMKV and imports Indian movies Blu-raydisc. 
  • 2. Select any options from the side menu, choosing whether to include all audio streams, subtitles, or only include specific languages. 
  • 3. Choose the output folder (default is set to ~/Movies/DiscName) 
  • 4. Click the "Make MKV" button to start the conversion process. 
Editor's Notes: With MakeMKV, you can backup Blu-ray on iMac, but this does not mean you can play Blu-ray everywhere. If you want a more powerful yet easy-to-use Blu-ray Ripping tool for Mac, which supports ripping and converting Blu-ray movie on iMac in one-stop, turn to BDMagic for Mac which provides more output formats for you like MP4, AVI, WMV, MOV, FLV, MPG, not limited to MKV as MakeMKV does. one.

Money Saving Software Bundles are coming and it will provide big special sale with BDMagic for Mac, like BDMagic($49) + DVD Creator($35) which is only $49.9, help you save $28.1.

Overall, this Mac Blu-ray Ripper enables you to rip your Indian Blu-ray discs into versatile popular video, audio formats including MKV, MP4, AVI, WMV, MOV, FLV, MPG, M4V, MP3, WAV, etc without any quality loss on Mac (Mavericks and Yosemite supported). And with the “Copy entire disc” option of the Blu-ray Ripper, you are able to make a successful and full copy of protected Blu-ray movie. Plus, you can just copy the movie only from your BD with its Directly Copy feature. What’s more, this Blu-ray ripping tool provides hundreds presets for iPad, iPhone, Nexus, Kindle, Galaxy, Surface devices for easier enjoyment. Download the tool and learn a simple guide on ripping Indian Blu-ray on iMac within 3 clips.

Tip:

a. A BD drive is needed for Blu-ray ripping first.
b. No matter which Blu-ray ripping program you choose, anywhere from 30 to 60 GB of hard disk space is needed depending on what you’re ripping.

1. Launch the Blu-ray Ripper for Mac OS X and import Blu-ray movies to it.

Blu-ray Ripper for Mac OS X

2. Choose output format via clicking the Format bar.

best playback format

3. Press the big “Convert” button to start the Blu-ray ripping process on iMac.

In one word, if you want to rip and convert your Blu-ray library to different video, audio formats and to more manageable file sizes for playing, editing, uploading, streaming anywhere, BDMagic for Mac is a better choice than MakeMKV, for achieving these aims in one stop.

What's more, you can backup Blu-ray to hard drive on PC, store DVD or copy recorded videos for watching with top qualtiy.

Tuesday, November 4, 2014

Keep your purchased DVDs permanently on personal networked library

If you want to search for an useful conversion software to put all your purchased DVD movie collections on personal networked library and play through big screen TV, this article will share my own experience to you.

It has been clear for a while now that we no longer need to load the DVD disc again and again to enjoy our digital content. As for me, I think it is a great idea to rip and keep all my purchased DVDs to my personal networked library permanently for clearing some space in my offices as well as for sharing with my family and friends at any time.

Put DVD to personal networked library

By searching for DVD ripper on google and reading some reviews, I find Pavtube DVDAid is the the best which my father in law has used for a time. Now it can successfully copy and backup the most popular DVD which I purchased like The first 3 seasons of GAME OF THRONES onto my personal networked library and transfer to my big screen TV via USB drive for enjoying. Better still, I can cut and save some of my favorites scenes from my DVDs with it. So excited! So perfect application! The mac version is Pavtube DVDAid for Mac.

Free download and install it and follow the guide I share below:

How to convert DVD to HD MP4 for personal networked library streaming?

1. Load DVD source.

First of all, insert your DVD to DVD drive and keep networked. Now it's time to import DVD into the software after launching it. Click "Load files" icon to choose DVD source for importing.

DVD Ripper for personal networked library

2. Choose output HD MP4 format.

In the dropdown list of Format menu, you can find "H.264 HD Video(*.mp4)" under "HD Video" catalogue which is best format for playing and streaming on my big screen TV.

personal networked library/tv video format

3. Select audio codec for output.

Click "Settings" button on the main interface; , you can change audio parameters like codec, channels according to your needs.

HD MP4 settings

4. Backup DVD to HD MP4 for personal networked library.

When everything is ready, you can click "Convert" button to start converting DVD to personal networked library. Once finished, go to "Open" the generated mp4 files. Now it is time to transfer converted mp4 video to big screen TV via USB drive and enjoy it.

What's more, together with TV, you can rip your DVDs for enjoying on Galaxy Note 10.1 2014 Edition, iPad Air or Windows 8.1/8 platform.

Friday, October 3, 2014

Ripping Marvel movies to media server with retention of 5.1 Audio

In this article, we will show you the way rip, convert, store, and stream your Marvel (2D/3D) Blu-ray movies to media server with retention of 5.1 Audio.

I own hundreds of Blu-Ray (purchase all the 3D versions on release day) too many to my movie list. All these are the marvel movies, and other family friendly movies. They’re digitally encoded versions of my favorite movies and TV shows, but trapped on physical platters. If I want to watch something, I have to find the disc, slide it into a player or a computer with a BD drive and flip TV to the proper input.

So I think it will be nice to have all these 2D/3D Marvel movies backed up/converted and saved to media server (latest encryption necessary), then I can watch on my portable devices (like LG-3D TV, iPad, iPod, Android Phone, Kindle, Nook, various Android Tablets, etc.) anytime I want without having to pull out the disc on my BD player.

The point here is the main thing I was looking for was full HD ripping with retention of 5.1 Audio -my other Ripping program is not able to rip the newer Blu-Rays. Well, this article will give you the answer to copying Marvel (2D/3D) Blu-ray movies to media server for watching and streaming with 5.1 audio preserving.

Backup Blu-ray to media server

Preparation:

To rip and backup Marvel (2D/3D) Blu-ray discs, what you need is a BD ripping tool. To find a one which is able to read TureHD audio and DTS Master Audio, and output them as 5.1 channels, Pavtube ByteCopy is right for you. This Blu-ray Ripper is a powerful program which can easily help you rip and convert 2D/3D Blu-ray (as well as DVD) to almost all the popular video format like MKV, MP4, MOV, MPEG-4, WMV, etc as you want. Plus, it enables you to extract audio/music like TrueHD, DTS HD, etc from Blu-Ray disc without losing quality and keep its original and perfect 5.1 channels. Best of all, it allows you to lossless copy your Blu-ray/DVD collections to MKV with all subtitles and original audio track for future usage like disc burning.

You can download Blu-ray ripper by using the link below.


Let’s get started backing up Marvel (2D/3D) Blu-ray to MKV with retention of 5.1 Audio.

1. Load Blu-ray movie.

Get ready to insert your Blu-ray disc to disc drive, click this “Load Disc” button to browser to disc drive and import the disc. Or you could load BD folder and BD ISO from computer hard drive to this best Blu-ray to MKV backup software.


2. Choose suitable output format.

Pavtubr ByteCopy offers an special category for users who would like to keep multiple audio tracks including Dolby Digital 5.1 and subtitles in saved Lossless MKV file.

To pass-through original TrueHD/Dolby Digital/DTS/PCM audio, just select Multi-track Video > Lossless/encoded Multi-track MKV(*.MKV) for output. In this way the original audio tracks are streamed without transcoding from source BD Disc to saved MKV file.


3. Adjust profile presets (Optional).

You are allowed to customize profile presets as you like, you could remove unwanted audio track in Audio tab under Settings menu, and uncheck subtitles you do not need in Subtitles tab.


4. Start ripping.

Save all your settings, and back to ByteCopy main interface, hit the “Convert” button to start get Dolby Digital 5.1 audio pass-through. When the lossless backup completes, you would get a single large MKV file saved in output file destination. And you could play copied Marvel (2D/3D) Blu-ray movie with Dolby Digital 5.1 audio preserved.

Learn how to enjoy your DVD collections on Windows 8.1/8, effortlessly backup Disney’s Blu-ray movies on Mac and copy Live Concert DVDs to Multimedia Drive.

Sunday, September 28, 2014

How to freely enjoy your DVD collections on Windows 8.1/8

As a big fan of movies, you must have collected a lot of DVD discs, here is how to copy your precious DVD movies for watching on Windows 8.1/8.

If you get a new Windows 8 or 8.1 computer, you might be surprised to find out that it won't play your DVDs as Microsoft. In fact, Windows 8.1 still can’t play DVD movies out of the box. To get DVD playback from Microsoft, you’d have to buy the Windows 8 Pro Pack for $100 and the Media Center Pack for $10 — and that only gets you DVD playback!

enjoy DVD collections on Windows 8.1/8

Then how to avoid paying Microsoft another $110 and let you enjoy DVD collections freely? Here offers the best way to get DVD playback on Windows Windows 8.1/8.

What you need:

To play your DVD movies without any hassles, you need to look for a DVD ripper that is comptible with Windows 8/8.1 to help you rip DVD in Windows computer. Look no further! You’ve come to the right place.

Here, Pavtube DVDAid is highly recommended for its good reputation, easy-to-use interface and quick conversion speed which makes converting DVD movies in Windows 8/Windows 8.1 AS EASY AS A PIE. In addition, it provides hundreds of video presets for portable devices like iPhone 6, iPhone 6 Plus, iPad Air, Samsung Galaxy Note 4, etc. Don’t hesitate to get it now and follow the easy steps below to make your DVDs playable anywhere in Windows 8/Windows 8.1.

How to rip and convert DVD in Windows 8/Windows 8.1

1. Load DVD movies

Click "DVD disc" icon to load DVD movie files directly from your DVD disc via the DVD ROM.

DVD Ripper for Windows 8.1/8

(Note: Don't forget to select subtitle and audio track for output.)

2. Choose an output format

Click "Format" drop-down list and choose proper format for different using.

Playable MP4 format

For instance, if you simply want to back up DVD to external hard drive, here are two solutions:

a. Click the "computer" icon on the top to output 1:1 DVD file exactly the same as original.

b. Select "Copy > Directly Copy" in format list to output an intact VOB file of the main title.

Tip: If you are not satisfied with default specs, then click "Settings" to enter Profiles Settings windows. You can customize video frame rate, bitrate, size and other settings freely. (It does not work for directly copy)

MP4 Settings

3. Start ripping

Click "Convert" button to start ripping Blu-ray movies on your Windows 8.1/8. When finished, click "Open" button to get the resulted video. Then connect your portable devices to your computer and transfer ripped DVD movie for watching and viewing with best video quality on the go.

More related:

Saturday, February 22, 2014

Keep the 3D Blu-ray Disc "Jack the Giant Slayer" on your Hard Drive for watching

Description: Want to keep the 3D Blu-ray Disc "Jack the Giant Slayer" on your Hard Drive for storage? Check out this article to learn how to backup/copy Blu-ray/DVD discs onto hard drive with the best 3D Blu-ray Backup Tool.

In order to be a giant slayer, one must first have giants. Luckily for Jack, played by Nicholas Hoult in Jack the Giant Slayer, he’ll get a chance to earn his moniker by battling Fee, Fye, Foe and/or Fumm. We’ve got a great look at the four named giants from the famous “Jack and the Beanstalk” quatrain in addition to some giants with unfamiliar names (Fallon?) in these newly released posters from the Bryan Singer film.


Jack the Giant Slayer is now in 3D Blu-ray version, it will bring us an imaginative fantasy realm straight into our room without going to the cinema. Need to back up your favourite Blu-rays like "Jack the Giant Slayer" on your hard drive, then you can easily get the 3D movies playback on any device?

At first, to backup Jack the Giant Slayer 3D Blu-ray Disc to Hard Drive, you need to a third-party software to backup Blu-ray discs without sacrificing the picture quality seems to the best choice for you. And for those who rent lots of movie of discs, it is also a great way to copy the discs for future watching.

Here Pavtube Blu-ray Ripper is a professional program in making digital copy of Blu-ray. It can rip the latest 3D/2D Blu-ray and DVD and convert to various video formats for some popular smartphones and tablets as well as editing software. Simple interface and CUDA acceleration will bring you an easy but effective conversion. The following guide will show you detailed steps. (Another two programs can also do the job like ByteCopy and Video Converter Ultimate.)

Now you can have the trial version to try all the functions firstly, and then download the retail version to install it. (Mac users go to get Blu-ray Ripper for Mac).

How to convert/copy Jack the Giant Slayer 3D Blu-ray Disc to Hard Drive for enjoying


1. Import Blu-ray source.

Click "Load file" button to import the inserted Jack the Giant Slayer 3D Blu-ray disc. After few second, it will be imported successfully and you can preview the whole movie in the preview window.

Then, you need to select the subtitle and audio track for output. As blu-ray movie contains multiple audio and subtitle tracks, you could choose your favorite one for output.


Note: Force subtitle can be checked for output so as to help you to read the unknown language and fully enjoy the blu-ray.

2. Choose output format.

Now go to "Format" menu to select output format there. A variety of options are listed such as many portable devices, video editing software, various HD video formats, etc. Choose the one you desired.


Note: You can find the "Directly Copy" option there. It will support to backup 100% intact the blu-ray main movie with all multiple tracks preserved. And you will get one M2TS file for output. If you want to backup blu-ray, it is a good choice for you.


By the way, if you want, you can adjust output video and audio parameters according to your own needs. You can change bitrate, frame rate, channels, etc. Click "Settings" button to set output profiles.

3. Convert Jack the Giant Slayer 3D Blu-ray disc.

Now it's time to start conversion. Click big Convert button on the interface and then you will get a conversion dialogue box to show the exact progress, like time left, estimated size, state and so on.


Note: If you are bothered about waiting for conversion to finish, you can choose to check "shut down computer after conversion". Then just let it alone, you are free to go out to do anything you like.

Now you have copied Jack the Giant Slayer 3D Blu-ray onto your hard drive. With the best 3D Blu-ray Backup and copy tool, you can take your favorite blu-ray anywhere and enjoy them whenever you want to. Just try it now!

Meanwhile, there are many Money Saving Software Bundles, such as Blu-ray Ripper + DVD Creator for rip blu-ray and burn to DVD. You will get 35% off for bundled software. Go to find the one you need.

From: http://pc-mac-compatibility-issues.blogspot.com/2014/02/backup-3d-blu-ray-to-hard-drive.html