Showing posts with label Backup. Show all posts

Tuesday, July 21, 2015

Make 1:1 Backup of Copy Protected DVD on Mac OS X El Capitan

In the yearly cadence of OS releases, roughly every other one ends up being smaller — and El Capitan is the “small” one. But inside those releases are signposts that point to the future direction of the OS. With El Capitan, we have the usual performance improvements and bug fixes, but there are also a lot of app updates. And all of it works incredibly well. However, Mac users often go awry with Handbrake in copying DVDs on Mac computer. You may fall into these questions: “DVD cannot playback on Mac 10.11” “playing dvd on Mac after updated 10.11”. If you have the same questions, you can read this guide and get the best solutions. 

Hot Search: Blu-ray Tips | DVD Tips | Chromecast Tips | Roku Tips | PS4 Tips

Ever wondered to copy protected DVD on Mac OS X El Capitan flawlessly? Well, forget about the copyright. You know copying a legitimately purchased DVD for personal convenience is utterly legal. As long as your Mac DVD copy software cracks the built-in measures that thwart your from making a digital backup of a copyright protected DVD, you can easily create a DVD backup on your Mac computer. 

Here, Pavtube BDMagic for Mac is a good combination. This top Mac OS X El Capitan DVD Player copies protected Blu-ray and DVD movie to your Mac with highly quality. In that way you can play DVD movie on Mac OS X El Capitan without quality loss. The following guide tells how to copy/rip DVD movies to Mac OS X El Capitan HTPC with Pavtube BDMagic for Mac. 

Embraced with exclusively up-to-date DVD analysis technology, decrypting DVD will be accomplished impeccably with this Mac DVD ripper. Therefore, you can enjoy an unblemished DVD copying experience on Mac computer, regardless of any copy protection measures put on DVDs. Overall, the software is able to back up Blu-ray movies and commercial DVDs for Mac HTPC Media Center without quality loss or compress the BD and DVD movies to MOV, MP4, MKV, M4V,  etc. in perfect sync.) Read the review


Other Download: 
- Pavtube old official address: http://www.pavtube.cn/blu-ray-ripper-mac/
- Cnet Download: http://download.cnet.com/Pavtube-BDMagic/3000-7970_4-76177782.html

Make 1:1 Copy DVD to Watch Any DVD Movies via Mac OS X El Capitan
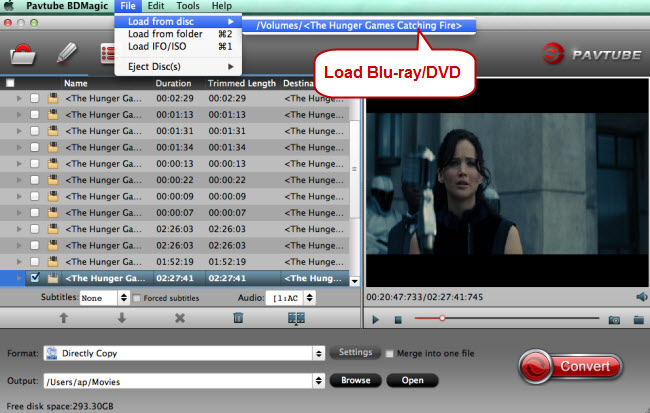
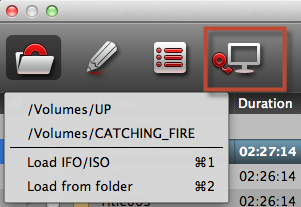
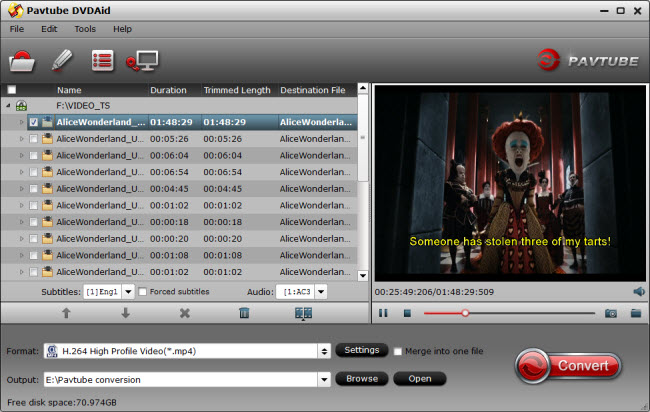
Step 1. Load DVDs

Run Mac OS X El Capitan converter on Mac, It work on both with Mac OS X 10.11 and 10.10 Yosemite perfectly. and load Blu-ray/DVD movies by clicking “File” > “Load from disc.” For Blu-ray import, an external or internal Blu-ray is required to read your Blu-ray disc.


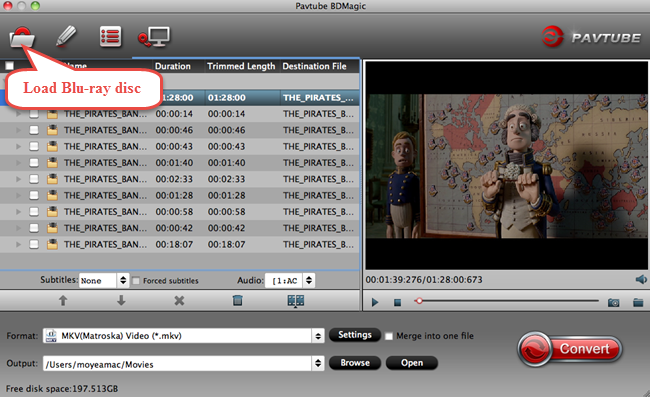
Step 2: Backup DVD to OS X El Capitan.

Make a full disc copy of DVD movie

Hit the top tool menu bar " icon to make a full disc copy of your original DVD movies.

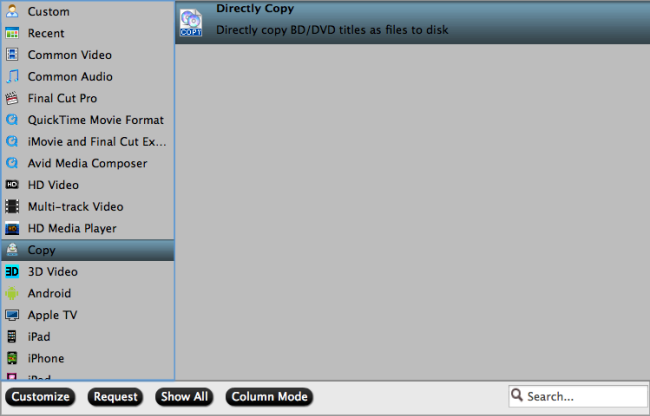
Copy only the main DVD movie

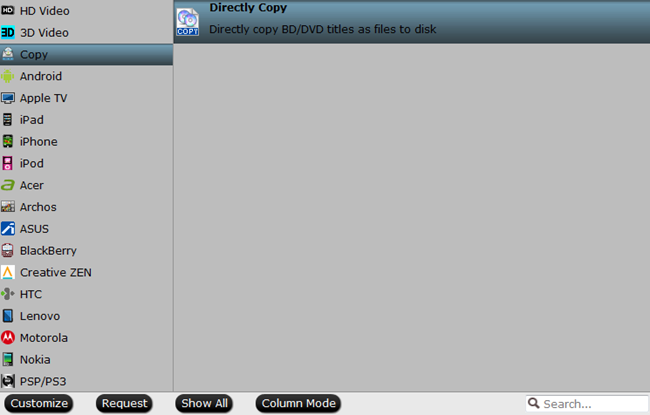
From "Format" drop-down list, go to "Copy" > "Direct Copy" and backup DVD movies in VOB format.


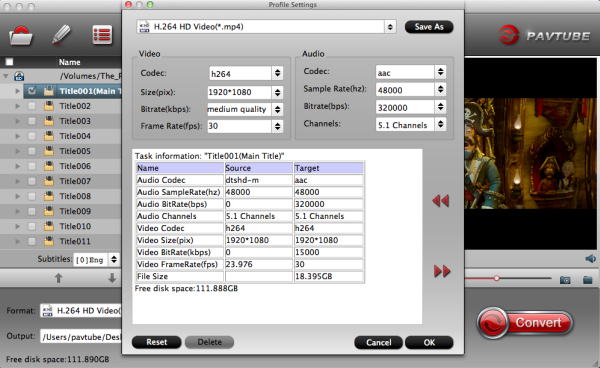
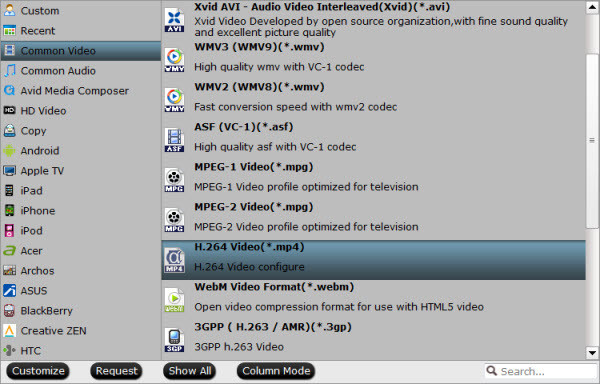
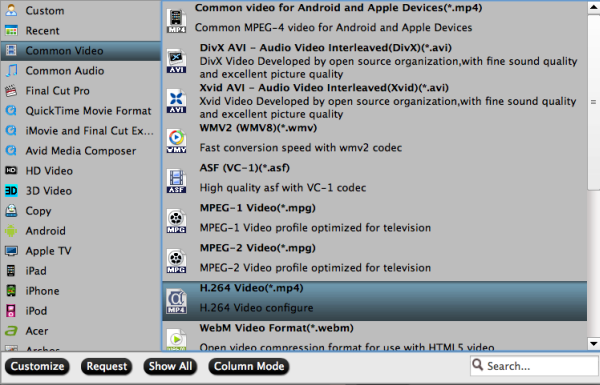
Convert DVD to MP4 for Mac 10.11

Mac can playback MP4 format well, so just head to the output format list to follow “HD Video” > “H.264 HD Video (*.mp4).”Learn Best Video Formats for Mac and Apple TV.


Tips: Here, we can recommend you Pavtube ByteCopy for Mac, you can get the container format with multiple audio tracks and subtitles included. Besides retaining multiple audio tracks and multiple subtitles in an video files without transcoding and quality loss. A simple guide about DVD to lossless MKV

Note: For more movie entertainment, read this Pavtube Softwares Comparison review to get more multimedia tools.
   
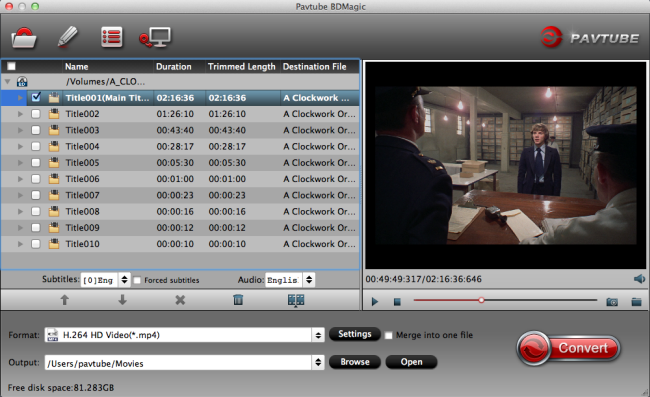
Step 3. Start ripping.

Click big “Convert” button to start conversion. It won’t take much time for conversion and then you will get the main content of the DVD. Once completed, hit “Open” button you will go to location of generated files. 

After you finished all the tasks, you can transfer the converted DVD files on Mac OS X El Capitan. Have fun! 

Below are the six major types of DVD copy protection approaches encoded on DVDs.

1.     Commercial DVD CSS encryption: A digital rights management (DRM) and encryption system employed on almost all commercially produced DVD discs, which prevents byte-for-byte copies of an MPEG stream from being playable.

2.     DVD Region Code Enhanced (RCE): A retroactive scheme to prevent the playing of one region's discs in another region, even if the disc was played in a region-free player.

3.     User operation prohibition (UOP): A form of use restriction used on video DVD discs and Blu-ray discs, which is used mainly for copyright notices or warnings.

4.     Sony ARccOS DVD protection: A copy-protection system made by Sony that is used on some DVDs. It deliberately creates corrupted sectors on the DVD, which cause copying software to produce errors.

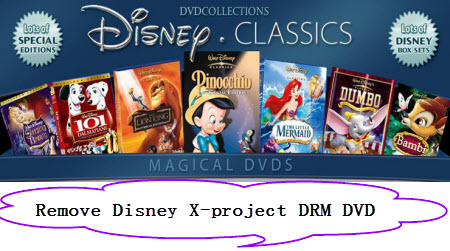
5.      Disney New DVD Copy Protection: As its name suggests, it’s new copy protection system originally developed by Disney, which leads to error while making DVD backup or the DVD copy file comes with big size, even larger than 50G. 

6.     The Analog Protection System (APS): Originally developed by Macrovision, this system works by adding pulses to analog video signals to negatively impact the AGC circuit of a recording device. 
   
Read More:
Source: http://multimediatips.jimdo.com/2015/07/22/copy-dvd-on-mac-os-x-el-capitan/

Monday, May 25, 2015

Rip DVDs on OS X and get movies onto your Mac Media server

Whether you have music DVDs, latest fantastic DVD movies and other DVDs, it’s worth your time to make sure that your investment doesn’t become scratched, lost, stolen, or otherwise useless. If you have a collection of DVDs, the last thing you probably want to do is swap them out every time you want to watch something. The solution, of course, is to rip them: to convert them to a digital format the same way you may have done in the past with your audio CDs. Hold on reading...


(For the sake of simplicity, I'm going to deal with Blu-ray Discs separately, so the tips I'm giving you are mainly for DVDs specifically.)

Copy protection

As we know, Commercial discs are encrypted to make copying them a little more difficult. The first part of this guide will show you how to bypass that encryption and maintaining original structure without loss, second part is Directly Copy only DVD Main Movie and Leave Out Extras. Thanks to copy protection and encryption on commercially produced DVDs and Blu-ray Discs, this isn't just as easy as popping them in and hitting an "Import DVD" button in iTunes, like it is for audio CDs.

First, it's worth noting that the Motion Picture Association of America (MPAA) and most content publishers say that you shouldn't copy, convert, or otherwise mess with the content you buy on DVDs and Blu-ray Discs for any reason. 

You Need: Pavtube BDMagic for Mac

Pavtube BDMagic for Mac is highly recommended as one of the best BD/DVD disc handling tools for Mac users on the market, integrates disc backing up and ripping skills to make it standout.

Features:

Mac Blu-ray Ripper + Mac Blu-ray 3D Ripper + Mac DVD ripper.
Directly Copy Blu-ray 3D/2D main movie without extras.
Full Disc Copy 3D/2D Blu-ray Disc with original disc structure.
Convert Blu-ray 3D/2D movies or ISO files to MP4, M4V, MOV, AVI, MKV files for iPad, ATV 3, iPhone, iTunes, QuickTime player, Galaxy Note, Samsung Galaxy Tab, Nexus devices, etc.
Convert BD/DVD to iMovie, Final Cut Express/Pro compatible video format.
Convert/rip/shrink/copy the latest releases of Blu-ray/DVD movies.
Support adding *.srt or *.ass subtitles in BD/DVD movies.

Price: $34.3 now

Requires: Mac OS X 10.10 Yosemite, 10.9 Mavericks, 10.8 Mountain Lion, 10.7 Lion, Snow Leopard10.6, Leopard 10.5

Overall, it can make a 1:1 copy of BD or DVD movies to your computer with all subtitles, audio streams and chapter information included. You could download it to take a try right now. 

How to rip DVDs on OS X and get movies onto your Mac Media server?

Option 1 - "Full Disc Copy" maintaining original structure without loss. 
  
Step 1. Directly download Pavtube BDMagic for Mac, Then install and drive it on Mac OS X (10.10 Yosemite include).
    
Step 2. Launch it and load your DVD movie from discs to the app, Click the quick button "Copy the entire disc" to start copying Blu-ray with original structure. 


Step 3. Click the “Browse” button to set output folder where you want to save the copied DVD movies. 
  

Step 4. Hit the copy the entire disc icon on this Top Blu-ray/DVD Backup tool main interface and start DVD backing up process.

Option-2: Directly Copy only DVD Main Movie and Leave Out Extras. 
   
Step 1. Load DVD movies.

Load DVD Disc to this Pavtube BDMagic for Mac, Launch it and click "Load from disc" button to import DVD movies.


Step 2. Choose Directly Copy DVD disc. 

Click "Format" bar, choose "Copy" > "Directly Copy" from the Format menu and then specify a folder to save the VOB files from DVD disc.


Step 3. Start DVD backup on Mac. 

Hit "Convert" button to start copying your DVD discs. When the copying work is done, you are able to click "Open" button to get the output .VOB files without any other extra structures or contents. 
  
Now, you don't need to worry about how to Backup DVDs on Mac and stream movies onto your Mac Media server. Hope you can find it more useful and helpful. Well worth a shot, in one word. 

Read More: 

Tuesday, May 19, 2015

Rip DVD “The Hobbit 3: The Battle of the Five Armies” to MP4/MOV/AVI on PC/Mac

Q: "I wanna backup a DVD movie on PC since “The Hobbit 3: The Battle of the Five Armies” is much important for me. Do you know how to lossless copy the Blu-ray into digital formats so that I can store in my HD forever? Thank you for any tip." 

The Hobbit: The Battle of the Five Armies (2014) is much important to movie lovers. Now, it can be DVDs for adding it into your movie collection at home and backup DVD on Mac OS X Yosemite or Windows 10. This article will discuss how to play The Hobbit 3: The Battle of the Five Armies DVD on PC/Mac. 

For Movie Fans: Top Robin Williams Comedy Movies List | Top Antonio Banderas Movies | 2015 New Disney Movies Reviews... 

Movie Information: The Hobbit: The Battle of the Five Armies (2014)


PG-13  |  144 min  |  Adventure, Fantasy  |  23 January 2015 (China) 
Bilbo and Company are forced to engage in a war against an array of combatants and keep the Lonely Mountain from falling into the hands of a rising darkness.
Director: Peter Jackson
Writers: Fran Walsh (screenplay), Philippa Boyens (screenplay), 3 more credits »
Stars: Ian McKellen, Martin Freeman, Richard Armitage | See full cast and crew »  
The Hobbit: The Battle of the Five Armies DVD release date: March 24, 2015 

Storyline

After the Dragon leaves the Lonely Mountain, the people of Lake-town see a threat coming. Orcs, dwarves, elves and people prepare for war. Bilbo sees Thorin going mad and tries to help. Meanwhile, Gandalf is rescued from the Necromancer's prison and his rescuers realize who the Necromancer is. 

A Good Choice to Rip DVD The Hobbit 3: The Battle of the Five Armies to MP4 MOV AVI WMV on PC/Mac

As you see, a professional DVD ripper is badly needed to remove region code and make personal DVD backups from The Hobbit 3: The Battle of the Five Armies DVD, or convert to a common video file. The best program I can recommend for handling The Hobbit 3: The Battle of the Five Armies DVD disc is Pavtube DVDAid

It takes everything from the DVD, including the chapters, extras, and subtitles. It comes with decent decrypting capability (removing CSS Copy-protections and DVD region codes including the latest DVD discs); provides high quality video output and considerate backup solution and specific format templates for iPad, iPhone 6, Apple TV, Xbox, PS4, Galaxy S6, etc. More than a powerful DVD ripper, it can also allows you to backup a DVD with original structures or just copy main movie from a DVD. Read the review
  
So much for the features of Pavtube DVDAid, the following post will guide you to rip and convert DVD The Hobbit: The Battle of the Five Armies to MP4, MOV, AVI and others for DVD backup and playback on PC/mobiles. For Mac users, Pavtube DVDAid for Mac is a helpful app to encode videos for further usage.

Step 1. Import DVD source files

Once you run the The Hobbit: The Battle of the Five Armies DVD Ripping software, click DVD disc to load DVD movie into the program. Select wanted subtitles and audio track if necessary.


Tips: For copying The Hobbit: The Battle of the Five Armies DVD discs, the button on the top of the main interface can help you to achieve the goal, which allows you to backup entire The Hobbit: The Battle of the Five Armies DVD with original structures. Alternatively, click “Format” bar, choose “Copy > Directly Copy”, you can copy The Hobbit: The Battle of the Five Armies DVD main movies only. 

Step 2. Choose output profile

Navigate the Format and click Common Video; MP4, MOV, AVI, WMV, MPEG-2, M4V are all the popular output formats for you.


Step 3. Start DVD backup and ripping

Once the above mentioned steps are finished, you can click “Convert” button to rip The Hobbit: The Battle of the Five Armies DVD movie to either the hard drive of your pc, or to your portable devices, like iPad, iPhone, Apple TV, Microsoft Surface tablet, etc. When the ripping task is completed, you can click “Open” button to get the ripped files of The Hobbit: The Battle of the Five Armies DVD files. Enjoy! 

Hot News for all Mac users! Pavtube Studio has launched a user-requested upgrade for all its Mac BD/DVD and package tools: DVDAid for Mac, BDMagic for Mac, ByteCopy for Mac, iMedia Converter for Mac to version 4.8.5.1, which focuses on the addition of the H.265 encoders and decoders.
  
Read More: 

Thursday, April 23, 2015

Remove Disney X-project DRM DVD on Windows 10/Yosemite

Look at the new kids' movies list and Disney Christmas movies list - Cinderella, Big Hero 6, Into the Woods, Maleficent, Muppets: Most Wanted and Marvel's Guardians of the Galaxy. Some of them are on DVD now. You may need some tools to handle those DVD movies to enjoy better entertainment or to avoid damage on your DVD discs. Have you thought of backing your Disney DVD Children Movie collection on your Windows 10 and Mac Yosemite? this guide will show you how to rip and copy Disney protected DVD for family movie backup, not only removing Disney x-project DRM copy protection on Windows 10 and Mac Yosemite, but also dealing with Disney DVD with 99 titles freely and easily. 


Thus, the freeware like Handbrake can only deal with the non-protected DVD movies. Also even some paid DVD ripping programs can’t successfully finish this task smoothly. Whether you are suffering from collateral damage of DVDs mishandled, or you meet problems when ripping and making backup of the recently released DVDs, if you want to copy Disney Disney Copy-Protected DVDs on Windows and Mac quickly and efficiently what you need is reliable DVD ripping software.(Read Top 10 Best DVD Ripper Programs Review). 

Here we strongly recommend Pavtube DVDAid. This DVD ripping software can always catch up with the latest copy protection variant and is cable of converting Disney DRM-Protected DVD to videos bypassing copy protection(without quality loss). With it, you can fast rip video/audio from Disney DVDs and convert them to MP4, MOV, AVI, WMV, FLV, MKV, VOB, MP3, OGG, WMA, etc. for playback on Windows 10 with ease. If you are Mac users, please turn to Pavtube DVDAid for Mac (Yosemite10.10 include). Now download the right version and start the conversion. 
  
How to Rip and Copy Disney DVD Movies on Windows 10 Effortlessly

Note: This guide below uses Windows screenshots to show you how to finish the conversion easily. The way to convert VOB to iTunes on Mac is the same, just get the Mac app Pavtube DVDAid for Mac. Read Mac OS X 10.10 Yosemite VS Windows 10
  
Step 1: Load Disney DVD

Insert your Disney DVD disc into your DVD-ROM, run the Disney DVD ripping software and click disc icon to load your movies. As you can see, you can preview the loaded DVD files in the right preview window and select DVD audio track/subtitle. 


Step 2: Choose output format

Navigate the Format and click Common Video or HD Video; MP4, MOV, M4V are all the popular formats for working on Windows 10 natively. If you want to play Disney DVD movies on a device, scan to find the icon of the device and select it to get videos with optimized settings that are fit for your device. 


Step 3: Start Disney DVD ripping

Finally click the Convert button under the preview window to begin converting Disney DVD to MP4, MOV, M4V for Windows 10. After encoding process has finished successfully, go into the destination directory to find the converted Disney DVD files. Now just enjoy them anywhere as you wish.

More information about Disney X-project DRM DVDs

A: What is Disney X-project DRM?

DRM, the abbreviation of Digital Rights Management, is a series of access control or copy protection technologies to inhibit uses of digital content that are not desired or intended by the content provider. 

Disney (The Walt Disney Company), a well-known DVD releaser and publisher, applies DRM for copy right protection. Accordingly, the latest protected DVD by Disney (as well as by Paramount and Warner) usually has 99 titles and the DVD movie size is larger than 40 GB, which makes it almost impossible to make DVD copy and backup. 

B: How to Judge If Your DVDs Are Protected by Disney Copy Protection System?

* Disney copy protected DVDs has 99 titles and the DVD movie size is larger than 40 GB. 
* The DVDs are not playable on your DVD player which is not matching for the protected DVDs. You have to look for another workable DVD player. 
* When you use common DVD backup tool to copy Disney protected DVDs, error message pops up or the program crashes. 
* The new copy protection will prevent the DVDs from ripping by general DVD ripping software and the videos converted from DVD will be out of order, scrambled or get stuck in a loop. 
* It may even shorten the life for DVD drive if wrong decoding scheme is misused.

Note: Please respect the copyright law in your country. It is illegal to rip or copy DVDs for commercial use. It is allowed to clone a copy of copyrighted material for your own use under the concept of Fair Use in most countries. Disney copy protection is widely used by famous film publishers such as Disney, Paramount and Warner. 

Now, you can get the top Disney DVD Ripper which enables you transfer DVD movie for Kids on Windows 10 and Mac Yosemite. You’re be able to transfer the Disney movies for viewing on the go. 

Read More: 

Wednesday, February 4, 2015

Rip Blu-ray/DVD movie collection of my family to MP4, MKV, AVI, DIVX, XVID on Mac

The article show you how to effortlessly digitize or rip Blu-ray/DVD movie collection of my family to MP4, MKV, AVI, DIVX, XVID on Mac for playing anywhere you like.

If you have a lot of Blu-ray and DVD videos, especially some movie collection of family, you can choose to convert them to digital formats for viewing on Mac and portable media players like iPad, iPhone. It is a smart way to reduce the need for physical copies and speed up the process of selecting a title. So nice, isn't it?

Rip Blu-ray/DVD movie collection of my family to MP4, MKV, AVI, DIVX, XVID on Mac

In this article, we'll show you how to effortlessly convert family movie collection to .MP4, .MKV, .AVI, .DIVX, .XVID videos on Mac for playing anywhere you want.

Step 1: What you will need:

a. You will need a BD/DVD drive
b. You need Blu-ray & DVD ripping & conversion/compression software.

Here Pavtube BDMagic for Mac is the most ideal choice to help you finish your Blu-ray/DVD digital conversion bypassing disc copy protection. I've tested the product with success. (Read Best Blu-ray Ripper for Mac Programs Review)

With it, you can convert Blu-ray/DVD to almost all regular video formats like MP4, MOV, MKV, FLV, WMV, AVI, etc. and even extract MP3, WMA, FLAC, OGG, etc. audio from Blu-ray/DVD. Plus, it offers optimized format preset for kinds of portable devices like iPhone, iPad, PS3, Samsung, Asus, etc to let you get videos with the best settings to fit your device. Furthermore, it allows you to copy your BD/DVD to hard drive with original structure or main movie only. Best of all, the built-in editor allows you to get the exact part and effect you want. Windows version is here. Have the program installed, grab your family movie collection and get ready to digitize.

Step 2: Ripping and converting your Blu-ray/DVD family movie collection

First, add Blu-ray DVD movies

Launch the best software to convert family movie collection. Then click the Disc button to load Blu-ray/DVD files to the program.


DVDFab Blu-ray Ripper (3D Plus) for Mac Yosemite

Secondly, choose output format

Click the "Format" drop down list to select MP4, MKV, AVI, etc format from "Common Video" as you want. Since this Blu-ray ripper provides optimal profiles for kinds of media devices, you can also select a proper format that best meets your needs.


mp4 video format

And by clicking Edit, you can trim, crop videos, adjust video effects, add watermarks, insert subtitles etc.

Finally, start Blu-ray/DVD conversion on Mac

The last step is to click Convert icon to rip family movie collection to .MP4, .MKV, .AVI, .DIVX, .XVID on Mac. When the conversion finishes, click Open to get the ripped videos.Well, that's it!

Now you have the ability to turn your entire family movie collection into digital formats that can be played with iPad, iPhone, VLC, etc without any hassles. Easy work on your new Mac OS X 10.9 Mavericks and 10.10 Yosemite!

Related articles:

Monday, February 2, 2015

Get the Best DVDFab Blu-ray Ripper (3D Plus) for MacOS Sierra Yosemite Alternative

DVDFab Blu-ray Ripper (3D Plus) for MacOS Sierra doesn't work on Yosemite? With the DVDFab alternative program, you can easily rip Blu-rays on Mac OS X Yosemite 10.10 as you like.

Due to the increasing demands of Blu-ray movie enjoyment on tablets or smartphones, also comes the demand for an easy-to-use Blu-ray ripping tool. DVDFab Blu-ray Ripper (3D Plus) for MacOS Sierra is one of the best choices which is able to rip any 2D Blu-rays and 3D Blu-rays to various 2D and 3D videos, in specific video formats for playback on specific display devices.


DVDFab Blu-ray Ripper (3D Plus) for Mac Yosemite Alternative

However, it is lacking of DVD ripping feature. The interface is not very intuitive and costs more than its alternatives. And some users found when upgraded to OS 10.10 and try to launch DVDFab, they only got an error "Not Compatible".

So what if you want to rip Blu-rays on Yosemite? In fact, there are many alternatives to DVDFab Blu-ray Ripper (3D Plus) for MacOS Sierra out there that allow you to make copies of your Blu-rays/DVDs and let you watch them the way you want to view them. Well, the best one we can recommend is Pavtube BDMagic for Mac/ByteCopy for Mac, which is fully compatible with MacOS Sierra.

It is an all-in-one Blu-ray Ripper, DVD Ripper, editor and copier. Let's have a look at what this excellent replacement of DVDFab Blu-ray Ripper (3D Plus) for Mac can do for you:
  • A user-friendly interface
  • Support latest Blu-ray and DVD discs
  • Supports numerous output file format like MP4, MOV, M4V, MP4, WMV, AVI, MPG, FLV, MKV, etc for different use
  • Support Full Disc Copy and Directly Copy main movie from BDs/DVDs
  • Customize your movies by trimming, cropping, adding watermarks and subtitles with built-in editing functions.
  • Easily preview Blu-ray/DVD videos in any format with built-in video player
What's more, ByteCopy for MacOS Sierra is also  a professional yet easy-to-use Multi-track BD/DVD ripping software application which can copy Blu-ray/DVD to multi-track MKV without quality loss. For DVD users, you can also find a DVDFab DVD Ripper for Mac Alternative.

How to use DVDFab Blu-ray Ripper (3D Plus) for MacOS Sierra Alternative to Rip Blu-ray movies on Yosemite

Step 1. Load Blu-ray movie files

Insert your Blu-ray disc into Blu-ray drive. Launch the top alternative to DVDFab Blu-ray Ripper (3D Plus) for MacOS Sierra Yosemite and click "Disc" button to import the Blu-ray movies.

DVDFab Blu-ray Ripper (3D Plus) for Mac Yosemite

Step 2. Choose output format

Clicking the Format bar, here you can select MOV, MPEG-4, MPEG-2, MKV, WMV... from the Common Video profile list as the target format. Or you can choose a preset for you device like iPad.

mp4 video format

Tip: You can also check the "Settings" box , and set video codec, video size, Bitrate, frame rate to get a decent video you want.

Step 3. Start the conversion

When all settings are done, what you need to do now is to click the big Convert button and the DVDFab Blu-ray Ripper (3D Plus) for Mac alternative program will begin ripping Blu-rays in Mac Yosemite 10.10 immediately.

Once the conversion finished, you can click "Open" to locate the Blu-ray rips. Then, you can play or share Blu-ray movies on Yosemite or iPhone, iPad, etc devices at ease with high quality.

Related articles:

Thursday, January 29, 2015

Backup DVD to portable 2TB hard drive for using on tablet/phone

In this article, we’ll show you how to effortlessly copy your DVD library to portable 2TB hard drive for using and playback on a tablet or smartphone anywhere you like.

DVD discs are always trapped on physical platters. If you want to watch something, you have to find the disc, slide it into a DVD player—or a computer with a DVD drive, then converting your DVD movie library to digital files for storage is a nice idea. Now you are in the right place, I will share my experience to backup my DVD to portable 2TB hard drive for using on a tablet or smartphone here.

Backup DVD to portable 2TB hard drive for using on tablet/phone

Recently, I have some Teenage Mutant Ninja Turtles Episodes in DVD discs and want to rip them for putting onto my portable 2TB hard drive since it has a lot of storage space and provides portability, which means I can use the converted files for playback freely on my tablet or smartphone.

The software I will use is Pavtube BDMagic for Mac, one of the best Blu-ray Rippers, which can rip and convert Blu-ray and DVD to almost all regular video formats like MP4, MOV, MKV, FLV, WMV, AVI, etc. for storage on my portable 2TB hard drive. In addition, it provides various video presets for certain devices to let your get videos with the best settings to fit my Galaxy Tab, Apple TV, iPad, iPhone, etc. Furthermore, this Blu-ray Ripper offers different options for quick backups. Follow the detailed operating steps:


Step 1. Import source media.

Launch the program (For Windows users: choose Pavtube BDMagic) and insert the DVD disc into the DVD-ROM. Click “Load file(s)” button to import DVD movie files. You can load a DVD disc, a DVD folder, or an IFO/ISO image file. At the bottom, you can select your desired subtitle and audio track.

Blu-ray to 2TB hard drive Ripper

Step 2. Select output format.

Click the Format bar and choose MKV, AVI, MOV, MP4, etc as the output video format in the category of “HD Video” to get 1080p video quality. You can also find lots of optimized profiles for many popular portable media devices including Galaxy Tab, Apple TV, iPad, iPhone and more.

best format for 2TB hard drive

Tips: 

a.  The built-in video editor allows you to easily get my desired video part and effects click “Edit” icon to trim your videos, also you can crop videos, adjust video effects, add watermarks, etc.

b. Hit Settings icon, you can adjust video and audio parameters of output files like video codec, audio codec, bit rate, frame rate, sample rate, audio channel, etc, so that you can get a decent video as you need.


Step 4. Start copying DVD movies to portable hard drive.

When back to the main interface, click the “Convert” button to start converting DVD movie to MP4 video for portable 2TB hard drive.

When the conversion finishes, click Open to get the ripped videos and enjoy them anywhere you like. In addition to portable hard drive, you can also backup DVD to personal networked library, Seagate Wireless Plus and e-library server.

Friday, January 23, 2015

Copy Blu-ray to hard disc/iPad in single or multi-track MP4

This article shows you how to convert and copy Blu-ray to mp4 format with remaining single track or multiple audio tracks for storage on hard disc or playback on iPad without limitations.

Is there a Tool that can rip a Blu-ray into one MP4 file files with only a single track or multiple audio tracks since I like to play it from a hard disc (my media center at home) and also from the iPad when being not at home? Anyway, mp4 and multi-track mp4 are my preferred video formats. One it to be done in a few steps and not using different programs. Any insights?

Copy Blu-ray to hard disc/iPad in single or multi-track MP4

Not all videos output from a multi-track Blu-ray can keep intact audio tracks in different languages. To have complete movie content yet unimpaired audio tracks after copying Blu-ray to mp4 for backing up on hard disc and watching on iPad with any language by switching to the desired one, just give a shot on Pavtube ByteCopy- best Blu-ray to MP4/Multi-track MP4 Converter. (Read ByteCopy review)

Overall,the program is easy to use for editing and conversion and makes great quality copies of my Blu-rays and DVDs. It can help you backup files from Blu-ray discs and standard DVDs to MP4 container format with preserving multiple audio tracks. It also enables you to convert Blu-ray/DVD disc contents to compatible mp4 format for most media players and mobile devices with ease by removing Blu-ray/DVD copy protections. Follow the step-by-step guide below.

Copy Blu-ray movie to (Multi-track) MP4 for backup on hard disc/iPad

Step 1. Free download Pavtube ByteCopy (Mac users get it here), install and launch it. Click the top left icon, load source file into this program from Blu-ray drive, Blu-ray folder or Blu-ray ISO. Ensure the Blu-ray Disc was in the drive before loading. It will check the main title by default; moreover, ISO files could also be recognized automatically so that you no longer need to run virtual drive to mount it.

Blu-ray to MP4/Multi-track MP4 Converter

Step 2. Click the "Format" option, here are two choices for you;

A. To output a single track, choose MPEG-4, H.264 MP4 from Common Video profile list. If you want to keep 1080p resolution as source movie, you can choose HD Video > H.264 HD Video(*.mp4) for backing up on hard disc later using.

If you wanna play the output videos on certain devices, a better choice is selecting the preset for device like iPad as the output format in the output box. What's more, this Blu-ray to MP4 Converter also allows you to customize video and audio parameters via clicking Settings button. The adjustable settings include codec, bit rate, frame rate, sample rate, audio channel.

B. To output multiple audio tracks, choose “Multi-track Video > Multi-track MP4 (*.mp4)”

Multi-track MP4 format

This profile extracts more than one audio track from source Blu-ray movies in saved MP4 files. And you are allowed to remove unwanted audio track by unchecking the “Check” box in front of each audio source.

Step 3. Hit the “Convert” button on Pavtube ByteCopy main UI to start ripping Blu-ray to single or multi-track MP4. Once the conversion process finishes, open output folder and locate the created (multi-track) MP4 movie for storage on hard disc or playback on iPad with a multi-track player.

Apart from multi-track mp4, you can also rip Blu-ray as well as DVD to multi-track mov, multi-track mkv and multi-track AVI for viewing. 
  • Add Subtitles to MP4 Video
  • Friday, December 26, 2014

    Enjoy "A Christmas Story" Blu-ray freely on Mac Pro

    Want to watch "A Christmas Story" Blu-ray movie on Mac Pro? Pavtube BDMagic for Mac provides perfect solution for ripping protected Xmas Blu-ray to Mac Pro supported video formats in few clicks.

    "I just got a Christmas themed Blu-ray movie disc: A Christmas Story and plan to watch this Christmas Blu-ray movie on my new Mac Pro. I know Mac Pro doesn’t recognize Blu-ray. I’m looking for a solution to convert Christmas Blu-ray disc to my Mac Pro and retain the HD quality as much as possible. Is there any wonderful Blu-ray ripping software there?"
    Enjoy "A Christmas Story" Blu-ray freely on Mac Pro

    Playing Blu-ray Discs on a Mac computer is not as easy as on a Windows PC, as not a current Mac computer is not equipped with an internal Blu-ray Disc Drive and no built-in Blu-ray playing software either. So as mentioned above, what you need is to rip and convert A Christmas Story Blu-ray movie to a video format fitting for Mac Pro.

    To reach you goal, Pavtube BDMagic for Mac is the one that will fulfill your needs. It meets up OS X system requirement on any level with powerful Blu-ray disc ripping ability. It combines Blu-ray Ripper, DVD Ripper into one, which can help you rip/convert any Blu-ray disc, including A Christmas Story Blu-ray disc to Mac Pro supported videos with excellent and unmatchable ripping-converting speed while preserving HD quality. And with the disc copy feature, you not only can copy the full BD disc, but also can copy the main movies without any extras on Mac as you want. (Read the review)

    How to Rip and Convert A Christmas Story Blu-ray to Mac Pro?

    Step 1. Load Blu-ray to the software

    Insert the Blu-ray disc to Blu-ray drive as the source file. Launch the top Blu-ray Ripper for Mac; click the disc button to load the entire Blu-ray disc for ripping.

    top Blu-ray Ripper for Mac

    Tip: If you have backed up the entire Blu-ray disc on hard drive with BDMV file structure, you can also load the BDMV folder for conversion on Mac.

    Step 2. Choose output format

    Click the Format bar and follow Common Video; MP4, MOV, AVI, MPEG, M4V... are all the popular output formats for you. This Mac Blu-ray Riper also has 150+ presets for almost all popular multimedia devices. You are allowed to choose one device as the output format as well.

    Also learn how to backup your Blu-ray to Computer HDD, NAS and Plex server.

    mp4 video format

    Tip: The Blu-ray movie has more than one audio tracks and subtitles. You can choose your preferred one from the "Subtitles", "Audio" options retained in the output video.

    Step 3. Adjust video and audio settings (Optional)

    This Mac Mavericks Blu-ray Converter allows users to adjust video and audio parameters to customize the output file quality. Click "Settings" button and then you can adjust video resolution, frame rate, bit rate, audio channel, etc.

    Step 4. Start ripping Blu-ray on Mac

    Click "Convert" button to start converting Blu-ray movie to Mac Pro. After conversion click "Open" to find converted movie, and then you can play the output video Mac Pro freely.

    Monday, December 22, 2014

    How to Copy and convert 2014 Christmas Blu-ray Releases to playbale videos

    This guide offers detailed steps on how to convert 2014 Christmas Blu-ray Releases to playbale videos on mainstream portable media player and make 1:1 or main movie copy of your Blu-ray discs.
     
    For movie fans, it would be a good time to search a list of all the different Christmas titles that could make Christmas holiday even more enjoyable. With so many wonderful movies available in Blu-ray, it is essential to know how to put those 2014 Christmas movies to mainstream media players or copy to hard drive for backup and enjoying at home or on the go.

    Copy 2014 Christmas Blu-ray Releases

    Before getting it done, check these 2014 popular Christmas Blu-ray titles below:

    It’s A Wonderful Life
    An angel helps a compassionate but despairingly frustrated businessman by showing what life would have been like if he never existed.

    This Christmas

    Christmastime drama centered around the Whitfield family's first holiday together in four years.

    The Santa Clause 3

    Santa, aka Scott Calvin, is faced with double-duty: how to keep his new family happy, and how to stop Jack Frost from taking over Christmas.

    Backup to the topic, to turn 2014 Christmas Blu-ray Releases to playbale videos, below we will throw a quick tutorial up, guaranteed to effortlessly backup 2014 Christmas Blu-ray to hard drive to keep them away from being damaged, and rip to virtually any format you need for watching.

    To help users out of this kind of problem, you need to remove the Blu-ray copy protection first. To do this, you can use Pavtube BDMagic, a professional Blu-ray ripping tool that can help you rip 2014 Christmas Blu-ray and DVD to MP4, MOV, FLV, MPEG, AVI, etc for playback on iPhone, iPad, iPod, PSP, QuickTime. More than that, it also enables you to make Blu-ray/DVD backup to USB, hard drive with original quality. Now just download the program and follow the steps below to finish your task in few minutes.

    How to Rip, Convert and Backup 2014 Christmas Blu-ray Effortlessly

    Step 1: Load 2014 Christmas Blu-ray movies into the program

    Once you run the 2014 Christmas Blu-ray Ripper (If you are running on Mac OS X(including Mavericks), please turn to BDMagic for Mac), click BD disc button to load Blu-ray movie up into the Blu ray ripping program.

    2014 Christmas Blu-ray Ripper

    Step 2. Decide Blu-ray Copy Mode

    A. Full Disc Copy Mode: Copy 2014 Christmas Blu-ray Disc to a full Blu-ray folder containing all the content in original BD.

    B. Directly Copy Mode: Backup 2014 Christmas Blu-ray Disc to a file with M2TS as filename extension. This mode enables copy movie only from Blu-ray discs, compared with former mode, save time in copying Blu-ray Disc and space to store the output M2TS file to make reasonable and practical use.

    Step 3: Choose an output video format

    If you wanna rip 2014 Christmas Blu-ray to your needed file types, you need specify a format as output format. Click on the dropdown menu of "Format", and then choose your needed one from the multiple output format presets. You can rip Blu-ray to MKV, MP4, MOV, WMV, or rip Blu-ray for playback on iPad, iPhone, PS Vita, Nook HD, Galaxy Tab and more other portable devices you can think of.

    playbale video format


    Tip: Click "Settings" button, then you are able to adjust all the settings in the following window to customize the output file quality, including codec, size, bit rate, frame rate, sample rate and audio channel.

    Step 4: Rip and copy 2014 Christmas (3D) Blu-ray movie

    Once the above mentioned steps are finished, you can click "Convert" button to copy 2014 Christmas Blu-ray movie to either the hard drive of your PC, or to your media players like QuickTime, 3D projectors or other 3D players.

    When the copying/ripping task is completed, you can click "Open" button to get the gernerated files of 2014 Christmas Blu-ray. Then, you can play, share 2014 Christmas Blu-ray with your families anywhere you want.