Sunday, May 10, 2015

ISO to Plex Solution - Play ISO files using Plex on Mac

Plex Media Server bridges the gap between your computer and your home theater, doing so with a visually appealing user interface that provides instant access to your media. Learn How to Start Plex. If you also have backup Blu-ray or DVD discs as ISO image files for storage on  Mac. you may have the same trouble: "Can I play ISO files using Plex on Mac?" As we know, the  ISO file format is an excellent file type for data storage and backup, especially suited to backup media like Blu-ray and DVD's. Fortunately, there is a quick workaround to fix the issue. this article shows how to convert and copy ISO files to Plex Media Sever on Mac easily and fast. 


The point here, Plex doesn't support ISO format streaming. Plex also makes it clear in its supported sources list - "Plex does not support the use of ISO, IMG, Video_TS, or other "disk image" formats." If you wish to use ISO files with Plex, it's recommended that you convert them to a compatible format.  Actually, it's not as difficult as you imagine. What you need is a just a common ISO converter like Pavtube ByteCopy for Mac

This top Plex ISO Converter can help you rip ISO to Plex supported video format fast while keeping the original video quality. Besides, it can also convert ISO/DVD/IFO/Video_TS to almost all regular video formats, including AVI, MOV, M4V, WMV, MPG, 3GP, FLV, F4V, etc. Get the ISO converter and follow the tips to finish your conversion. Read the review

Tool Download

Pavtube ByteCopy for Mac ($42) –Download a trial from HERE (Mac OS X 10.9 Mavericks, 10.8 Mountain Lion, 10.7 Lion, Snow Leopard10.6, Leopard 10.5, Yosemite 10.10). 

Alternative version for Windows (Windows 2003/XP/Vista/Windows 7/Windows 8/Windows 8.1/Windows 10). 

Hot!!! - (Now, you can get 50% OFF discount after liked our FaceBook.) More Money Saving Tips, you can Click Special Offer
  
Guide- Convert ISO to Plex Media Server playable file type on Mac

Step 1. Launch Pavtube ByteCopy for Mac and load disc.

Firstly you need an external blu-ray drive; there's no special requirements of the drive model as long as it's supported by your Mac. Click the top left icon and it will detect the inserted Blu-ray disc, click disc name to load them.
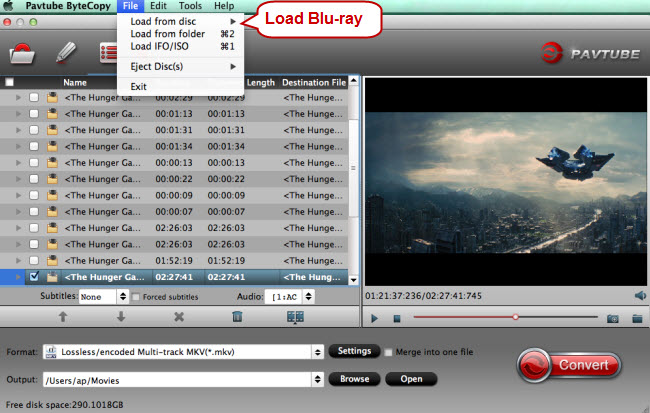


Step 2. Choose lossless format.

Click "Format" list and select "Multi-track Video>Lossless/encoded Multi-track MKV(*.mkv)" as below.
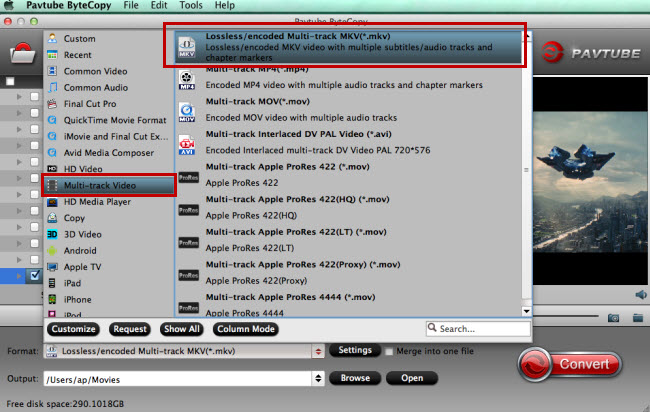


Step 3. Adjust V/A settings.

Click "Settings" to enter Multi-track video profile window; switch to "Video" and find the "Encode" box which is unchecked by default, so if you want a lossless MKV copy, do not touch it. The switch to "Audio", check wanted audio track; so does the "Subtitles".

Step 4. Start backing up Blu-rays to lossless MKV for Plex Media Server

Click the big "Convert" to start the conversion. It takes about 40 mins for my Macbook to backup a Blu-ray disc, but the conversion speed also depends on your computer configuration. My suggestion is not to play or edit videos when it's converting. After conversion, click "Open" or "Open output folder" to quick locate converted files.

Ok now the lossless MKV files are prepared; Add Movies to your hard drive and connect it to Plex Media Server, now you can enjoy ISO files on Plex without quality loss! 

Read more:

Thursday, May 7, 2015

2015 Mother's Day Deals: ByteCopy 50% OFF/Giveaway

With the coming of Mother's Day 2015, have you had any good idea of your gifts for your dear Mummy? Great news for all multimedia software users for the upcoming Mother's Day: Pavtube launches a big Mother's Day Promotion for all multimedia software users to celebrate Mother's Day until May 14th.


To commemorate Mother's Day, everybody who like our Facebook is welcome to get Pavtube ByteCopy v4.8.6.0 50% OFF, which is a powerful all-in-one utility integrated by DVD Ripper, Blu-ray Ripper, DVD Copy, Blu-ray Copy, Multi-track Blu-ray/DVD Ripper, Blu-ray/DVD Editor, etc. Or you can also get Pavtube ByeCopy as free gift if you Facebook Community activities. See other Mother's Day specials below:

2015 Pavtube Mother's Day Promotion

Promotion period: until May 14,2015

The promotion content:

1. Official Website 20% – 40% discount

a. List of 20% off Discount for all-in-one tools from May 10th to May 12th

Pavtube Video Converter Ultimate

All in one solution to convert Blu-ray, DVD, MP4, MOV, MKV, MXF, TiVo, JPEG, BMP, et to any video and audio format. The decoding and encoding of H.265/HEVC codec, create 3D movies from 2D or 3D resources is also supported by the program.

Pavtube iMedia Converter for Mac

A distinctive Mac video conversion tool to comprehensively handle all common SD and HD video, copy 2D/3D Blu-ray and standard DVD with original structure, convert all Blu-ray DVD collection to any video and audio format for all portable device.

b. List of 40% off discount video conversion tools on May 10th

Pavtube Video Converter for Mac (for Windows)

Have full access to SD videos,digital camcorder recordings, DVR videos on devices such as Apple/Android/Windows series, media players, game consoles and video editing programs.

Pavtube HD Video Converter for Mac (for Windows)

Turn Sony/Canon/JVC/Panasonic HD footage and 1080p/720p MKV, MOV, MXF, MTS, M2TS, M2T, TS, M4V, MP4, AVI, MPG, VOB, WMV, 3GP, FLV videos to any video format.

Pavtube MTS/M2TS Converter for Mac (for Windows)

Convert Sony/Canon/JVC/Panasonic recorded MTS/M2TS/M2T/TS/MOD/TOD footage to play on media players or edit with Premiere Pro, Avid Media Composer, Final Cut Pro, etc.

Pavtube MXF Converter for Mac (for Windows)

Converting MXF video files generated by Canon/Sony/Panasonic camcorders to various video formats such as H.264/MPEG-4, MKV, MP4, AVI, MPEG, WMV, FLV, SWF, F4V, etc.

Pavtube iMixMXF (for Windows)

Transcoding MXF video files to Multi-track Apple Prores MOV for Final Cut Pro or Multi-track MP4/MKV format for other video editing program and media playback devices.

Join Pavtube Facebook to enjoy 50% off discount and Giveaway

Still not satisfied with the promotions listed above, just visit Pavtube Facebook Official Community and join the 3 activities below for big discounts on more products.

a. Activities 1 on May 10th

Leave the most touching words you want to say to your mother on our official campaign pages and click "Like Us", we will send you a 50% discount coupon code for our Pavtube HD Video Converter for Mac (for Windows).

b. Activities 2 from May 7th to May 14th

Click to like Pavtube Facebook Official Home Page, you will gain a 50% off discount for the following products:

Pavtube Video Converter Ultimate & Pavtube iMedia Converter for Mac

Pavtube BDMagic for Mac(for Windows)

Pavtube ByteCopy for Mac

Pavtube DVDAid for Mac(for Windows)

Pavtube HD Video Converter for Mac(for Windows)

c. Activities 3 from May 7th to May 14th

In addition, users forward our post page and write a review for any of our products, email the screen-shots of your review to support@pavtube.com or macsupport@pavtube.com. We will pick out the first twenty reviews we receive and send the review writers one of your desired software from our product list for free.

Wish all mothers in the world have a happy, healthy and wonderful holiday!

To get more detailed information about the 2015 Mother’s Day Big Promotion, you can check the promotion link below:

http://www.multipelife.com/pavtube-2015-mothers-day-giveaway.html

Watch DVD on Gear VR with 3D SBS MP4/MKV in Oculus Cinema

Do you heard of Gear VR and got a new one yet? Usually Samsung’s Gear VR can work brilliant for us. It’s easy for users to play their own videos/movies using the Oculus Cinema. Have an extensive collection of DVDs, but face the problem: how to rip and convert DVD to MP4 Side-by-Side 3D Video for playback on Gear VR (Oculus Cinema)? If you want to convert DVD to 3D video, so as to play, share your DVD movies more conveniently, now just follow this article to finish the conversion while reserving the original 3D effect and video quality. (Learn Differences Between Anaglyph 3D and SBS 3D).


Samsung Gear VR by default supports most common file formats including MKV, MP4, AVI, and FLV. When it comes to playing 3D videos, Samsung Gear VR requires either side-by-side or top-to-bottom (top down), but most DVD are in the "frame packed" format. So the workaround is to download professional DVD ripping tool to rip the DVDs to Gear VR compatible videos so that you can enjoy your DVD movies in Gear VR with Oculus Cinema more conveniently. 

Here, we recommend you a top DVD Ripper for Gear VR - Pavtube DVDAid. With it, you can effortlessly rip your favorite DVD movie from DVD disc and output MP4 videos supported by Samsung Gear VR Unit/Innovator Edition with best quality easily. If you're using a Mac, please turn to Pavtube DVDAid for Mac, which allows you to convert DVD to Samsung Gear VR on Mac OS X (Yosemite and Mavericks included). 

Now download the right version according to your situation and check out the steps below.  


(Now, you can get 30% OFF discount after liked our FaceBook.)

Convert DVD movies to watch in Gear VR from Galaxy Note 4

Step 1. Import DVD movies

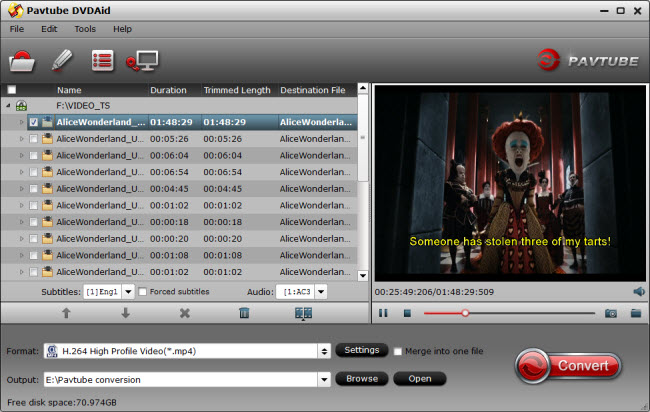
Insert the DVD disc into your DVD drive and launch the Gear VR DVD ripper. Click "Load DVD" to select and import the DVD movies you want to rip for Gear VR. ISO and IFO files are also supported.


Step 2. Select Gear VR preferred format 
  
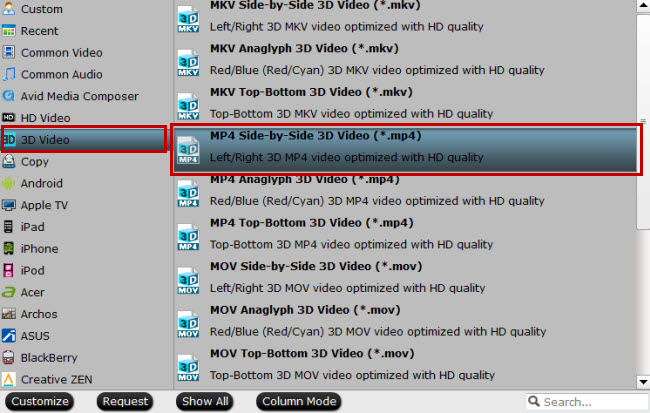
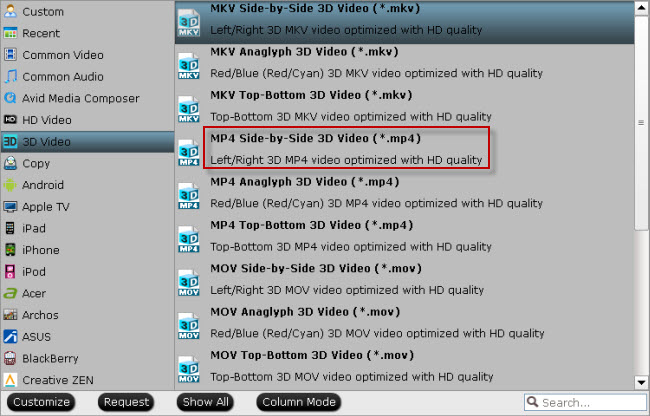
Click the "Format" bar to choose the output format for Galaxy Note 4 and Gear VR. Find "3D Video" catalogue, you will find several presets for Side-by-Side 3D, Top-Bottom 3D and Anaglyph 3D. You can choose the one according to your device specification. SBS MP4/MKV is usually the recommended one which is perfect for Gear VR. Then click "Settings" to adjust video codec, bit rate, frame rate, etc. if necessary. You can also rip DVD to Galaxy S6/S6 Edge in Gear VR. 


Tip- Profile Settings 

lick the "Settings" icon and you will go into interface named "Settings". You can adjust codec, aspect ratio, bitrate, frame rate, sample rate and audio channel as you like. For ripping DVD to view on Gear VR, 2D videos for the Cinema app should be in 720p (1280*720) with a higher bitrate around 5mbit/s. 
  
Step 3. Start to convert DVD to Gear VR

Now go to the last step: click "Convert" to begin ripping DVD to 3D SBS MP4/MKV video files. After the conversion, you can tap "Open" to locate the converted videos immediately. Then connect your Note 4 to computer and transfer the video files to your device for enjoyment on the go. Also learn how to set up Gear VR.

More Tips:

Monday, May 4, 2015

3 Methods of Copy a DVD Movie on Windows PC

There are lots of reasons why you might want to rip and copy a movie from a DVD and store it on your Windows PC. You might want to watch a new DVD on your iPad or tablet (which do not have DVD drives); you might just want to backup your expensive movie collection. In actually, DVDs can be duplicated by copying or burning them. It may be a good idea to copy your DVD Movie collection in case of damage or theft. In order to save your DVD collection you must first know how to copy a DVD movie. 


Here, we will cover some of the best tools for the job. If you are interested, don’t hesitate to read more.

Method 1: Copying DVD with Pavtube Free DVDAid

Free Download:


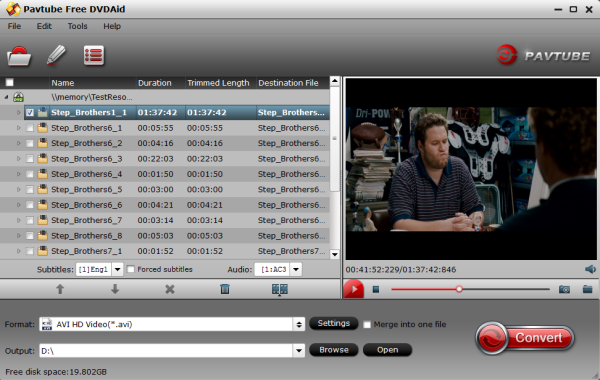
Step 1. Import DVD source. Insert one of DVD discs you need to convert and then double click the icon on the desktop to launch the software. Click "Import DVD" icon and select the DVD disc in the drop-down list.


Step 2. Click "Format" menu to choose "AVI HD Video(*.avi)" under "HD Video" option which is perfect for storing on hard drive and playing.

Step 3. Click "Settings" button on the interface you will do to video and audio parameters of output profiles.

Step 4. Now, you can free convert DVD to AVI format by clicking the "Convert" button. During the conversion starts.

More features about Free DVDAid:

1. Click "Edit" icon on the interface, you will be able to see every individual frame there, rotate and flip it. And what's more, you can cut off the undesired part, crop output size, edit output audio, and add subtitles, etc. Go to try it if you need.

2. Click "Option" icon on the interface and then go to Acceleration option, you can choose to check Enable GPU acceleration, which will help to speed up conversion. Here you can check your graphic card is supported or not.
With great decrypting capability, high quality video output and popular video format for outputing, Pavtube Free DVDAid ranks top on the list of free DVD ripping application. (Read the review). It will bring you great experience of converting DVD and you cannot suffer any video and audio out of sync issue.

Method 2: Copying with Pavtube DVDAid

Free Download:


As a software expert, Pavtube DVDAid is capable to rip and convert DVDs to more than 200 video and audio formats just for your enjoyment and entertainment. It support Windows2003/XP/Vista/Windows 7/Windows 8/Windows 8.1/Windows 10. The ways of Copy DVD movies is the same as the Free DVDAid, you can just click the same clips. If you want to editing some clips from DVD on Windows/Mac editing software, Pavtube DVDAid is your best choice. Read the review.  


The Pavtube DVDAid more features: "Directly Copy" will help you to 100% backup the intact main movie of DVD, and "Copy the entire disc" will support 1:1 backup the whole movie with original structure and chapter mark. It is a better way to copy DVD for playback and safekeeping.

It supports converting DVD to MP4/M4V files and has built-in the best compatible format for many devices and named after the certain device. So you just need to go to the certain device under format menu and choose a format. That is so easy.

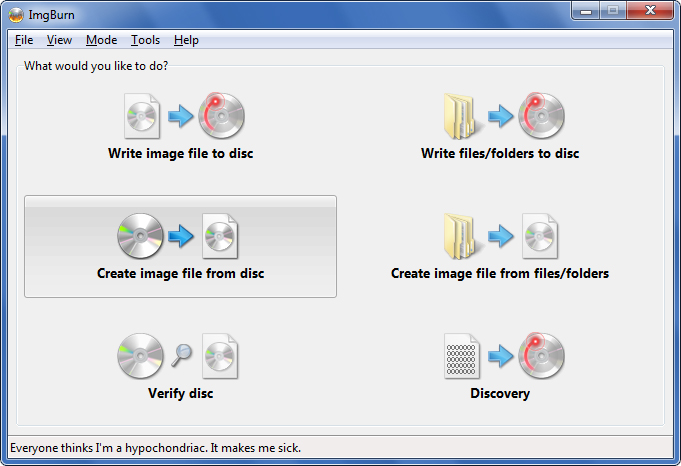
Method 3: Copying to a Disk with ImgBurn

1. Copy the DVD file from your hard drive to a disk. As with the above, there are various programs available for copying DVDs from a hard drive to a disk. There are also complete programs that will copy the DVD to your hard drive and to a disk from one application. 1 popular free program for burning a DVD to a disk is ImgBurn.


2. Download and install ImgBurn directly from the software's website. Before downloading check your computer's compatibility with the software.
3.Open ImgBurn from your "Start" menu.

4.Select "Browse" from the "File" menu on the first screen in ImgBurn.

5.Insert a blank writable DVD into your computer's drive. A DVD-R, DVD+RW or DVD-RW are all writeable DVDs. 

6.Select the blank DVD as the "Destination" on your current ImgBurn screen.

7. Click the "Write" icon resembling a paper and pencil. This can be found in the bottom right corner of your ImgBurn screen. The program will now burn your DVD to the disk. 

8.Test the DVD in your computer or DVD Player.

Editor’s Note

Although the above discussed method is very simple and straightforward when it comes to just copying the contents of the DVD discs. However, all free tools has its own limitation, the Pavtube DVDAid is your best choice for play DVDs on Windows PC.

Sunday, May 3, 2015

Convert 3D YIFY Torrents Movies to 3D TV for Enjoyment

You may know about many popular safe torrent sites, such as The Pirate Bay, Kickass, etc., but may not know about YIFY. The good new is that YIFY now uploads good quality prints in DVD, 720p, 1080p and 3D quality. They usually wait for the official release of movie DVDs or Blue-ray discs, and then they rip and encode the movie DVDs or Blu-rays to MP4 or MKV videos. This is what they always maintain movie torrents with high quality and smaller file size. In this guide, you will find the best way to Convert 3D YIFY Torrents Movies to 3D TV with side-by-side 3D MP4 or MKV format. 


3D YIFY Torrents Movies can be found and downloaded here

The Hobbit: The Battle of the Five Armies, Big Hero 6, Sin City A Dame to Kill For, Teenage Mutant Ninja Turtles, Lucy, Hercules, X-Men: Days of Future Past, Maleficent, Captain America: The Winter Soldier, The Amazing Spider-Man 2, Noah, The Lego Movie, Rio 2, 300 Rise of An Empire, Mr. Peabody and Sherman, Step Up All In, The Nut Job, The Boxtrolls, Transformers: Age of Extinction, The Legend of Hercules... 

If you download these 3D YIFY Torrents Movies, unplayable on 3DTV, or the YIFY movie videos have black stripes over & below the scene, Pavtube Video Converter Ultimate fits the bill. (Read review). It’s qualified to be the best 3D YIFY to 3DTV converter for Windows 10, which is available to convert downloaded 3D YIFY mkv videos to 3DTV compatible MP4/MKV format on Windows (10/8/7/XP) in couple of minutes with deliver crisp images and hi-fi audio quality in a few clicks. 

What’s more? Built-in more than 200 profile presets, this 3D YIFY Converter realizes SD/HD/4K videos to iPhone/iPad, Android/Windows devices conversion. It can also convert YIFY movie videos to various video formats and mobile devices including the latest iPhone 6/6 Plus and Samsung Galaxy S6/S6 Edge. 

Download 3D YIFY Video Converter:


How to Convert downloaded 3D YIFY movies to 3DTV for playing

After downloading the converter, install and run it. Note that this guide uses the screenshots of Video Converter Ultimate (Windows 10 included) version.

Step 1: Add 3D YIFY Downloads

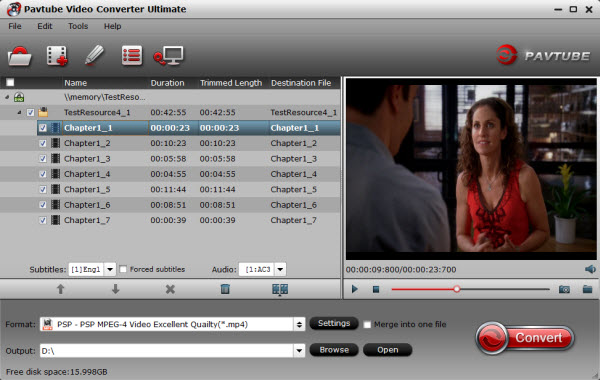
Click Add button to add 3D YIFY MKV videos to the program. You can also directly drag the video files into the program. And you can add multiple files to save your time for this program supports batch conversion.


Step 2: Edit or clip 3D YIFY movies (Optional)

Click “Edit” on the menu to trim, crop, add special effects to your source movies.

Step 3: Set output options

You can then select an output format and specify a directory on your computer to save the output files. From the Format bar, find “3D Video” catalogue, and choose either “MKV Side-by-Side 3D Video (*.mkv)” or “MP4 Side-by-Side 3D Video (*.mp4)” as output for converting 3D YIFY to side-by-side 3D MP4/MKV video. 


Step 4: Start 3D YIFY Conversion 

Click “Convert” button to start 3D YIFY to 3D MKV or MP4 conversion in side-by-side mode. Once the conversion finished, you are able to get the generated 3D MKV or MP4 files via clicking “Open” button with ease. Then, you can enjoy the 3D YIFY Torrents Movies on 3D TV on the sofa at the weekend. 

If you need to convert downloaded 3D YIFY movie videos or other videos to AVI, MOV, WMV, VOB, 3GP, H.265, H.264, MPEG etc., just use Pavtube Video Converter Ultimate!

Read More: 

Monday, April 27, 2015

Pavtube Video Converter for Mac Retail + Crack

Big news for all! Pavtube studio has announced that its hottest product Mac Video Converter has upgraded to latestversion 4.8.5.0. According to the official news, this updated product can decode the H.265/HEVC video codec well. In other words, it has become the hottest and comprehensive video converter for all Mac users!


What’s new in this upgraded version?
  • Fix the bug of breakdown when importing MXF and XAVC format.
  • H.265/HEVC decode well.
  • Solve the issues well for decoding basic codec
  • Support the VPx series codec perfectly


Main features:
  • Convert various video/audios as input and output.
  • So many popular editing tools and media players are available.
  • Easy operation workflow and faster conversion speed.
  • Extra acceleration function for Windows users.
  • Strong ability of setting and editing output vides.


Outstanding highlight for H.265/HEVC supported:

If you have more touched this new H.265 codec enough, you may know well about it. For H.264/MPEG-4 and H.265/HEVC, those two codec are said to double the date compression at the same level of video quality. This H.265 can be said as the Intro Time of 4K Generation. With the H.265 codec videos, we can get the higher definition and smaller vide size.

Pavtube Video Converter for Mac Version 4.8.5.0 ---Deserved to choose as your favorite!

Now this brand new video has updated to a more powerful one, new features like adding H.265/HEVC decode which can provide much higher quality than H.264, videos shooting under XAVC mode can be loaded flawless, more output items added to consider about the compatible with old system or devices. What’s more, we will not be disappointed with its’ original fast speed and easy operation.

Release Name: Pavtube Video Converter for Mac v4.8.5.0
Developer: Pavtube Studio
License: ShareWare
Language: English, Japanese, Chinese
Size: 31 MB
OS: Mac
Download: Pavtube Video Converter for Mac 4.8.5.0 Retail

Notes: Upgraded Windows version also provided for all Windows users

Another surprise for you! 

All of us can get 40% discount off on Pavtube Video Converter for Mac from FaceBook. before May, 1st, 2015. Come on!  

Learn More: http://www.multipelife.com/pavtube-video-converter-for-mac-upgrade.html

Thursday, April 23, 2015

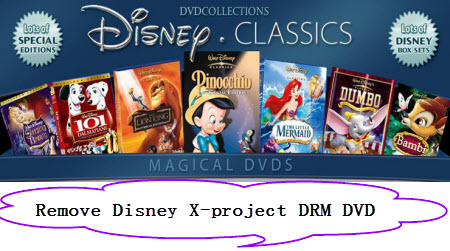
Remove Disney X-project DRM DVD on Windows 10/Yosemite

Look at the new kids' movies list and Disney Christmas movies list - Cinderella, Big Hero 6, Into the Woods, Maleficent, Muppets: Most Wanted and Marvel's Guardians of the Galaxy. Some of them are on DVD now. You may need some tools to handle those DVD movies to enjoy better entertainment or to avoid damage on your DVD discs. Have you thought of backing your Disney DVD Children Movie collection on your Windows 10 and Mac Yosemite? this guide will show you how to rip and copy Disney protected DVD for family movie backup, not only removing Disney x-project DRM copy protection on Windows 10 and Mac Yosemite, but also dealing with Disney DVD with 99 titles freely and easily. 


Thus, the freeware like Handbrake can only deal with the non-protected DVD movies. Also even some paid DVD ripping programs can’t successfully finish this task smoothly. Whether you are suffering from collateral damage of DVDs mishandled, or you meet problems when ripping and making backup of the recently released DVDs, if you want to copy Disney Disney Copy-Protected DVDs on Windows and Mac quickly and efficiently what you need is reliable DVD ripping software.(Read Top 10 Best DVD Ripper Programs Review). 

Here we strongly recommend Pavtube DVDAid. This DVD ripping software can always catch up with the latest copy protection variant and is cable of converting Disney DRM-Protected DVD to videos bypassing copy protection(without quality loss). With it, you can fast rip video/audio from Disney DVDs and convert them to MP4, MOV, AVI, WMV, FLV, MKV, VOB, MP3, OGG, WMA, etc. for playback on Windows 10 with ease. If you are Mac users, please turn to Pavtube DVDAid for Mac (Yosemite10.10 include). Now download the right version and start the conversion. 
  
How to Rip and Copy Disney DVD Movies on Windows 10 Effortlessly

Note: This guide below uses Windows screenshots to show you how to finish the conversion easily. The way to convert VOB to iTunes on Mac is the same, just get the Mac app Pavtube DVDAid for Mac. Read Mac OS X 10.10 Yosemite VS Windows 10
  
Step 1: Load Disney DVD

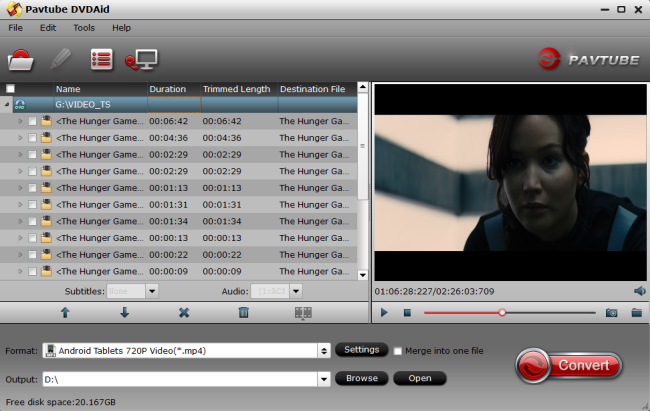
Insert your Disney DVD disc into your DVD-ROM, run the Disney DVD ripping software and click disc icon to load your movies. As you can see, you can preview the loaded DVD files in the right preview window and select DVD audio track/subtitle. 


Step 2: Choose output format

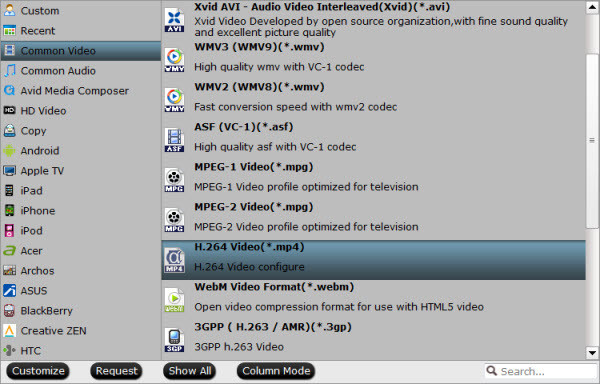
Navigate the Format and click Common Video or HD Video; MP4, MOV, M4V are all the popular formats for working on Windows 10 natively. If you want to play Disney DVD movies on a device, scan to find the icon of the device and select it to get videos with optimized settings that are fit for your device. 


Step 3: Start Disney DVD ripping

Finally click the Convert button under the preview window to begin converting Disney DVD to MP4, MOV, M4V for Windows 10. After encoding process has finished successfully, go into the destination directory to find the converted Disney DVD files. Now just enjoy them anywhere as you wish.

More information about Disney X-project DRM DVDs

A: What is Disney X-project DRM?

DRM, the abbreviation of Digital Rights Management, is a series of access control or copy protection technologies to inhibit uses of digital content that are not desired or intended by the content provider. 

Disney (The Walt Disney Company), a well-known DVD releaser and publisher, applies DRM for copy right protection. Accordingly, the latest protected DVD by Disney (as well as by Paramount and Warner) usually has 99 titles and the DVD movie size is larger than 40 GB, which makes it almost impossible to make DVD copy and backup. 

B: How to Judge If Your DVDs Are Protected by Disney Copy Protection System?

* Disney copy protected DVDs has 99 titles and the DVD movie size is larger than 40 GB. 
* The DVDs are not playable on your DVD player which is not matching for the protected DVDs. You have to look for another workable DVD player. 
* When you use common DVD backup tool to copy Disney protected DVDs, error message pops up or the program crashes. 
* The new copy protection will prevent the DVDs from ripping by general DVD ripping software and the videos converted from DVD will be out of order, scrambled or get stuck in a loop. 
* It may even shorten the life for DVD drive if wrong decoding scheme is misused.

Note: Please respect the copyright law in your country. It is illegal to rip or copy DVDs for commercial use. It is allowed to clone a copy of copyrighted material for your own use under the concept of Fair Use in most countries. Disney copy protection is widely used by famous film publishers such as Disney, Paramount and Warner. 

Now, you can get the top Disney DVD Ripper which enables you transfer DVD movie for Kids on Windows 10 and Mac Yosemite. You’re be able to transfer the Disney movies for viewing on the go. 

Read More: 

Monday, April 20, 2015

Record Blu-ray/DVD Digital Copy to Surface Hub Tablet

This tutorial will tell you how to remove DRM protection and record Blu-ray/DVD Digital Copy to non-protected video for play on Surface Hub Tablet.

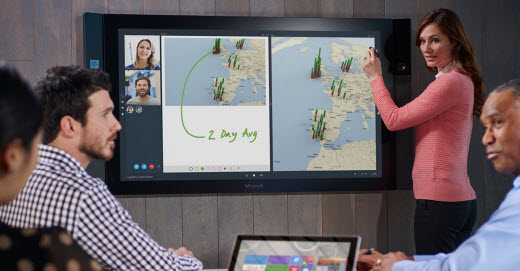
Microsoft has announced the Surface Hub, a huge 84in touch screen display with 4K resolution and stylus support. The screen is intended to be used as a next-generation whiteboard, but behind this basic function the Hub runs a full build of Windows 10, complete with applications optimised for the massive screen. In fact, the Surface Hub tablet has a great function is that you can enjoy Blu-ray/DVD Digital Copy to Surface Hub for on Meeting Room. Let’s have a look. 

Hot search: iTunes to Smart TV | iTunes to Home Theater System | iTunes to Gear VR | Upload iTunes to YouTube...


Literally, Digital Copies are DRM protected digital version of your Blu-rays. Usually it will be attached as an independent disc (DVD) with its code in your Blu-ray set; it requires a code to be playback on Windows, Mac, IOS devices or authorized tablets. However, if you really want to transfer Digital Copy movies to your Surface Hub, you will find it takes up large memory space; moreover, playback large files are always stuttering. 

To watch Digital Copy movies on your Surface Hub, you’ll have to remove the DRM protection first. Here, Pavtube ChewTune can strip DRM protection from Digital Copy movies, convert them to Surface Hub supported MP4 format and freely transfer converted DRM videos to Surface Hub Tablet. Note: Mac users can find Pavtube ChewTune for Mac here. 

Few tips before starting the Digital Copies to Surface Hub conversion: 

1. Make sure that your computer is authorized for source Digital Movies, that is
to say you can play the source iTunes movies in iTunes, play Amazon and digital copy using Windows Media Player.

2. Allow the audio driver installed during the Pavtube ChewTune installation.

3. Close iTunes before running the Pavtube DRM Removal Converter when converting iTunes M4V movies.
4. It would take as long as the source movie length for the whole DRM video to Surface Hub conversion process since Pavtube ChewTune records source DRM videos in 1:1 video and audio quality. 

How to Free from DRM Copy Protection and transfer Digital Copy Movies to Surface Hub?

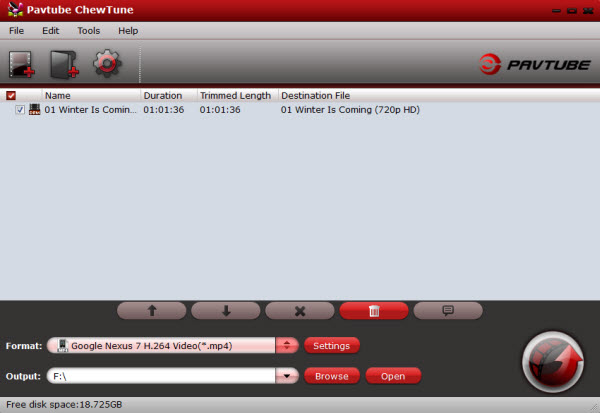
Step 1: Run Pavtube DRM Free tool, drag and drop the source DRM video from local computer to ChewTune. Or hit the “Add Video” button to import your Digital Copy. 


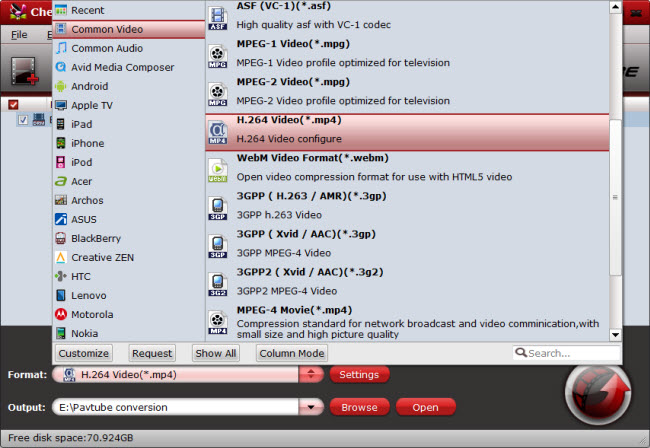
Step 2: Select an Surface Hub friendly format, e.g. H.264 .mp4 for conversion. There are optimized video format for Surface Hub. Basically the Common Video -> H.264 Video (*.mp4) is an universal format for Surface Hub. 


Tip: You are allowed to adjust profile parameters including video codec, display resolution, bitrate, frame rate, audio channels, etc. to achieve a satisfying enjoyment on Surface Hub. 

Step 4. Start Digital Copy movies to Surface Hub conversion.

Now click the big red icon to start stripping DRM from the added movies and convert them for your Surface Hub. The ChewTune will automatically start to play this video; this windows cannot be removed or closed during this period. 

When the conversion completes, click “Open output folder” to locate the converted Xperia compatible files. After that, you cantransfer Blu-ray/DVD Digital Copy to your Surface Hub and enjoy them with your gorgeous screen on the go. Just have fun! 

Read More: 

Thursday, April 16, 2015

Play HD/4K Videos on HTC One M9+ running Android 5.0 Lollipop

How to play HD/4K videos on HTC One M9+? You'd better to convert HD/4K videos (AVCHD MTS, MKV, H.265, etc,) to HTC One M9+ and the best video converter for HTC One M9+ is strongly recommended for HD/4K video to HTC One M9 Plus conversion.

Now here comes the fresh product – HTC One M9+! What's the story so far? HTC One M9+ is rumoured to have a 5.5-inch display, others have pinned the One M9+ to 5.2 inches, said to step up to Quad HD, with a 2560 x 1440 resolution, where the regular M9 model is 1920 * 1080 pixels, the latest Android 5.0 Lollipop, meaning that it is a can’t-miss stuff for entertainment, whether for video movies music playback. Well, this article will focus on how to play HD/4K videos on HTC One M9+ running Android 5.0 Lollipop.


HTC One M9 Plus File Formats Supported

From HTC One M9+ user manual or its product page, you will find the supported video format of HTC One M9+.
  • HTC One M9+ supported formats: DivX, XviD, H.264 MP4 and WMV 
  • HTC One M9+ video formats not supported: MKV, AVI, FLV, MTS, VOB, MOV, M4V, TiVo, ISO, Blu-ray, DVD, etc. 

How to Play HD/4K Videos on HTC One M9+

On Android related forums, many users have HTC One M9+ movie playback issues, most users want to transfer HD/4K movies or videos like MKV (downloaded online), AVCHD MTS/M2TS (recorded by camcorder or copied from Blu-ray discs), H.265 etc., to HTC One M9+ for playing freely, but failed, such as:

I have video of myself playing volleyball and I want to send video clips to college coaches. But when copying them from hard drive and save it to HTC, the M9 smartphone said the video format is not supported? Why?

If you prefer HTC One M9+ to watch HD movie videos at any time, HTC One M9+ limited supported video formats would be a headache. But don't worry, a professional HTC One M9+ Video Converter will make HTC One M9+ video formats issue quite easy for you.

Hot Search: Video to Galaxy Note Edge | Video to Windows Media Player | Video to Roku

Here Pavtube Video Converter Ultimate (Read why choose it) enables to convert any HD/4K videos to format HTC One M9+ support with vivid images and high quality audios. As an H.265/HEVC encoder, this best HD/4K video converter can also convert any videos to MPG, AVI, WMV, iPhone, iPad, Samsung Galaxy, Google Nexus, Windows Phone, Microsoft Surface, Xbox, PS3/4 and so on. Well, free download it and then we will start the HD/4K Videos to HTC One M9+ conversion.


Guide to convert HD/4K Videos to HTC One M9+

Step 1. Add HD/4K movie files.

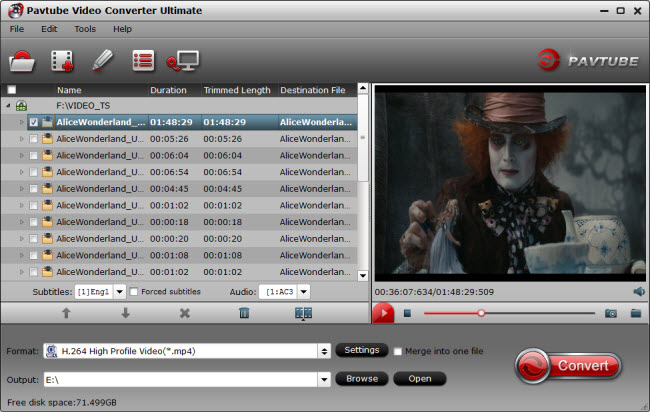
Open the converter, you will see its main interface, now you can directly drag and drop the movie files into it, or click “Add Video” to import common files you want to convert. Note that you can import multiple files at once thanks to batch conversion.


Step 2: Select HTC One M9+ supported format.

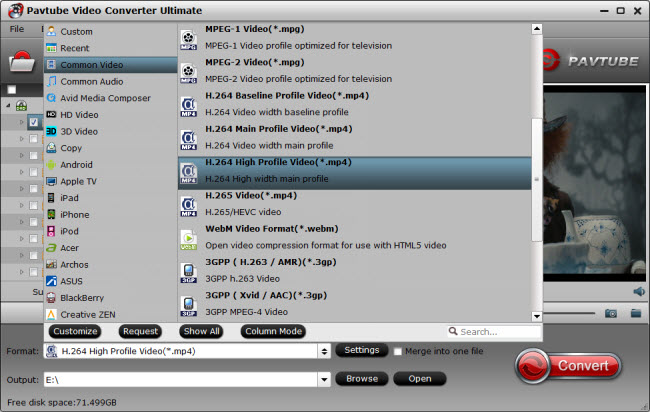
Click “Format” to select the output format for HTC smartphone. You can directly choose the device as output format to get videos with optimized settings, you can also choose “Common Video -> H.264 High Profile Video(*.mp4)″ as HTC One M9+ playable video format. Similarly, to convert some music to HTC One M9+, simply choose MP3 as the output audio format.


Tips: For playing HD/4K movies on HTC One M9+ with best quality, you can click “Settings” button to change the output video resolution by yourself. For example, if you’d like to play HD/4K on HTC One M9+, you can set the video resolution as 1280*720 (it’s 720p), 1920*1080 (it’s 1080p).

Step 3: Begin converting HD/4K movies to MP4 for HTC One M9+.

We have done most of job here, now click the big “Convert” button lower-right on the main window to start HD/4K to HTC One M9+ conversion. Once the conversion is finished, you could find the converted files by simply clicking “Open”. Then connect your HTC One M9+ with PC through the USB cable, then you transfer converted movies to HTC One M9+ without limitation.

Now freely enjoy HD/4K movie files on HTC One M9+ running Android 5.0 Lollipop!

Useful Tips: