Outline:When you convert a movie with Handbrake and find it has Video/Audio out of sync problem, what should you do? Read on this article and get the solution.
Feel annoying that the video is out of sync audio in Handbrake when you rip DVD and convert video on Pc/Mac with it? Don't worry, this tutorial will give you reasons and tell you how to solve Handbrake audio/video out of sync problem on your Mac and PC to ensure you a consistent and synchronous video and audio playback.
This is a question on a forum.:“So I first noticed the audio desynchrony problem was when I played Jurassic World. I ripped it from DVD that borrowed from my friend with Handbrake on my Mac. But when I started to play the movie, the audio would be way ahead of the video by a few seconds. It really grinded my ears. I tried to reboot my media player and the problem also existed. I really don’t know how to then. Please help!”
Actually, Video/Audio out of sync problem is common on many video help forums. People response that after they used Handbrake to rip their Blu-ray/DVD movies on Mac computer, the output movies often appear audio and video out of sync problem. Here, this article will explain to you the reason and show you the solution to solve Handbrake video/audio out of sync problem.
What factors result in Handbrake output video and audio out of sync
As a matter of fact, it is not Handbrake but the following cases that makes output audio not match up with video:
The media player
Many media players, such as Windows Media Player, VLC and QuickTime, sometimes have a hiccup. Take QuickTime for instance, it may have timescale issues when bringing MPEG source into Avid or Final Cut Pro, which may make audio go out of sync with video.
Encoding video with intense features
When you encode video with high references, CABAC Entropy coding, 8*8 transform, Pyramidal B-Frames on a slow computer with low configuration, your audio and video will be synced in a wrong way.
Restart your Mac system
If many apps are running at the same time on Mac, the intensive use of CPU maybe lead your system go abnormal. So the processes like video encoding, editing or downloading will not go smooth. This is where the audio/video out of sync happens.
Be careful of Xvid
When you rip Blu-ray/DVD on Mac and are selective in the codecs, you are not suggested to choose DivX and Xvid for them are regularly regarded as the crime culprit of audio/video sync issues.
How to solve Handbrake video/audio out of sync problem on Mac
Solution A: Reset the framerate in Handbrake
To make output audio match up with video, you can adjust the output framerate to match the source file’s framerate.
Open Handbrake on Mac; click "Source" to load the file that has an Audio/Video syncing issue. Click the drop-down menu Framerate to select an appropriate frame rate for your video. Then hit "Preview" button to check whether the syncing problem is fixed. If so, you can go on the encoding process with Handbrake. Or else, try another frame rate till the problem is solved.
 Solution B: Backward or forward audio to match up with video in players
Some media players support adjust audio timescale on Mac, like VLC. Choose this media player with backward or forward functions to make audio keep pace with video in order to solve audio and video out of sync problem.
In fact, there is simple way to solve Handbrake audio/video out of sync problem.
Solution C: With Handbrake Alternative on Mac to rip and backup Blu-ray/DVD with syncing audio and video
Using Pavtube iMedia Converter for Mac will be fix this problem with ease. This app not only can fix Handbrake audio/video desynchrony problem, but also can directly rip and backup Blu-ray/DVD/HD/4K video on Mac. In this app, you can choose any popular codec to avoid audio/video out of sync problem. And in profile settings, you can reset video and audio size, bitrate,etc to get better video quality. You can preserve 5.1 sound with it when outputting video. If you make full disc coy, it even can keep 7.1 sound.
This Handbrake Mac Alternative can easily rip Blu-ray/DVD/HD/4K video to H.265, M3U8, AVI, MOV, MP4, etc to provide compatibility with various devices, like iPad, Plex Server, iMovie and so on. And this programme for Mac is very easy to use:
Step 1: Download and install this Handbrake Mac Alternative:
Free download and install
Solution B: Backward or forward audio to match up with video in players
Some media players support adjust audio timescale on Mac, like VLC. Choose this media player with backward or forward functions to make audio keep pace with video in order to solve audio and video out of sync problem.
In fact, there is simple way to solve Handbrake audio/video out of sync problem.
Solution C: With Handbrake Alternative on Mac to rip and backup Blu-ray/DVD with syncing audio and video
Using Pavtube iMedia Converter for Mac will be fix this problem with ease. This app not only can fix Handbrake audio/video desynchrony problem, but also can directly rip and backup Blu-ray/DVD/HD/4K video on Mac. In this app, you can choose any popular codec to avoid audio/video out of sync problem. And in profile settings, you can reset video and audio size, bitrate,etc to get better video quality. You can preserve 5.1 sound with it when outputting video. If you make full disc coy, it even can keep 7.1 sound.
This Handbrake Mac Alternative can easily rip Blu-ray/DVD/HD/4K video to H.265, M3U8, AVI, MOV, MP4, etc to provide compatibility with various devices, like iPad, Plex Server, iMovie and so on. And this programme for Mac is very easy to use:
Step 1: Download and install this Handbrake Mac Alternative:
Free download and install

 Other Download:
- Pavtube old official address: http://www.pavtube.cn/imedia-converter-mac/
- Cnet Download: http://download.cnet.com/Pavtube-iMedia-Converter/3000-2194_4-76177788.html
Step 2: Load video to app and select format
Load the Handbrake file with audio/video out of sync problem from “File” icon. Or you can directly import Blu-ray/DVD movies into it to rip and backup for avoiding audio and video desynchrony problem. In “Format’ bar, select the output video format you want. This app offers you plenty of video/audio formats.
Step 3: Adjust video/audio parameters and start conversion
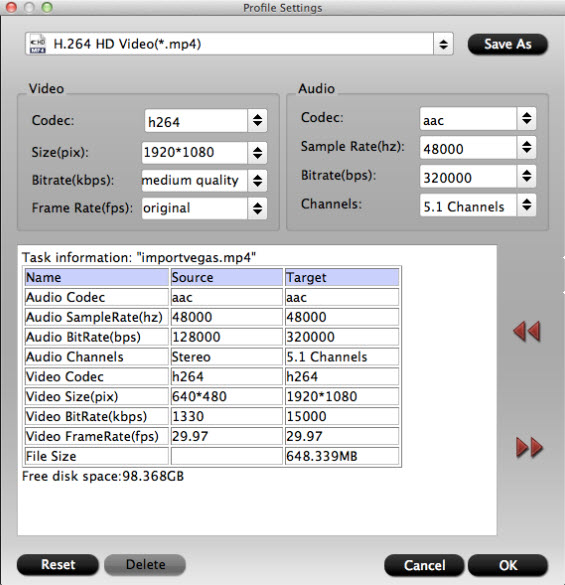
This is the most important step to fix or avoid Handbrake audio/video out of sync problem. Open “Profile Settings”, you can adjust video framerate, bitate and audio sample rate, bitrate as the source movie. Finally, click “Convert” to start fix Handbrake audio/video out of sync problem.
Other Download:
- Pavtube old official address: http://www.pavtube.cn/imedia-converter-mac/
- Cnet Download: http://download.cnet.com/Pavtube-iMedia-Converter/3000-2194_4-76177788.html
Step 2: Load video to app and select format
Load the Handbrake file with audio/video out of sync problem from “File” icon. Or you can directly import Blu-ray/DVD movies into it to rip and backup for avoiding audio and video desynchrony problem. In “Format’ bar, select the output video format you want. This app offers you plenty of video/audio formats.
Step 3: Adjust video/audio parameters and start conversion
This is the most important step to fix or avoid Handbrake audio/video out of sync problem. Open “Profile Settings”, you can adjust video framerate, bitate and audio sample rate, bitrate as the source movie. Finally, click “Convert” to start fix Handbrake audio/video out of sync problem.
 Now, you can enjoy your movie smoothly. With Handbrake Mac Alternative, you can optionally convert the newest movies in 2015 and get a video with syncing audio and video.
Related Article:
Source: http://movietopix.jimdo.com/2015/07/22/solve-handbrake-audio-video-out-of-sync-problem/
Now, you can enjoy your movie smoothly. With Handbrake Mac Alternative, you can optionally convert the newest movies in 2015 and get a video with syncing audio and video.
Related Article:
Source: http://movietopix.jimdo.com/2015/07/22/solve-handbrake-audio-video-out-of-sync-problem/
Convert universal AVI to MP4/WMV for playback on XBMC? This AVI to XBMC Tutorial teaches convert AVI to XBMC video format with fast speed.XBMC has been the most popular media player that can be used to build a home theater system. Although XBMC says that it can play a plenty of media formats including AVI, we still easily find complaints about XBMC won't play AVI issue:The people who have developed XBMC have done a bang-up job, by packaging a nice interface along with a great platform for playing all sorts of videos and even being able to load games. I started using XBMC a few days ago, but now I am frustrated because I couldn't get some AVI files to play. They would act like they were going to start, but after a second or so, they would just stop. I was pulling out what little hair I had left.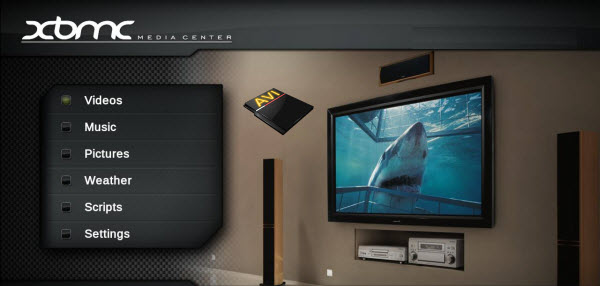 In fact, XBMC allows users to play AVI files, but the condition is not that stable. Whether we can play AVI on XBMC or not, it mainly depends on the video/audio codec included in the AVI video. So, the best way to get XBMC play AVI movie is to convert AVI to XBMC more compatible formats.Easy Solution to Play AVI on XBMC SmoothlyThere is a simple tool with which you can do AVI to XBMC converting without the need to know any code knowledge: Pavtube Video Converter Ultimate. This AVI to XBMC Converter helps users to convert AVI to any XBMC supported video formats, be it H.264, MPEG4, MKV, or WMV2, WM3, enabling them to play AVI on XBMC. (Read Best Video Converter Ultimate review). Note: For those who want to watch videos in other formats, such as MKV, MOV, FLV,and etc on mobile devices besides XBMC like iPhone, iPad, Android, XBox, PS3 and etc, eg. AVI to Galaxy Tab S, AVI to iPhone 6 Plus, AVI to PS4and etc, this video converter, enables conversion with fast speed and no quality loss. Free Download this Top AVI to XBMC Converter:
 Other Download:- Pavtube old official address: http://www.pavtube.cn/blu-ray-video-converter-ultimate/- Cnet Download: http://download.cnet.com/Pavtube-Video-Converter-Ultimate/3000-2194_4-75938564.htmlHow to Play AVI on XBMC with AVI on XBMC ConverterStep 1. Start AVI to XBMC Converter(Mac version is here), drag and drop the AVI files to the software window to import.
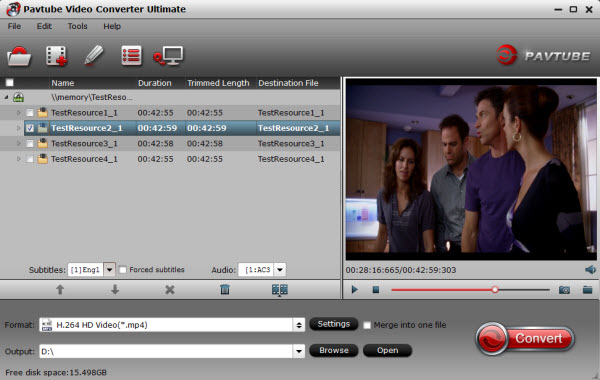 Step 2. After the files are added, click Format > HD Video and set output video format as mp4. The reason mp4 is the target format is that by packing the videos in mp4, the file size will be reasonable small and the video quality remains. WMV is also compatible.
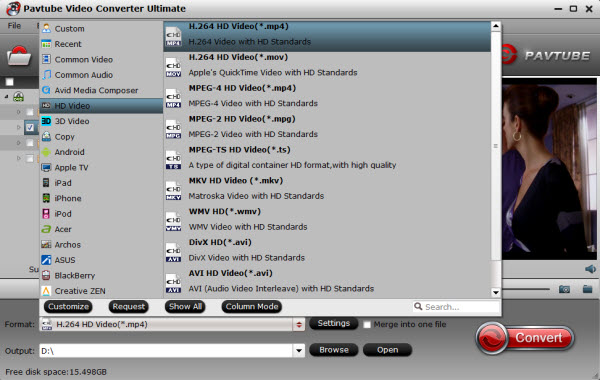 Tips: There are also some optional tinkering you can take to make the videos look better on a HDTV screen, such as changing the aspect ratio or specifying the video resolution. Just click the Settings icon to do it.Step 3. Finally, hit the Convert button to star converting AVI to MP4 for XBMC playback.After the conversion is completed, transfer the converted videos to XBMC library. Now you can enjoy your AVI movies with XBMC. More related:
Play Anime DVD movies with VLC player on Macbook
Rip DTS-HD track on Blu-ray to FLAC 5.1 audio for playback using Plex
Enable Blu-ray/DVD playback on Mac Mini HTPC with XBMC
Play Blu-rays with Amazon Fire TV via Plex
How Do I Upload Unbroken DVD on Facebook?
Tips: There are also some optional tinkering you can take to make the videos look better on a HDTV screen, such as changing the aspect ratio or specifying the video resolution. Just click the Settings icon to do it.Step 3. Finally, hit the Convert button to star converting AVI to MP4 for XBMC playback.After the conversion is completed, transfer the converted videos to XBMC library. Now you can enjoy your AVI movies with XBMC. More related:
Play Anime DVD movies with VLC player on Macbook
Rip DTS-HD track on Blu-ray to FLAC 5.1 audio for playback using Plex
Enable Blu-ray/DVD playback on Mac Mini HTPC with XBMC
Play Blu-rays with Amazon Fire TV via Plex
How Do I Upload Unbroken DVD on Facebook?
Thanksgiving Day is coming. Some of you are probably planning the Thanksgiving menus for your family while some are ready for selecting the best Thanksgiving present for their parents. With great blessing and best wishes, Pavtube Studio also prepared a big gift for their consumer - Thanksgiving Promotion 2015 to celebrate Thanksgiving Day with our friends. Focusing on product quality and customer needs, Pavtube offers up to 40% discount for hot products to reward our customers. Thanksgiving Day always comes with movies. I believe you must have prepared some Thanksgiving movies for enjoy with your family after dinner. With this wish, how can you bear the incompatibility issue when playing Thanksgiving Blu-ray/DVD movies on your HD TV, iPad, 4K Projector, etc. To avoid the embarrassing situation, you’d better rip the Blu-ray/DVD movies to your multimedia players with most compatible format and specs by usingPavtube BDMagic for Windows / MacPavtube DVDAid for Windows / MacPavtube ByteCopy for Windows / MacWhen enjoying the Thanksgiving movies and having the Thanksgiving dinner together, how can you not record the scene to remember the warm time? After you record the happy time, you maybe want to edit the shooting in iMovie, FCP, Premiere Pro CC, etc before you sent it to your other family members or share it on Facebook. While putting the shoot into video editing program, you probably need the help of Pavtube Video Converter Ultimate and iMedia Converter for Mac, which can convert your HD/4K shoot to H.265 MKV/MP4, HD MP4, QuickTime, MOV, ProRes, AIC, DNxHD, MPEG-2, WMV, H.264, MPEG-4, etc. for your FCP X, iMovie, Premiere Pro CC, Sony Vegas Pro 13, Windows Media Player, VLC, Youtube, etc. On Windows 10/8.1/8/7/XP and Mac OS X 10.11 El Capitan, 10.10 Yosemite, 10.9 Mavericks, 10.8 Mountain Lion, 10.7, 10.6, 10.5.Pavtube Video/BD/DVD software can convert Blu-ray/DVD, 4K/SD/HD video in any format to H.265 MP4/MKV, M3U8, MP4, MOV, MKV, AVI, M4V, etc. Especially, ByteCopy can rip Blu-ray/DVD to lossless MKV keeping multi-track subtitle/audio and all chapter markers. What’s more, Pavtube adds optimized preset profile for main digital products, like TV series, iPad, iPhone, Samsung, Sony, PS3/PSP, Xbox One/360, Android Tablet/Phone, Surface, etc. Hot Search: Blu-ray Tips | DVD Tips | Chromecast Tips | Roku Tips | PS4 TipsAll of the products can be get now at up to 40% off discount. Below is the list:1. 40% OFF Pavtube DVDAid for Windows/MacOriginal price: $35Now: $21Reasons to choose Pavtube DVDAid 2. 30% OFF Pavtube BDMagic for Windows/MacOriginal price: $49Now: $34.3Reasons to choose Pavtube BDMagic 3. 20% OFF Pavtube ByteCopy for Windows/Mac Original price: $42Now: $33.6Reasons to choose Pavtube ByteCopy 4. 20% OFF Pavtube Video Converter Ultimate for Windows/MacOriginal price: $65Now: $52 You won’t get a Blu-ray/DVD Software at such low price in normal days. So if you have a plan to purchase a BD/DVD/Video Converter in the near future, why not push the schedule forward and get it in Pavtube Thanksgiving Promotion activity.Additional: To help you make a wise choice, I did a deep review and comparison between the four backup tools. You can check out the differences and then choose the favorite to create high quality Blu-ray/DVD/ISO/4K/HD Video and Movie backups: Pavtube Softwares Comparison: ByteCopy vs BDMagic vs DVDAid vs Video Converter UltimateRelated Guides1. Pavtube DVDAid for Windows/Mac Guides
2. Pavtube BDMagic for Windows/Mac Guides
3. Pavtube ByteCopy for Windows/Mac Guides
4. Pavtube Video Converter Ultimate for Windows/Mac Guides
That’s All!PS. Have more questions about how to download, buy and use our Blu-ray/DVD Ripper, various Video Converter programs, please feel free to contact us>> or leave a message on our Official Facebook.
Thanksgiving Day always comes with movies. I believe you must have prepared some Thanksgiving movies for enjoy with your family after dinner. With this wish, how can you bear the incompatibility issue when playing Thanksgiving Blu-ray/DVD movies on your HD TV, iPad, 4K Projector, etc. To avoid the embarrassing situation, you’d better rip the Blu-ray/DVD movies to your multimedia players with most compatible format and specs by usingPavtube BDMagic for Windows / MacPavtube DVDAid for Windows / MacPavtube ByteCopy for Windows / MacWhen enjoying the Thanksgiving movies and having the Thanksgiving dinner together, how can you not record the scene to remember the warm time? After you record the happy time, you maybe want to edit the shooting in iMovie, FCP, Premiere Pro CC, etc before you sent it to your other family members or share it on Facebook. While putting the shoot into video editing program, you probably need the help of Pavtube Video Converter Ultimate and iMedia Converter for Mac, which can convert your HD/4K shoot to H.265 MKV/MP4, HD MP4, QuickTime, MOV, ProRes, AIC, DNxHD, MPEG-2, WMV, H.264, MPEG-4, etc. for your FCP X, iMovie, Premiere Pro CC, Sony Vegas Pro 13, Windows Media Player, VLC, Youtube, etc. On Windows 10/8.1/8/7/XP and Mac OS X 10.11 El Capitan, 10.10 Yosemite, 10.9 Mavericks, 10.8 Mountain Lion, 10.7, 10.6, 10.5.Pavtube Video/BD/DVD software can convert Blu-ray/DVD, 4K/SD/HD video in any format to H.265 MP4/MKV, M3U8, MP4, MOV, MKV, AVI, M4V, etc. Especially, ByteCopy can rip Blu-ray/DVD to lossless MKV keeping multi-track subtitle/audio and all chapter markers. What’s more, Pavtube adds optimized preset profile for main digital products, like TV series, iPad, iPhone, Samsung, Sony, PS3/PSP, Xbox One/360, Android Tablet/Phone, Surface, etc. Hot Search: Blu-ray Tips | DVD Tips | Chromecast Tips | Roku Tips | PS4 TipsAll of the products can be get now at up to 40% off discount. Below is the list:1. 40% OFF Pavtube DVDAid for Windows/MacOriginal price: $35Now: $21Reasons to choose Pavtube DVDAid 2. 30% OFF Pavtube BDMagic for Windows/MacOriginal price: $49Now: $34.3Reasons to choose Pavtube BDMagic 3. 20% OFF Pavtube ByteCopy for Windows/Mac Original price: $42Now: $33.6Reasons to choose Pavtube ByteCopy 4. 20% OFF Pavtube Video Converter Ultimate for Windows/MacOriginal price: $65Now: $52 You won’t get a Blu-ray/DVD Software at such low price in normal days. So if you have a plan to purchase a BD/DVD/Video Converter in the near future, why not push the schedule forward and get it in Pavtube Thanksgiving Promotion activity.Additional: To help you make a wise choice, I did a deep review and comparison between the four backup tools. You can check out the differences and then choose the favorite to create high quality Blu-ray/DVD/ISO/4K/HD Video and Movie backups: Pavtube Softwares Comparison: ByteCopy vs BDMagic vs DVDAid vs Video Converter UltimateRelated Guides1. Pavtube DVDAid for Windows/Mac Guides
2. Pavtube BDMagic for Windows/Mac Guides
3. Pavtube ByteCopy for Windows/Mac Guides
4. Pavtube Video Converter Ultimate for Windows/Mac Guides
That’s All!PS. Have more questions about how to download, buy and use our Blu-ray/DVD Ripper, various Video Converter programs, please feel free to contact us>> or leave a message on our Official Facebook.
Wanna know how to rip and backup DVD to Synology DS216play NAS via Mac OS X El Capitan without any quality loss? Well, with just a professional Mac DVD ripper, it could be done."Synology provides high value storage solutions for home and business users. We designed the DS416 to be an affordable, all-in-one NAS server that's optimized for encryption and sensitive data transmission," said Jason Bonoan Synology marketing manager.  Synology DiskStation DS216play is a two-bay feature-rich NAS with powerful multimedia processing and real-time transcoding of 4K Ultra HD source content, perfect for multimedia and file sharing. While, Synology DS216play NAS can’t support DVD files. If you want to copy DVD to Synology DS216play via Mac OS X El Capitan, what would be the best way to go about it?To get DVDs onto Synology DS216play NAS, we'll need a third-party Mac DVD ripping software to get the content off the DVD disc as a protection-free and easily readable element for NAS. There’re kinds of different software out there (some free, some not) with a variety of different options. It seems a bit overwhelming. Here we highly recommend Pavtube BDMagic for Mac, which can help us finish DVD conversion bypassing DVD copy protection. Read the review.With it, you can convert DVD to almost all regular video formats like MP4, MOV, MKV, FLV, WMV, AVI, etc. without quality loss. audio from DVD movies. Best of all, it allows you to copy your DVD to hard drive via Mac 10.11 with original structure or main movie only. If you are running on Windows 10, simply turn to Pavtube BDMagic for Windows, which has the same function as the Mac version.Hot Search: iTunes to NAS | Blu-ray to NAS | H.265 to NAS |Copying DVDs to Synology DS216play for streaming on 4KTV/4K Media Players via Mac OS X El CapitanFree Download Mac DVD Ripper for Synology DS216play: Other Download:- Pavtube old official address: http://www.pavtube.cn/blu-ray-ripper-mac/- Cnet Download: http://download.cnet.com/Pavtube-BDMagic/3000-7970_4-76177782.htmlStep 1. Load DVD FilesInsert your DVD disc to the drive, then launch the DVD ripping software and click the "Load Disc" button to have the DVD content imported. You can also add Blu-ray discs(with BD drive), VIDEO_TS folder, Blu-ray/DVD ISO files are the source files for converting.
 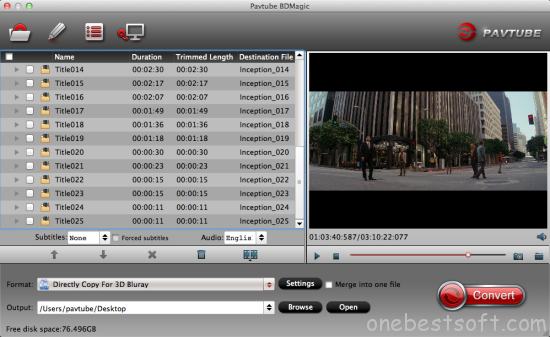 Step 2. Select Synology DS216play NAS friendly formatClick Format bar and choose your desired format. To store hundreds of DVD's on NAS, you can rip DVD to .mp4, or .avi, .mkv, etc compressed format. And click Settings bar, you can adjust the level of compression to suit the quality you want.
  Tip: With the right settings you can retain the quality of the original DVD while also saving space. This is particularly helpful when streaming over your network, depending on your network quality. Simply click Settings bar and you can tweak the settings to your satisfaction and even save it as preset. Step 3. Start ripping DVD to Synology DS216playWhen everything is done, click the “Convert” button to start converting DVDs to Synology DS216play NAS compatible video files.Once the conversion is finished, click “Open” to quickly find the converted movies. Then, Synology DS216play NAS will recognize, catalog, play and stream these DVD rips to 4KTV/4K Media Players via Mac OS X El Capitan at ease. Read More:
Source:http://multimedia-hive.com/2015/11/02/rip-dvd-to-synology-ds216play-via-mac-el-capitan/
Tip: With the right settings you can retain the quality of the original DVD while also saving space. This is particularly helpful when streaming over your network, depending on your network quality. Simply click Settings bar and you can tweak the settings to your satisfaction and even save it as preset. Step 3. Start ripping DVD to Synology DS216playWhen everything is done, click the “Convert” button to start converting DVDs to Synology DS216play NAS compatible video files.Once the conversion is finished, click “Open” to quickly find the converted movies. Then, Synology DS216play NAS will recognize, catalog, play and stream these DVD rips to 4KTV/4K Media Players via Mac OS X El Capitan at ease. Read More:
Source:http://multimedia-hive.com/2015/11/02/rip-dvd-to-synology-ds216play-via-mac-el-capitan/
BlackBerry has been revealed the first photos of its security-focused Android smartphone, the Priv. It had a dual-curved, all-touch display with a keyboard, a slider phone - BlackBerry Priv will be running Android 5.1.1 Lollipop and features a 5.4-inch dual curved QHD screen and a physical keyboard. BlackBerry has opened up pre-orders for the Priv in the United States, U.K., and Canada. Most fans can hands-on the BlackBerry Priv as soon as possible. How about you?
Hot Search: YouTube Videos on Android | DVD ISO/IFO to Android | TiVo to Android | Top Android Apps | After you got the first BlackBerry Android phone, you may want to play iTunes movies on BlackBerry Priv(a bunch of videos and movies in your iTunes library). But it cannot works. There is a global acceptance of Android OS Smartphones and Tablets. Well, one possible reason is that your movies (usually M4V format) are purchased from iTunes Store and are protected by Apple's FairPlay DRM system. Another reason is that iTunes MOV and M4V are not supported by most Android devices, BlackBerry Priv include. In response to the issue, this guide will introduce an easy solution that allows you to play iTunes movies on BlackBerry Priv easily by converting them to a format that can run on BlackBerry Priv (Android 5.1.1 Lollipop). Here, with this versatile iTunes to BlackBerry Priv Recorder tool, you can easily remove DRM protection and also recorder M4V video to MP4 format as the most compatible format on BlackBerry Priv Phones. After recording, the output quality is still as vivid as original. Free download DRM Converter for BlackBerry Priv, and get your iTunes movie recording process started. Read>>Top 3 DRM Removal Software and choose Best DRM Removal/Video Recorder For You. Tutorials: Remove DRM protection and Record iTunes M4V Video to BlackBerry Priv
 Step 1. Load .m4v videos.Run this Pavtube Chewtune as a top DRM Removal Software and DRM Video Recorder, and add videos. Drag and drop your videos to it directly, or you can click icon to import them as below.
 Step 2. Choose format for BlackBerry Priv.Click the drop-down-list besides “Format” and choose “Common Video> H.264 Video(*.mp4)” as the most compatible format with BlackBerry Priv.
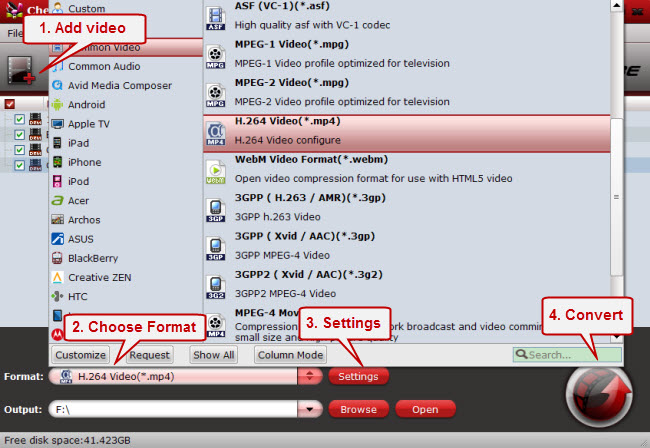 BlackBerry Priv supported video formats: H.264, MP4BlackBerry Priv supported audio files: FLAC, MP3, WAV Step 3. Change video specs.Click “Settings” to enter Profile Settings window, you can find settings for video size, codec, bitrate and frame rate. For BlackBerry Priv, you are suggested to set the Size to 1280*720; and bitrate will be fine from 1500 to 2500k.
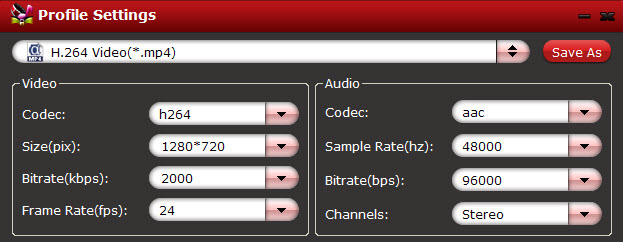 Step 4. Start iTunes M4V to BlackBerry Priv recorder.Now click the “Convert” icon to start removing DRM from iTune M4V videos and recording iTunes videos to BlackBerry Priv for playing; this DRM Video Recorder will activate your iTunes automatically and start to play this video. The player windows cannot be removed or closed.In the meanwhile, it will start to record this video in MP4 real-time. The conversion time is equal to the video length itself; you can do other tasks during the converting the process.Note: The system volume could turn off temporally during this period; no worries, do not touch it to get perfect DRM removed video.After the conversion, click “Open output folder” to quick locate the converted video.
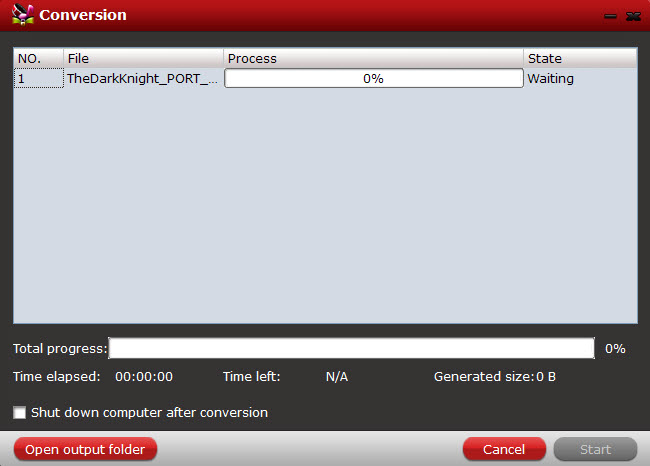 Tips:1. The DRM removing process may mislead your anti-virus software to falsely report virus/worm. Please ignore the report to keep on ripping.2. This product cannot convert unplayable video (damaged, unauthorized, etc).How to transfer the converted iTunes M4V video to BlackBerry Priv?Windows transfer1. Connect your device to the USB port on your computer. Its USB storage is mounted as a drive and appears on your computer screen.2. Copy files back and forth as you would using any other external device.3. When you finish, eject the device from within Windows before unplugging the USB cable.Mac OS transfer1. Install BlackBerry Priv File Transfer from www.BlackBerry Priv.com/file transfer, and follow the instructions there. (If you are using BlackBerry Priv File Transfer for the first time, double-click it to open it. After the first connection, it opens automatically whenever you connect.)2. Connect your device to your computer with a USB cable. BlackBerry Priv File Transfer starts, if it’s not already running, and opens a window that displays the contents of your device, along with storage space details at the bottom of the window.3. Work with this window much as you do in the Finder window: open and close folders, create new folders, and drag files to or from it and other Finder windows.4. Disconnect the USB cable when you finish.Related settings: To change your device's USB connection options, touch Settings > Device > Storage > Menu > USB computer connection. Read More:
Summary: Want to play Blu-ray on iPad 4 on the go? This post would be the right place for you to get detailed guide on how to rip and copy Blu-ray movie to iPad keeping the best quality via Mac OS X El Capitan.Hot Search: Blu-ray to unRAID Server | Blu-Rays to PowerBook | Blu-ray to Apple TV | Blu-ray on Mac El Capitan Recently, Apple disclosed its latest desktop operating system - Mac OS X El Capitan, which received wide range reputation. When you marvel at this amazing update, you may also find the tweaks finally make your desktop software fall into disuse. How do you rip a Blu-ray you own to your iPad 4 or Apple iPhone 6S, iPad Mini 4, iPad Air 2 via Mac 10.11? Which software do you use for Blu-ray to iPad 4 conversion? In this article, I will share a simple way to get Blu-ray playable on iPad 4 within clicks. If you want to watch Blu-ray movies on iPad via Mac OS X El Capitan, keep reading. Actually, there are different software out there & I have tried several trial versions. It rips to .m2ts files but they are never in order & I don't know how to put them in order to get 1 continuous file to play the movie on the iPad 4 after converting. What I want is a software that can help me convert Blu-ray to iPad 4 friendly format for playback directly and gives me the best picture & video quality… When you try to hunting the proper Blu-ray Ripper to convert videos on the newest Mac OS X EI Capitan, the most important thing you must consider in advance is system compatibility. Constantly updated to fit with the latest technology, Pavtube BDMagic for Mac give you the strong compatibility for Mac El Capitan, which is the most ideal choice to rip and backup Blu-ray to iPad via Mac OS X El Capitan. Now, we will introduce a step guide and how does it works. Read the review. Pavtube BDMagic for Mac is a user-friendly and handy tool for Mac OS X EI Capitan users to backup Blu-ray, convert Blu-ray ISO, and edit Blu-ray movies with simple operations. It offers you 1:1 backup Blu-ray without quality loss and supports to rip Blu-ray to H.265/HEVC codec and M3U8 file. With this Blu-ray Ripper, you can convert 3D Blu-ray to 3D MKV, 3D MP4 in side-by-side, top-bottom and Anaglyph effect. (Read BDMagic for Mac Review). Free download and install: Other Download: - Pavtube old official address: http://www.pavtube.cn/blu-ray-ripper-mac/ - Cnet Download: http://download.cnet.com/Pavtube-BDMagic/3000-7970_4-76177782.html Steps to rip Blu-ray on iPad 4 via Mac OS X El Capitan with BDMagic for Mac Step 1: Load Blu-ray movie Run the Blu-ray to iPad ripper for Mac and click “File” > “Load from disc” to import Blu-ray movie. 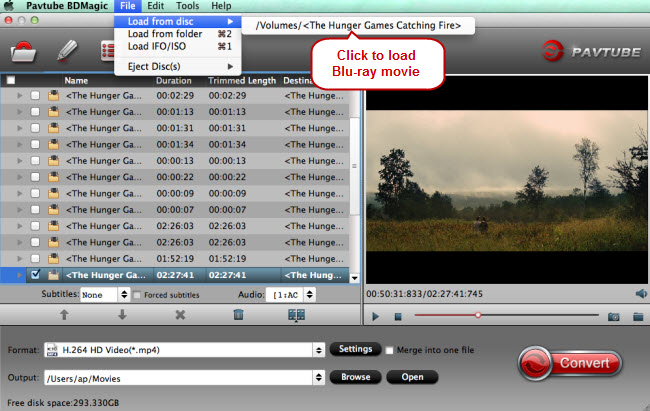 Step 2: Choose output format for iPad 4. Mac can playback MP4 format well, so just head to the output format list to follow “HD Video” > “H.264 HD Video (*.mp4).”Learn iPad supported formats. Additional: You can extract preferred clips from Blu-ray with this Blu-ray Ripper. Click the “Edit” button and the “Video Editor” screen will pop up. Hit the “Trim” tab, and set the start and end time of the Blu-ray clip you want to save and rip.
 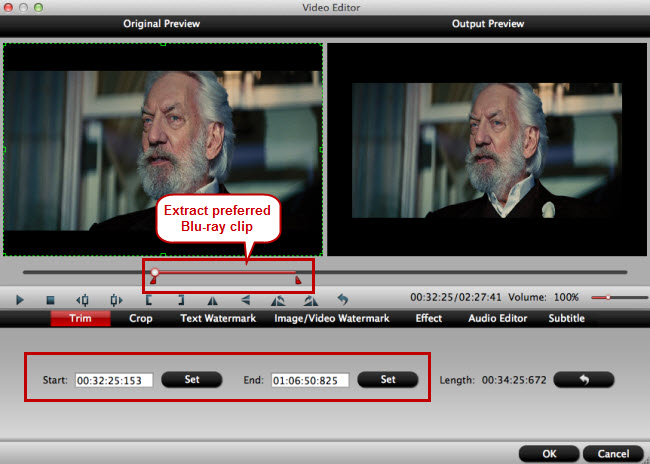 Step 3: Start to rip Blu-ray Click on the “Convert” in bottom right corner to start extracting and ripping Blu-ray clips to iPad for playback on via Mac El Capitan. When you the conversion process shows in 100%, you can locate the ripped video in target folder and transfer the media to iPad , then enjoy the Blu-ray movies as you like on iPad 4 via Mac OS X El Capitan without any hassles. Read More: