If you travel a lot and you are looking for a way to take Halloween DVD Movies you purchased with you to enjoy all the movies on Surface Book, or you just want to backup your DVD collection to avoid them from daily playback damage based on windows 10, Pavtube DVDAid is the best choice.
Hot Search: Blu-ray to PS3, DVD to Seagate Wireless Plus, DVD to QNAP TS-469L NAS, DVD to Synology DS414…
This program is regarded as the best DVD ripping software on the market that provides movie lovers, children and people in any group with the easiest and fastest way to rip and convert Halloween DVD Movies to MP4/AVI/MKV/WMV and many other video and audio formats with high quality. No matter what operating system (Windows 2003/XP/Vista/Windows 7/Windows 8/Windows 8.1/Windows 10) you are using now, this software can meet the requirements of you and lets you enjoy Halloween DVD Movies on Surface satisfied, or you can transfer to any other portable device with it’s supported format like iPhone 6, iPhone 6 Plus, iPad Air 2, iPad Mini 3, Galaxy S6, Galaxy S6 Edge, Kindle Fire HDX, PS3, PSP, and more..


Other Download:
- Pavtube old official address: http://www.pavtube.cn/dvd_ripper/
- Cnet Download: http://download.cnet.com/Pavtube-DVDAid/3000-7970_4-76158510.html
How to Watch Halloween DVD Movies on Surface Book on windows 10
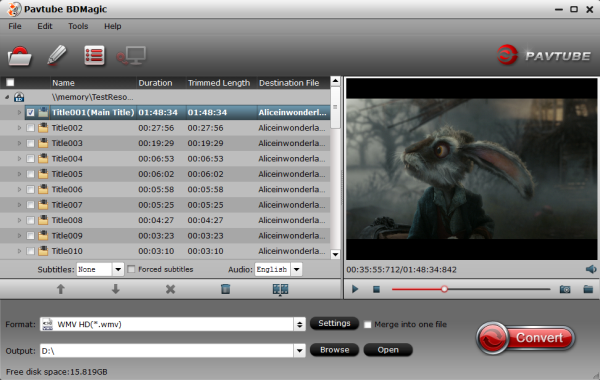
Step 1. Load DVD
Click “File” in top left corner and then follow “Load from disc” to import DVD movie. If you got DVD ISO images, DVD IFO files, and DVD folders on your computer, just follow “File” > “Load from folder” or “File” > “Load IFO/ISO.”
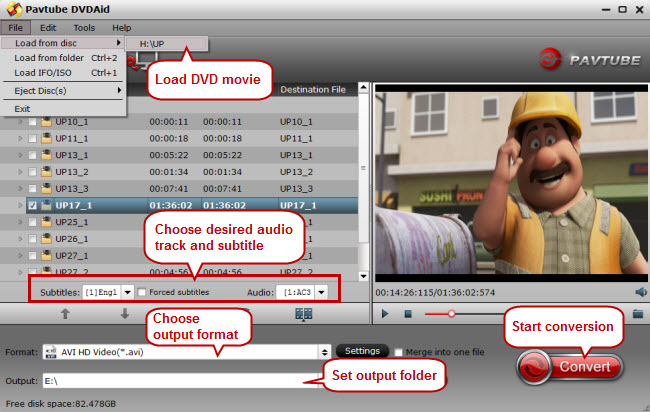
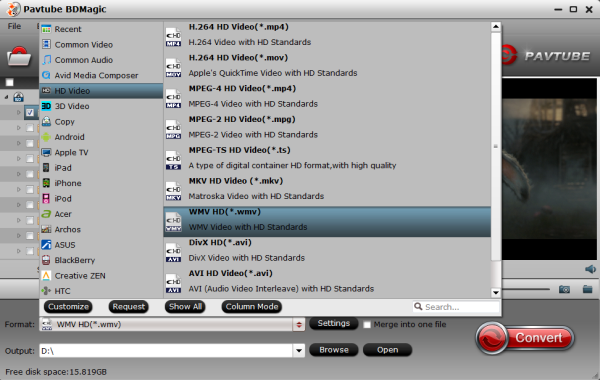
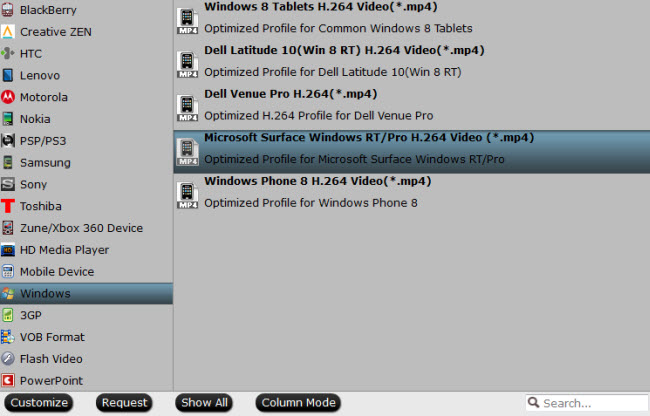
Step 2. Choose MP4 as output format for Surface Book
Surface Book can absolutely play MP4 files, so just go to the output format list to choose “Windows” > “Microsoft Surface Windows RT/Pro H.264 Video (*.mp4).”
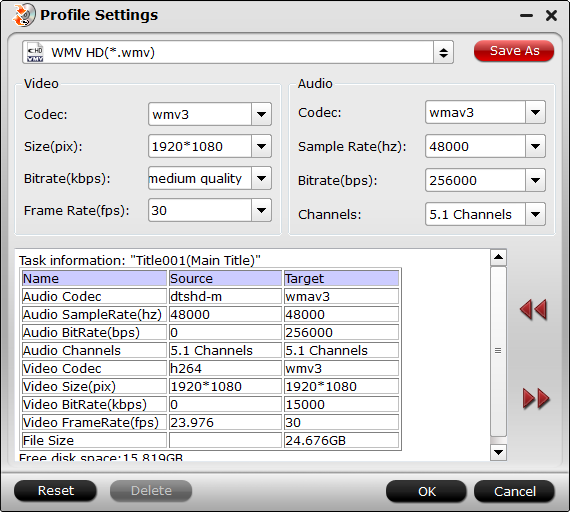
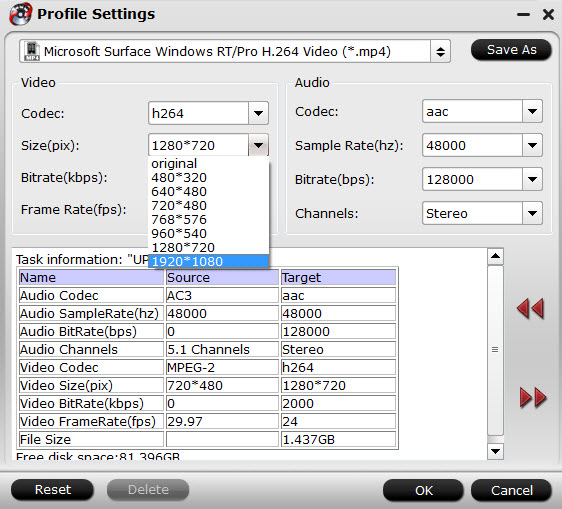
Step 3. Adjust audio and video settings for Surface Book (Optional)
Check the technical specifications of Surface Book. And go to “Profile Settings” screen to adjust audio and video settings like size/resolution, frame rate, sample rate and bitrate to match your Surface Book, which will maximize your enjoyment on the fabulous tablet.
Step 4. Rip DVD to Surface Book
Set an output folder to save the converted DVD movie and then hit the “Convert” button to start conversion from DVD to Surface Book.
Step 5. Copy DVD to Surface Book.
There are multiple ways for you to copy the converted DVD movie to Surface Book.
a. OneDrive (formerly called SkyDrive, Microsoft cloud service)
b. Connect to a network computer
c. Use USB flash drive or memory card
For details about copying files to a Surface, please click move files to surface.
Note: If you want to rip your Blu-ray to your portable devices, you should get Pavtube BDMagic(Windows version)/Pavtube BDMagic for Mac, for higher requirement of DVD or Blu-ray instrument copy please turn to Pavtube ByteCopy(Windows version)/Pavtube ByteCopy for Mac. Other Multi-track video solution please turn to Pavtube Video Converter (Windows version)/Pavtube Video Converter for Mac.
See Also:
Source: How to Watch Halloween DVD Movies on Surface Book on windows 10
Hot Search: Blu-ray to PS3, DVD to Seagate Wireless Plus, DVD to QNAP TS-469L NAS, DVD to Synology DS414…
This program is regarded as the best DVD ripping software on the market that provides movie lovers, children and people in any group with the easiest and fastest way to rip and convert Halloween DVD Movies to MP4/AVI/MKV/WMV and many other video and audio formats with high quality. No matter what operating system (Windows 2003/XP/Vista/Windows 7/Windows 8/Windows 8.1/Windows 10) you are using now, this software can meet the requirements of you and lets you enjoy Halloween DVD Movies on Surface satisfied, or you can transfer to any other portable device with it’s supported format like iPhone 6, iPhone 6 Plus, iPad Air 2, iPad Mini 3, Galaxy S6, Galaxy S6 Edge, Kindle Fire HDX, PS3, PSP, and more..
Other Download:
- Pavtube old official address: http://www.pavtube.cn/dvd_ripper/
- Cnet Download: http://download.cnet.com/Pavtube-DVDAid/3000-7970_4-76158510.html
How to Watch Halloween DVD Movies on Surface Book on windows 10
Step 1. Load DVD
Click “File” in top left corner and then follow “Load from disc” to import DVD movie. If you got DVD ISO images, DVD IFO files, and DVD folders on your computer, just follow “File” > “Load from folder” or “File” > “Load IFO/ISO.”
Step 2. Choose MP4 as output format for Surface Book
Surface Book can absolutely play MP4 files, so just go to the output format list to choose “Windows” > “Microsoft Surface Windows RT/Pro H.264 Video (*.mp4).”
Step 3. Adjust audio and video settings for Surface Book (Optional)
Check the technical specifications of Surface Book. And go to “Profile Settings” screen to adjust audio and video settings like size/resolution, frame rate, sample rate and bitrate to match your Surface Book, which will maximize your enjoyment on the fabulous tablet.
Step 4. Rip DVD to Surface Book
Set an output folder to save the converted DVD movie and then hit the “Convert” button to start conversion from DVD to Surface Book.
Step 5. Copy DVD to Surface Book.
There are multiple ways for you to copy the converted DVD movie to Surface Book.
a. OneDrive (formerly called SkyDrive, Microsoft cloud service)
b. Connect to a network computer
c. Use USB flash drive or memory card
For details about copying files to a Surface, please click move files to surface.
Note: If you want to rip your Blu-ray to your portable devices, you should get Pavtube BDMagic(Windows version)/Pavtube BDMagic for Mac, for higher requirement of DVD or Blu-ray instrument copy please turn to Pavtube ByteCopy(Windows version)/Pavtube ByteCopy for Mac. Other Multi-track video solution please turn to Pavtube Video Converter (Windows version)/Pavtube Video Converter for Mac.
See Also:
- Watch Halloween DVD Movies on iPad series
- Get the Best TMPGEnc Mac Alternative to Convert Videos on Mac OS X El Capitan
- Upload 4K Video Shot on iPhone 6s to YouTube on Mac OS El Capitan with
- Rip Blu-ray to Samsung Tablet/Phone/TV With Utmost Perfection
- Watch DVD on Apple TV 4 via Plex Channel on El Capitan
- Experience Blu-ray Dolby TrueHD and DTS-HD MasterAudio
- Top 5 Home Theater Systems with Dolby Digital
Source: How to Watch Halloween DVD Movies on Surface Book on windows 10