Windows 8 Media Center does not support Blu-Ray?
Windows Media Player, the native video player on Windows 8's desktop and the video player application on the start screen cannot play DVD or Blu-Ray movies. The core reason for the missing feature is money in the form of licensing fees that companies have to pay when they integrate playback support into their hardware or software. Microsoft saves money, and makes available the Windows Media Center as an upgrade to bring back support to the operating system.
Learn More>> Top Alternatives for Windows Media Center | Windows 10 VS Windows 8 Comparison | Blu-ray on Windows Desktop....
Part 1: How to Convert Blu-ray to Windows Media Center on Windows 8/8.1/10?
The Video File Types that Windows Media Center supports:
*.wm, *.asf, *.wmv, *.avi, *.mpeg, *.mpg, *.mpe, *.m1v, *.mp2, and *.mpv2, *.dvr-ms(Microsoft Recorded TV Show file)
In order to convert Blu-ray to Media Center, my preferred tool is Pavtube BDMagic, it will do the job of ripping Blu-ray to the video file types that are supported in Windows Media Center. I choose it due to its ease of use, the support service and very affordable price. It is capable of converting Blu-ray discs and Blu-ray ISO files to various formats for almost any devices. Read the review.
P.S. If you are a Mac user, go to get BDMagic for Mac. Free download it now. Once having installed it, follow below instructions to rip Blu-ray to Windows Media Center.
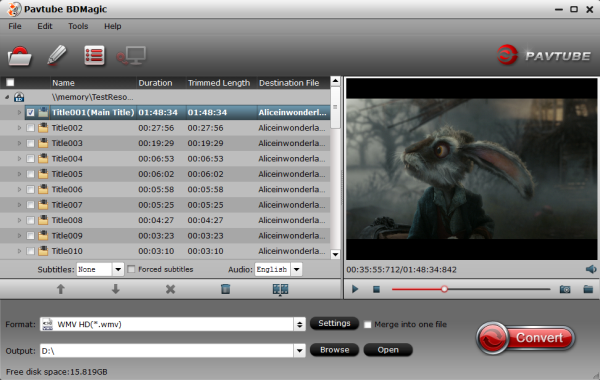
Step 1. Load Blu-ray to the Best Blu-ray to Windows Media Center Ripper.
You are allowed to load Blu-ray discs, load Blu-ray files or load from blu-ray folder.
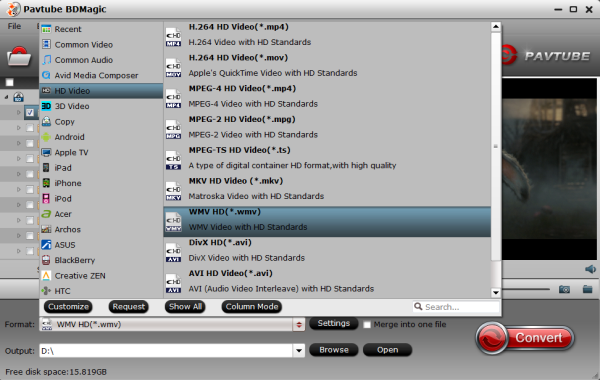
Step 2. Select video format for Windows Media Center.
Click "Format" menu to choose the output format. Here you can choose "DivX HD(*.avi)" from "HD Video" option, or you can choose "WMV HD(*.wmv)" which works for Windows Media Center natively.
Step 3. Set parameters for output video. (Optional)
Click "Settings" to adjust the parameters including size, bitrate, frame rate, etc according to your own need. Then you can save it as your customized option with the new name made by yourself. The new option will locate in "Custom" under "Format" menu.
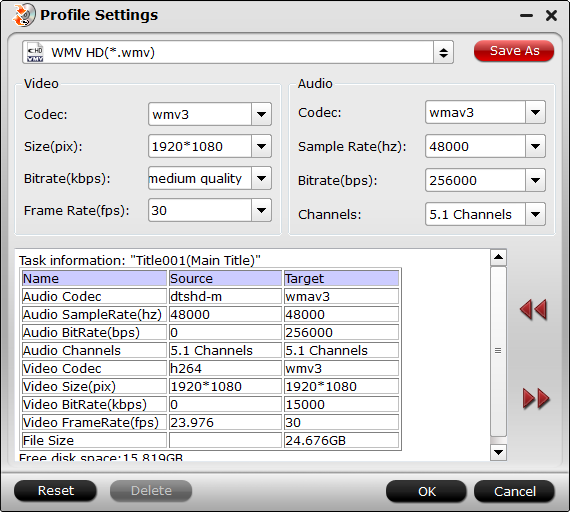
Tip : If you are not good at settings or have no idea about it, it is ok to keep the default settings for output video. The default settings are able to provide an output video with high quality.
Step 4. Convert Blu-ray to Windows Media Center.
Click big "Convert" button to start ripping Blu-ray to AVI/WMV for Windows Media Center and then click "Open" button to get generated videos for Windows Media Center when completed. Open Windows Media Player and then add items to the Windows Media Player Library via Windows 8/8.1/10 for playback.
Tip 2: It supports CUDA Acceleration, which will contribute to speed up the conversion. Find "Option" button on the interface to get "Acceleration" option, then Enable GPU Acceleration to get a faster conversion.
Part 2: Set up Xbox 360 as your Media Center Extender
If you have an Xbox 360 connected to a home network that also has a PC running Windows Media Center, you can add your Xbox 360 as an Extender for Windows Media Center – so you can enjoy your digital media from your PC on your TV. You can connect your Xbox 360 to a wireless or a wired network (using an Ethernet cable).
When you convert Blu-ray to Media Center Extender, you can take entertainment on the go with your windows phone device, Zune, Xbox, etc.
Read More:
Windows Media Player, the native video player on Windows 8's desktop and the video player application on the start screen cannot play DVD or Blu-Ray movies. The core reason for the missing feature is money in the form of licensing fees that companies have to pay when they integrate playback support into their hardware or software. Microsoft saves money, and makes available the Windows Media Center as an upgrade to bring back support to the operating system.
Learn More>> Top Alternatives for Windows Media Center | Windows 10 VS Windows 8 Comparison | Blu-ray on Windows Desktop....
Part 1: How to Convert Blu-ray to Windows Media Center on Windows 8/8.1/10?
The Video File Types that Windows Media Center supports:
*.wm, *.asf, *.wmv, *.avi, *.mpeg, *.mpg, *.mpe, *.m1v, *.mp2, and *.mpv2, *.dvr-ms(Microsoft Recorded TV Show file)
In order to convert Blu-ray to Media Center, my preferred tool is Pavtube BDMagic, it will do the job of ripping Blu-ray to the video file types that are supported in Windows Media Center. I choose it due to its ease of use, the support service and very affordable price. It is capable of converting Blu-ray discs and Blu-ray ISO files to various formats for almost any devices. Read the review.
P.S. If you are a Mac user, go to get BDMagic for Mac. Free download it now. Once having installed it, follow below instructions to rip Blu-ray to Windows Media Center.
Step 1. Load Blu-ray to the Best Blu-ray to Windows Media Center Ripper.
You are allowed to load Blu-ray discs, load Blu-ray files or load from blu-ray folder.
Step 2. Select video format for Windows Media Center.
Click "Format" menu to choose the output format. Here you can choose "DivX HD(*.avi)" from "HD Video" option, or you can choose "WMV HD(*.wmv)" which works for Windows Media Center natively.
Step 3. Set parameters for output video. (Optional)
Click "Settings" to adjust the parameters including size, bitrate, frame rate, etc according to your own need. Then you can save it as your customized option with the new name made by yourself. The new option will locate in "Custom" under "Format" menu.
Tip : If you are not good at settings or have no idea about it, it is ok to keep the default settings for output video. The default settings are able to provide an output video with high quality.
Step 4. Convert Blu-ray to Windows Media Center.
Click big "Convert" button to start ripping Blu-ray to AVI/WMV for Windows Media Center and then click "Open" button to get generated videos for Windows Media Center when completed. Open Windows Media Player and then add items to the Windows Media Player Library via Windows 8/8.1/10 for playback.
Tip 2: It supports CUDA Acceleration, which will contribute to speed up the conversion. Find "Option" button on the interface to get "Acceleration" option, then Enable GPU Acceleration to get a faster conversion.
Part 2: Set up Xbox 360 as your Media Center Extender
If you have an Xbox 360 connected to a home network that also has a PC running Windows Media Center, you can add your Xbox 360 as an Extender for Windows Media Center – so you can enjoy your digital media from your PC on your TV. You can connect your Xbox 360 to a wireless or a wired network (using an Ethernet cable).
When you convert Blu-ray to Media Center Extender, you can take entertainment on the go with your windows phone device, Zune, Xbox, etc.
Read More: