Tuesday, May 19, 2015

Rip DVD “The Hobbit 3: The Battle of the Five Armies” to MP4/MOV/AVI on PC/Mac

Q: "I wanna backup a DVD movie on PC since “The Hobbit 3: The Battle of the Five Armies” is much important for me. Do you know how to lossless copy the Blu-ray into digital formats so that I can store in my HD forever? Thank you for any tip." 

The Hobbit: The Battle of the Five Armies (2014) is much important to movie lovers. Now, it can be DVDs for adding it into your movie collection at home and backup DVD on Mac OS X Yosemite or Windows 10. This article will discuss how to play The Hobbit 3: The Battle of the Five Armies DVD on PC/Mac. 

For Movie Fans: Top Robin Williams Comedy Movies List | Top Antonio Banderas Movies | 2015 New Disney Movies Reviews... 

Movie Information: The Hobbit: The Battle of the Five Armies (2014)


PG-13  |  144 min  |  Adventure, Fantasy  |  23 January 2015 (China) 
Bilbo and Company are forced to engage in a war against an array of combatants and keep the Lonely Mountain from falling into the hands of a rising darkness.
Director: Peter Jackson
Writers: Fran Walsh (screenplay), Philippa Boyens (screenplay), 3 more credits »
Stars: Ian McKellen, Martin Freeman, Richard Armitage | See full cast and crew »  
The Hobbit: The Battle of the Five Armies DVD release date: March 24, 2015 

Storyline

After the Dragon leaves the Lonely Mountain, the people of Lake-town see a threat coming. Orcs, dwarves, elves and people prepare for war. Bilbo sees Thorin going mad and tries to help. Meanwhile, Gandalf is rescued from the Necromancer's prison and his rescuers realize who the Necromancer is. 

A Good Choice to Rip DVD The Hobbit 3: The Battle of the Five Armies to MP4 MOV AVI WMV on PC/Mac

As you see, a professional DVD ripper is badly needed to remove region code and make personal DVD backups from The Hobbit 3: The Battle of the Five Armies DVD, or convert to a common video file. The best program I can recommend for handling The Hobbit 3: The Battle of the Five Armies DVD disc is Pavtube DVDAid

It takes everything from the DVD, including the chapters, extras, and subtitles. It comes with decent decrypting capability (removing CSS Copy-protections and DVD region codes including the latest DVD discs); provides high quality video output and considerate backup solution and specific format templates for iPad, iPhone 6, Apple TV, Xbox, PS4, Galaxy S6, etc. More than a powerful DVD ripper, it can also allows you to backup a DVD with original structures or just copy main movie from a DVD. Read the review
  
So much for the features of Pavtube DVDAid, the following post will guide you to rip and convert DVD The Hobbit: The Battle of the Five Armies to MP4, MOV, AVI and others for DVD backup and playback on PC/mobiles. For Mac users, Pavtube DVDAid for Mac is a helpful app to encode videos for further usage.

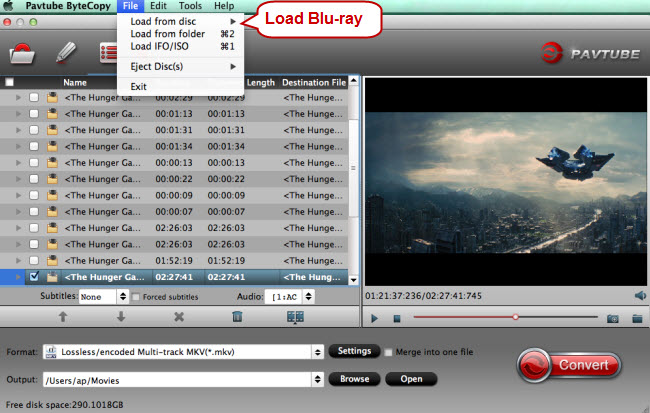
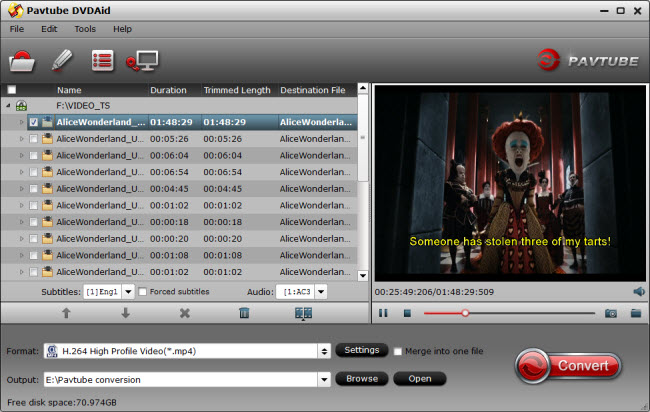
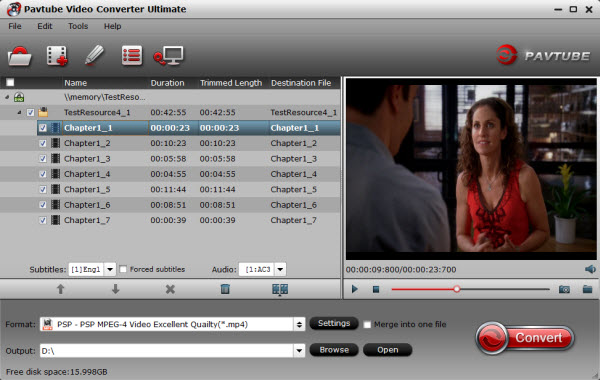
Step 1. Import DVD source files

Once you run the The Hobbit: The Battle of the Five Armies DVD Ripping software, click DVD disc to load DVD movie into the program. Select wanted subtitles and audio track if necessary.


Tips: For copying The Hobbit: The Battle of the Five Armies DVD discs, the button on the top of the main interface can help you to achieve the goal, which allows you to backup entire The Hobbit: The Battle of the Five Armies DVD with original structures. Alternatively, click “Format” bar, choose “Copy > Directly Copy”, you can copy The Hobbit: The Battle of the Five Armies DVD main movies only. 

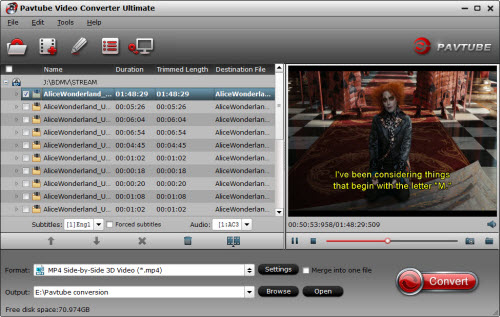
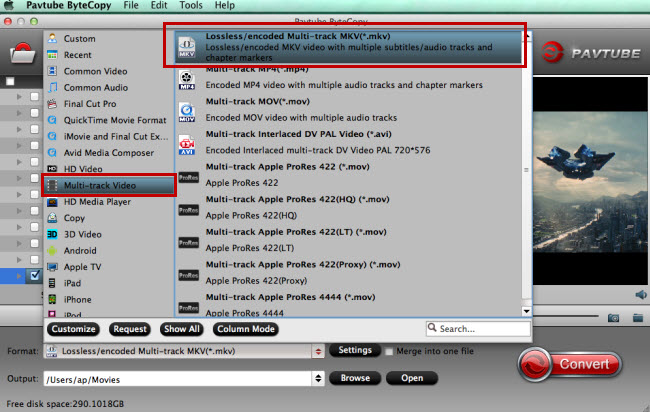
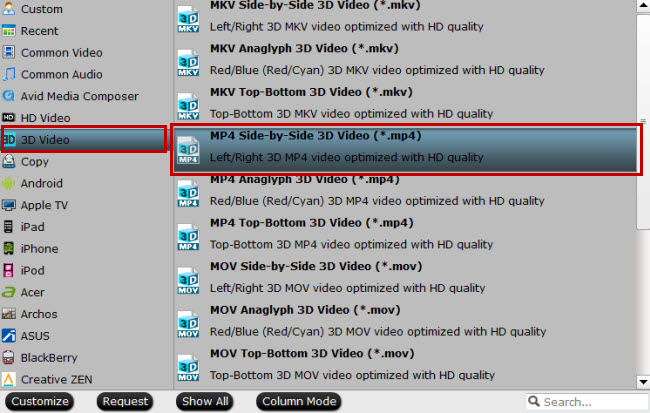
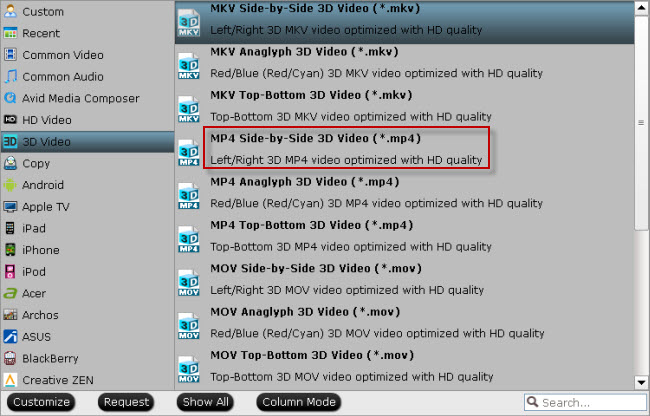
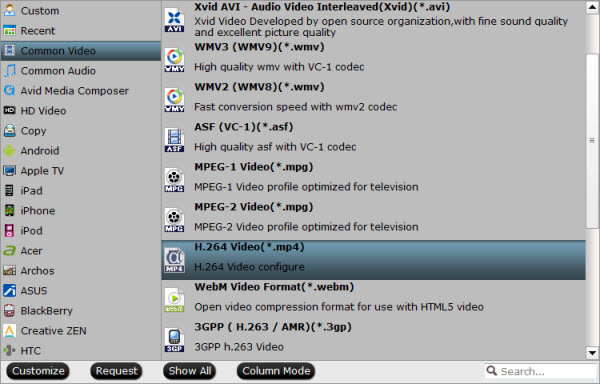
Step 2. Choose output profile

Navigate the Format and click Common Video; MP4, MOV, AVI, WMV, MPEG-2, M4V are all the popular output formats for you.


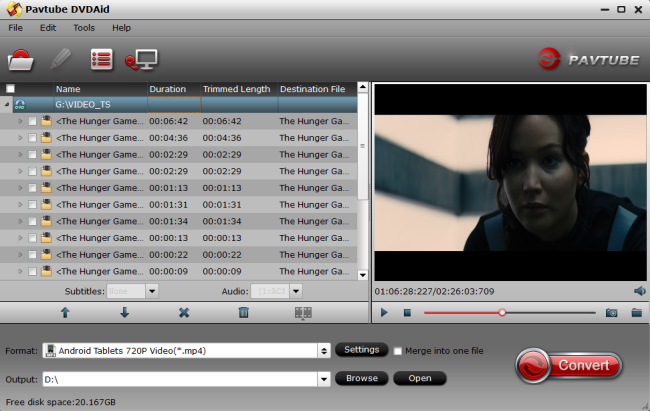
Step 3. Start DVD backup and ripping

Once the above mentioned steps are finished, you can click “Convert” button to rip The Hobbit: The Battle of the Five Armies DVD movie to either the hard drive of your pc, or to your portable devices, like iPad, iPhone, Apple TV, Microsoft Surface tablet, etc. When the ripping task is completed, you can click “Open” button to get the ripped files of The Hobbit: The Battle of the Five Armies DVD files. Enjoy! 

Hot News for all Mac users! Pavtube Studio has launched a user-requested upgrade for all its Mac BD/DVD and package tools: DVDAid for Mac, BDMagic for Mac, ByteCopy for Mac, iMedia Converter for Mac to version 4.8.5.1, which focuses on the addition of the H.265 encoders and decoders.
  
Read More: 

Friday, May 15, 2015

Pavtube Releases All-In-One Mac BD/DVD/Video to H.265 Converter

Good News on May 15th, 2015! Pavtube upgraded its best-selling iMedia Converter for Mac to version 4.8.5.1, which features strong and perfect support for Blu-ray/DVD/Video to H.265 MP4 encoding and H.265 video decoding on Mac.


New features of iMedia Converter for Mac v4.8.5.1:

1. Supported to decode/encode the H.265/HEVC codec
2. Fix the XAVC MXF codec importing issues
3. Optimize coding parameters
4. Fix some bugs
   
This updated Pavtube iMedia Converter for Mac can act as best Mac H.265 Video onverter, which ensures you to complete 2D/3D Blu-ray, DVD, ISO and 4K/H.265 MP4 video conversion on Mac OS X 10.10 Yosemite, 10.9 Mavericks, 10.8 Mountain Lion at one go for enjoying with Windows 10, H.265 players like DivX Player, PotPlayer, PowerDVD 14 Ultra, etc, and for storage on Mac. And as a Mac H.265 decorder, it enables users to both decode H.265 videos to almost all video and audio formats like MP4, MOV, WMV, AVI, WMA, MP3 and convert H.265/HEVC for playback on iPhone, iPad, Apple TV, Chromecast, Android mobile and tablets, etc.

What's more, it is also an all-in-one mac toolkit to which can not only copy 2D BD, 3D BD and standard DVD with original structure, and convert all BD/DVD collection to virtually any video and audio format for iPhone, iPad, Apple TV, Android, Windows Phones, Xbox, PS3, and other devices, but also transcode between virtually all video and audio formats and add practical video editing functions to export media files playable on iOS, Android, Windows, game consoles, etc. on Mac.

For windows users, read this H.265/HEVC video decoder and encoder Review.

Wondering how to do the conversion?

Start Using Pavtube iMedia Converter for Mac
  
Pricing and Availability

For all the new Mac (especially Mac OS X Yosemite 10.10) users, iMedia Converter for Mac now is offering with $65 with a lifetime free upgrade. 

Download sites:

Pavtube Official Website | CNET Download Site

Other three upgraded Mac products are listed below:

Pavtube DVDAid for Mac
  
Pavtube BDMagic for Mac

Pavtube ByteCopy for Mac

All Mac users are welcome to get these upgraded hottest and comprehensive mac products. Get more money-saving boundles at http://www.multipelife.com/special-offer. Come on!

Further Reaing:

Import H.265/HEVC to FCP X on Mac
Upload H.265 Video to YouTube
Play H.265 MP4 Blu-ray Movies on WDTV
The world's Top Blu-ray to H.265 Converter 
Rip DVD to H.265/HEVC MP4 on Windows 8.1/8

For more info about this Pavtube update, just visit: http://www.multipelife.com/mac-bluray-dvd-upgrade-for-h265.html

Thursday, May 14, 2015

Watching a Full 3D movie in Oculus Rift DK2 & DK1 with Oculus Cinema

The 3D Effects are really strong on the Oculus Rift (DK1 or DK2). You may also love watching 3D TV tech demos and 3D movies on this thing! Haven't get the new Oculus Glasses? Read Top 3D glasses. The Oculus Rift Developers Kit DK1 & DK2 has stereoscopic 3D capability assuming you use programs (e.g. SBS 3D Video Player) for the DK2. It won't let you down. So the question is How to get these downloaded 3D Movies to your Oculus Rift DK2 & DK1 with no efforts? Fortunately, there are always solutions there. This article is a solution of ripping 3D Contents to 3D SBS MP4 for watching 3D movies on Oculus Rift DK2 & DK1.


As we all know, Oculus Rift DK1 or DK2 does not included a drive for playing 3D movies. So, the best solution is that ripping 3D Movies to 3D SBS MP4 for Oculus Rift DK1 or DK2 suitable formats. To play 3D movies with Oculus Rift DK1/DK2, you can adopt Pavtube Video Converter Ultimate for help. (Now, get 50% OFF discount). It supports handling 3D Blu-ray/DVD disc is necessary. Here is Best 3D Movie to Oculus Rift Converter review

With this all-in-one 3D Video Converter Ultimate for Oculus Rift , you can easily convert 3D Blu-ray movie no matter from Blu-ray disc, Blu-ray movie folder, DVD disc, MKV, AVI, VOB, WMV, Tivo, MPG, FLV/F4V files and export Anaglyph, Top-Bottom, Side-by-Side 3D video supported by Oculus Rift DK2/DK1/Oculus Cinema with the best quality easily.  If you are a Mac user, then Pavtube iMedia Converter for Mac  is your first choose. Now download the right version and follow the tips below to finish your task. 
    
How to rip Full 3D Movies for viewing Oculus Rift DK2 & DK1

Step 1: Import 3D Movies.
  
Insert your 3D/2D Blu-ray or standard DVD movie to disc drive, and click "Load from disc" button to load Blu-ray or DVD from ROM. For video file, click the "Add video" button, you can also transfer video files like M2TS, MTS, MXF, MOV, browse to computer hard drive and import video into this app. 


Tip: Learning How to Rip 3D Movies toPanasonic VT65 via PlexLakento MVR Glasses and Samsung Gear VR... 

Step 2: Set Oculus Rift DK2/DK1 friendly format.

Click Format and select “MP4 Side-by-Side 3D Video(*.mp4)” under 3D Video. In general, mp4 is a well-accepted file format for its ability to save memory storage and keep up the video quality. Also you can choose 3D SBS MKV or 3D SBS AVI format. Learn to Anaglyph 3D and Side-by-Side 3D difference


Step 3. Set advanced settings

By clicking "Settings" button, output parameters are classified and can be adjusted freely: Video Codec, Video Size, Bitrate, Frame Rate, Audio Codec, etc. Just choose the best settings for Oculus Rift DK2/DK1. 

Step 4: Start 3D Movies conversion

Hit the Convert button to start converting Any 3D movies to 3D MP4/MKV video for playing on Oculus Rift DK2/DK1. After a short conversion, you will get the ripped files.In order to have the wonderful 3D home theater experience, two extra things we need are VR Player and media player. Refer to the how to set up guide

How awesome is this? The Best 3D Home Theater Experience! Have Fun! You may not have any Full 3D Movies playback issues on Oculus Rift DK2/DK1. 
  
Read More: 

Sunday, May 10, 2015

ISO to Plex Solution - Play ISO files using Plex on Mac

Plex Media Server bridges the gap between your computer and your home theater, doing so with a visually appealing user interface that provides instant access to your media. Learn How to Start Plex. If you also have backup Blu-ray or DVD discs as ISO image files for storage on  Mac. you may have the same trouble: "Can I play ISO files using Plex on Mac?" As we know, the  ISO file format is an excellent file type for data storage and backup, especially suited to backup media like Blu-ray and DVD's. Fortunately, there is a quick workaround to fix the issue. this article shows how to convert and copy ISO files to Plex Media Sever on Mac easily and fast. 


The point here, Plex doesn't support ISO format streaming. Plex also makes it clear in its supported sources list - "Plex does not support the use of ISO, IMG, Video_TS, or other "disk image" formats." If you wish to use ISO files with Plex, it's recommended that you convert them to a compatible format.  Actually, it's not as difficult as you imagine. What you need is a just a common ISO converter like Pavtube ByteCopy for Mac

This top Plex ISO Converter can help you rip ISO to Plex supported video format fast while keeping the original video quality. Besides, it can also convert ISO/DVD/IFO/Video_TS to almost all regular video formats, including AVI, MOV, M4V, WMV, MPG, 3GP, FLV, F4V, etc. Get the ISO converter and follow the tips to finish your conversion. Read the review

Tool Download

Pavtube ByteCopy for Mac ($42) –Download a trial from HERE (Mac OS X 10.9 Mavericks, 10.8 Mountain Lion, 10.7 Lion, Snow Leopard10.6, Leopard 10.5, Yosemite 10.10). 

Alternative version for Windows (Windows 2003/XP/Vista/Windows 7/Windows 8/Windows 8.1/Windows 10). 

Hot!!! - (Now, you can get 50% OFF discount after liked our FaceBook.) More Money Saving Tips, you can Click Special Offer
  
Guide- Convert ISO to Plex Media Server playable file type on Mac

Step 1. Launch Pavtube ByteCopy for Mac and load disc.

Firstly you need an external blu-ray drive; there's no special requirements of the drive model as long as it's supported by your Mac. Click the top left icon and it will detect the inserted Blu-ray disc, click disc name to load them.


Step 2. Choose lossless format.

Click "Format" list and select "Multi-track Video>Lossless/encoded Multi-track MKV(*.mkv)" as below.


Step 3. Adjust V/A settings.

Click "Settings" to enter Multi-track video profile window; switch to "Video" and find the "Encode" box which is unchecked by default, so if you want a lossless MKV copy, do not touch it. The switch to "Audio", check wanted audio track; so does the "Subtitles".

Step 4. Start backing up Blu-rays to lossless MKV for Plex Media Server

Click the big "Convert" to start the conversion. It takes about 40 mins for my Macbook to backup a Blu-ray disc, but the conversion speed also depends on your computer configuration. My suggestion is not to play or edit videos when it's converting. After conversion, click "Open" or "Open output folder" to quick locate converted files.

Ok now the lossless MKV files are prepared; Add Movies to your hard drive and connect it to Plex Media Server, now you can enjoy ISO files on Plex without quality loss! 

Read more:

Thursday, May 7, 2015

2015 Mother's Day Deals: ByteCopy 50% OFF/Giveaway

With the coming of Mother's Day 2015, have you had any good idea of your gifts for your dear Mummy? Great news for all multimedia software users for the upcoming Mother's Day: Pavtube launches a big Mother's Day Promotion for all multimedia software users to celebrate Mother's Day until May 14th.


To commemorate Mother's Day, everybody who like our Facebook is welcome to get Pavtube ByteCopy v4.8.6.0 50% OFF, which is a powerful all-in-one utility integrated by DVD Ripper, Blu-ray Ripper, DVD Copy, Blu-ray Copy, Multi-track Blu-ray/DVD Ripper, Blu-ray/DVD Editor, etc. Or you can also get Pavtube ByeCopy as free gift if you Facebook Community activities. See other Mother's Day specials below:

2015 Pavtube Mother's Day Promotion

Promotion period: until May 14,2015

The promotion content:

1. Official Website 20% – 40% discount

a. List of 20% off Discount for all-in-one tools from May 10th to May 12th

Pavtube Video Converter Ultimate

All in one solution to convert Blu-ray, DVD, MP4, MOV, MKV, MXF, TiVo, JPEG, BMP, et to any video and audio format. The decoding and encoding of H.265/HEVC codec, create 3D movies from 2D or 3D resources is also supported by the program.

Pavtube iMedia Converter for Mac

A distinctive Mac video conversion tool to comprehensively handle all common SD and HD video, copy 2D/3D Blu-ray and standard DVD with original structure, convert all Blu-ray DVD collection to any video and audio format for all portable device.

b. List of 40% off discount video conversion tools on May 10th

Pavtube Video Converter for Mac (for Windows)

Have full access to SD videos,digital camcorder recordings, DVR videos on devices such as Apple/Android/Windows series, media players, game consoles and video editing programs.

Pavtube HD Video Converter for Mac (for Windows)

Turn Sony/Canon/JVC/Panasonic HD footage and 1080p/720p MKV, MOV, MXF, MTS, M2TS, M2T, TS, M4V, MP4, AVI, MPG, VOB, WMV, 3GP, FLV videos to any video format.

Pavtube MTS/M2TS Converter for Mac (for Windows)

Convert Sony/Canon/JVC/Panasonic recorded MTS/M2TS/M2T/TS/MOD/TOD footage to play on media players or edit with Premiere Pro, Avid Media Composer, Final Cut Pro, etc.

Pavtube MXF Converter for Mac (for Windows)

Converting MXF video files generated by Canon/Sony/Panasonic camcorders to various video formats such as H.264/MPEG-4, MKV, MP4, AVI, MPEG, WMV, FLV, SWF, F4V, etc.

Pavtube iMixMXF (for Windows)

Transcoding MXF video files to Multi-track Apple Prores MOV for Final Cut Pro or Multi-track MP4/MKV format for other video editing program and media playback devices.

Join Pavtube Facebook to enjoy 50% off discount and Giveaway

Still not satisfied with the promotions listed above, just visit Pavtube Facebook Official Community and join the 3 activities below for big discounts on more products.

a. Activities 1 on May 10th

Leave the most touching words you want to say to your mother on our official campaign pages and click "Like Us", we will send you a 50% discount coupon code for our Pavtube HD Video Converter for Mac (for Windows).

b. Activities 2 from May 7th to May 14th

Click to like Pavtube Facebook Official Home Page, you will gain a 50% off discount for the following products:

Pavtube Video Converter Ultimate & Pavtube iMedia Converter for Mac

Pavtube BDMagic for Mac(for Windows)

Pavtube ByteCopy for Mac

Pavtube DVDAid for Mac(for Windows)

Pavtube HD Video Converter for Mac(for Windows)

c. Activities 3 from May 7th to May 14th

In addition, users forward our post page and write a review for any of our products, email the screen-shots of your review to support@pavtube.com or macsupport@pavtube.com. We will pick out the first twenty reviews we receive and send the review writers one of your desired software from our product list for free.

Wish all mothers in the world have a happy, healthy and wonderful holiday!

To get more detailed information about the 2015 Mother’s Day Big Promotion, you can check the promotion link below:

http://www.multipelife.com/pavtube-2015-mothers-day-giveaway.html

Watch DVD on Gear VR with 3D SBS MP4/MKV in Oculus Cinema

Do you heard of Gear VR and got a new one yet? Usually Samsung’s Gear VR can work brilliant for us. It’s easy for users to play their own videos/movies using the Oculus Cinema. Have an extensive collection of DVDs, but face the problem: how to rip and convert DVD to MP4 Side-by-Side 3D Video for playback on Gear VR (Oculus Cinema)? If you want to convert DVD to 3D video, so as to play, share your DVD movies more conveniently, now just follow this article to finish the conversion while reserving the original 3D effect and video quality. (Learn Differences Between Anaglyph 3D and SBS 3D).


Samsung Gear VR by default supports most common file formats including MKV, MP4, AVI, and FLV. When it comes to playing 3D videos, Samsung Gear VR requires either side-by-side or top-to-bottom (top down), but most DVD are in the "frame packed" format. So the workaround is to download professional DVD ripping tool to rip the DVDs to Gear VR compatible videos so that you can enjoy your DVD movies in Gear VR with Oculus Cinema more conveniently. 

Here, we recommend you a top DVD Ripper for Gear VR - Pavtube DVDAid. With it, you can effortlessly rip your favorite DVD movie from DVD disc and output MP4 videos supported by Samsung Gear VR Unit/Innovator Edition with best quality easily. If you're using a Mac, please turn to Pavtube DVDAid for Mac, which allows you to convert DVD to Samsung Gear VR on Mac OS X (Yosemite and Mavericks included). 

Now download the right version according to your situation and check out the steps below.  


(Now, you can get 30% OFF discount after liked our FaceBook.)

Convert DVD movies to watch in Gear VR from Galaxy Note 4

Step 1. Import DVD movies

Insert the DVD disc into your DVD drive and launch the Gear VR DVD ripper. Click "Load DVD" to select and import the DVD movies you want to rip for Gear VR. ISO and IFO files are also supported.


Step 2. Select Gear VR preferred format 
  
Click the "Format" bar to choose the output format for Galaxy Note 4 and Gear VR. Find "3D Video" catalogue, you will find several presets for Side-by-Side 3D, Top-Bottom 3D and Anaglyph 3D. You can choose the one according to your device specification. SBS MP4/MKV is usually the recommended one which is perfect for Gear VR. Then click "Settings" to adjust video codec, bit rate, frame rate, etc. if necessary. You can also rip DVD to Galaxy S6/S6 Edge in Gear VR. 


Tip- Profile Settings 

lick the "Settings" icon and you will go into interface named "Settings". You can adjust codec, aspect ratio, bitrate, frame rate, sample rate and audio channel as you like. For ripping DVD to view on Gear VR, 2D videos for the Cinema app should be in 720p (1280*720) with a higher bitrate around 5mbit/s. 
  
Step 3. Start to convert DVD to Gear VR

Now go to the last step: click "Convert" to begin ripping DVD to 3D SBS MP4/MKV video files. After the conversion, you can tap "Open" to locate the converted videos immediately. Then connect your Note 4 to computer and transfer the video files to your device for enjoyment on the go. Also learn how to set up Gear VR.

More Tips:

Monday, May 4, 2015

3 Methods of Copy a DVD Movie on Windows PC

There are lots of reasons why you might want to rip and copy a movie from a DVD and store it on your Windows PC. You might want to watch a new DVD on your iPad or tablet (which do not have DVD drives); you might just want to backup your expensive movie collection. In actually, DVDs can be duplicated by copying or burning them. It may be a good idea to copy your DVD Movie collection in case of damage or theft. In order to save your DVD collection you must first know how to copy a DVD movie. 


Here, we will cover some of the best tools for the job. If you are interested, don’t hesitate to read more.

Method 1: Copying DVD with Pavtube Free DVDAid

Free Download:


Step 1. Import DVD source. Insert one of DVD discs you need to convert and then double click the icon on the desktop to launch the software. Click "Import DVD" icon and select the DVD disc in the drop-down list.


Step 2. Click "Format" menu to choose "AVI HD Video(*.avi)" under "HD Video" option which is perfect for storing on hard drive and playing.

Step 3. Click "Settings" button on the interface you will do to video and audio parameters of output profiles.

Step 4. Now, you can free convert DVD to AVI format by clicking the "Convert" button. During the conversion starts.

More features about Free DVDAid:

1. Click "Edit" icon on the interface, you will be able to see every individual frame there, rotate and flip it. And what's more, you can cut off the undesired part, crop output size, edit output audio, and add subtitles, etc. Go to try it if you need.

2. Click "Option" icon on the interface and then go to Acceleration option, you can choose to check Enable GPU acceleration, which will help to speed up conversion. Here you can check your graphic card is supported or not.
With great decrypting capability, high quality video output and popular video format for outputing, Pavtube Free DVDAid ranks top on the list of free DVD ripping application. (Read the review). It will bring you great experience of converting DVD and you cannot suffer any video and audio out of sync issue.

Method 2: Copying with Pavtube DVDAid

Free Download:


As a software expert, Pavtube DVDAid is capable to rip and convert DVDs to more than 200 video and audio formats just for your enjoyment and entertainment. It support Windows2003/XP/Vista/Windows 7/Windows 8/Windows 8.1/Windows 10. The ways of Copy DVD movies is the same as the Free DVDAid, you can just click the same clips. If you want to editing some clips from DVD on Windows/Mac editing software, Pavtube DVDAid is your best choice. Read the review.  


The Pavtube DVDAid more features: "Directly Copy" will help you to 100% backup the intact main movie of DVD, and "Copy the entire disc" will support 1:1 backup the whole movie with original structure and chapter mark. It is a better way to copy DVD for playback and safekeeping.

It supports converting DVD to MP4/M4V files and has built-in the best compatible format for many devices and named after the certain device. So you just need to go to the certain device under format menu and choose a format. That is so easy.

Method 3: Copying to a Disk with ImgBurn

1. Copy the DVD file from your hard drive to a disk. As with the above, there are various programs available for copying DVDs from a hard drive to a disk. There are also complete programs that will copy the DVD to your hard drive and to a disk from one application. 1 popular free program for burning a DVD to a disk is ImgBurn.


2. Download and install ImgBurn directly from the software's website. Before downloading check your computer's compatibility with the software.
3.Open ImgBurn from your "Start" menu.

4.Select "Browse" from the "File" menu on the first screen in ImgBurn.

5.Insert a blank writable DVD into your computer's drive. A DVD-R, DVD+RW or DVD-RW are all writeable DVDs. 

6.Select the blank DVD as the "Destination" on your current ImgBurn screen.

7. Click the "Write" icon resembling a paper and pencil. This can be found in the bottom right corner of your ImgBurn screen. The program will now burn your DVD to the disk. 

8.Test the DVD in your computer or DVD Player.

Editor’s Note

Although the above discussed method is very simple and straightforward when it comes to just copying the contents of the DVD discs. However, all free tools has its own limitation, the Pavtube DVDAid is your best choice for play DVDs on Windows PC.

Sunday, May 3, 2015

Convert 3D YIFY Torrents Movies to 3D TV for Enjoyment

You may know about many popular safe torrent sites, such as The Pirate Bay, Kickass, etc., but may not know about YIFY. The good new is that YIFY now uploads good quality prints in DVD, 720p, 1080p and 3D quality. They usually wait for the official release of movie DVDs or Blue-ray discs, and then they rip and encode the movie DVDs or Blu-rays to MP4 or MKV videos. This is what they always maintain movie torrents with high quality and smaller file size. In this guide, you will find the best way to Convert 3D YIFY Torrents Movies to 3D TV with side-by-side 3D MP4 or MKV format. 


3D YIFY Torrents Movies can be found and downloaded here

The Hobbit: The Battle of the Five Armies, Big Hero 6, Sin City A Dame to Kill For, Teenage Mutant Ninja Turtles, Lucy, Hercules, X-Men: Days of Future Past, Maleficent, Captain America: The Winter Soldier, The Amazing Spider-Man 2, Noah, The Lego Movie, Rio 2, 300 Rise of An Empire, Mr. Peabody and Sherman, Step Up All In, The Nut Job, The Boxtrolls, Transformers: Age of Extinction, The Legend of Hercules... 

If you download these 3D YIFY Torrents Movies, unplayable on 3DTV, or the YIFY movie videos have black stripes over & below the scene, Pavtube Video Converter Ultimate fits the bill. (Read review). It’s qualified to be the best 3D YIFY to 3DTV converter for Windows 10, which is available to convert downloaded 3D YIFY mkv videos to 3DTV compatible MP4/MKV format on Windows (10/8/7/XP) in couple of minutes with deliver crisp images and hi-fi audio quality in a few clicks. 

What’s more? Built-in more than 200 profile presets, this 3D YIFY Converter realizes SD/HD/4K videos to iPhone/iPad, Android/Windows devices conversion. It can also convert YIFY movie videos to various video formats and mobile devices including the latest iPhone 6/6 Plus and Samsung Galaxy S6/S6 Edge. 

Download 3D YIFY Video Converter:


How to Convert downloaded 3D YIFY movies to 3DTV for playing

After downloading the converter, install and run it. Note that this guide uses the screenshots of Video Converter Ultimate (Windows 10 included) version.

Step 1: Add 3D YIFY Downloads

Click Add button to add 3D YIFY MKV videos to the program. You can also directly drag the video files into the program. And you can add multiple files to save your time for this program supports batch conversion.


Step 2: Edit or clip 3D YIFY movies (Optional)

Click “Edit” on the menu to trim, crop, add special effects to your source movies.

Step 3: Set output options

You can then select an output format and specify a directory on your computer to save the output files. From the Format bar, find “3D Video” catalogue, and choose either “MKV Side-by-Side 3D Video (*.mkv)” or “MP4 Side-by-Side 3D Video (*.mp4)” as output for converting 3D YIFY to side-by-side 3D MP4/MKV video. 


Step 4: Start 3D YIFY Conversion 

Click “Convert” button to start 3D YIFY to 3D MKV or MP4 conversion in side-by-side mode. Once the conversion finished, you are able to get the generated 3D MKV or MP4 files via clicking “Open” button with ease. Then, you can enjoy the 3D YIFY Torrents Movies on 3D TV on the sofa at the weekend. 

If you need to convert downloaded 3D YIFY movie videos or other videos to AVI, MOV, WMV, VOB, 3GP, H.265, H.264, MPEG etc., just use Pavtube Video Converter Ultimate!

Read More: