Over the years I archived the DVD's on an external USB hard drive, in DVD ISO Image format files. I soon realized that DVD ISO Image files are not very versatile. Does anyone know the best way to convert DVD ISO to Windows Media Player? I wanna play these DVD ISO files or movies on my PC. Google search there are multiple results, and it took me a long time to find a simple answer. I'm writing this topic for those who also intend to save the show from DVD as ISO files onto computer or play DVD ISO on Windows Media Player...
Internet Google searches suggested that a format, such as MP4, can be played almost universally including Windows Media Player and media devices. I did an extensive Internet search and concluded that Pavtube DVDAid software was the best way to negotiate through a maze of codecs to accomplish, for example, conversion from DVD ISO Image files to MP4 (H.264, 720 x 480 frame resolution). The inclusion of numerous "how to do" examples (FACS) helped me arrive at my decision. The lure of a big-discount coupon increased my interest but Pavtube refused to accept same. I choose the Pavtube because of I have read this review. You can have a try!
According to Microsoft, Windows Media Player supported file formats include WMV, AVI, ASF, WMA, etc. Among them, the relatively common used formats are WMV, WMA and AVI. To get some awesome DVDs and want to add/import DVD ISO image files to Windows Media Player for enjoying, all you need is a DVD ripper to rip DVD ISO to Windows Media Player most compatible MP4 or WMV format first.
First download and install Pavtube DVDAid. This video app works as the best software to convert DVD ISO to video supported by Windows Media Player which can give you optimum results. In addition, it has the capability to convert both protected and unprotected DVD and movies to your file format of choice. It is also fast in ripping but you are always assured of a high quality output video that you can also edit, watch share with friends without mentioning playing in different devices. I have found the Mac version at www.multipelife.com which called - Pavtube DVDAid for Mac can aid you finish the DVD ISO to WMP conversion on Mac(Yosemite and Maverick included).
Convert DVD ISO movie to MP4/WMV for Windows Media Player with high video quality
At first, just free download the Top DVD ISO Converter for WMP:

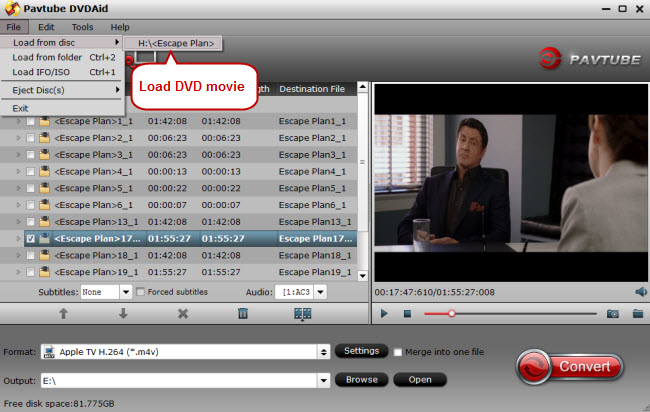
 Step 1: Add DVD ISO/IFO file.
Launch the software, click "Load IFO/ISO" button to browse to target file location and import source video file into this app.
Step 1: Add DVD ISO/IFO file.
Launch the software, click "Load IFO/ISO" button to browse to target file location and import source video file into this app.
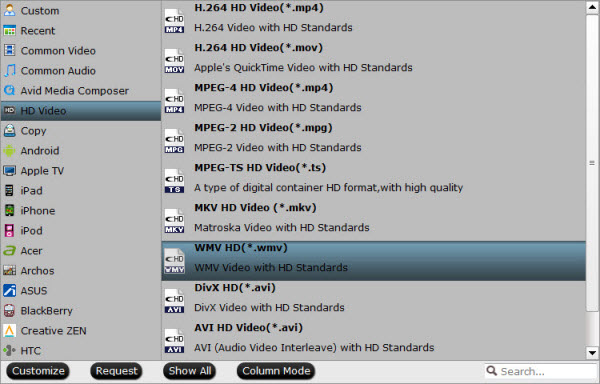
 Step 2: Select output format for Windows Media Player.
Click on the drop-down list at the opposite side of "Format", and then choose "HD Video > WMV HD(*.wmv)" format. The format is designed for users that wanna get DVD rips to Windows Media Player. Or you can select H.264 HD Video(*.mp4) for watching.
Step 2: Select output format for Windows Media Player.
Click on the drop-down list at the opposite side of "Format", and then choose "HD Video > WMV HD(*.wmv)" format. The format is designed for users that wanna get DVD rips to Windows Media Player. Or you can select H.264 HD Video(*.mp4) for watching.
 Tip: The best thing with such DVD converter for Windows Media Player they give you options to enhance your video experience by customizing the video and audio settings, for instance (Video Codec, Video Bitrate, Audio Codec, Audio Bitrate, Audio Channel) if you click “Settings” button.
 Step 3. Start DVD ISO to WMP conversion.
Finally click the Convert button to begin converting DVD ISO to Windows Media Player format. After encoding process has finished successfully, go into the destination directory and drop the converted files into Windows Media Player. Once all this is done, your videos will be ready to add and play with Media Player on Windows PC. Just enjoy. Have fun! Also learn how to how to backup Blu-ray/DVD for playback on Cyberlink,solve AVI playback on Windows Media Player problems and read how to add mp4 to VLC Player.
Now, you can get any DVD ISO files playback on Windows Media Player, Have Fun! I guess the key word is "simplicity" - the ability of Pavtube's software to lead the user through a maze of codecs to the desired solution.
Editor’s Note: If you are considering to get a powerful all-in-one tool to convert videos, Blu-ray movies and DVDs to your Windows Media Player, Nook HD, Galaxy Tab, Nexus 10, Nexus 9, Kindle Fire HDX, Galaxy Note, Galaxy S6, PS4 at the same saving time and effort, the all-in-one Pavtube Video Converter Ultimate program will a nice choice for you. If you are running a Mac OS X computer, iMedia Converter for Mac is the alternative.
Read More:
Step 3. Start DVD ISO to WMP conversion.
Finally click the Convert button to begin converting DVD ISO to Windows Media Player format. After encoding process has finished successfully, go into the destination directory and drop the converted files into Windows Media Player. Once all this is done, your videos will be ready to add and play with Media Player on Windows PC. Just enjoy. Have fun! Also learn how to how to backup Blu-ray/DVD for playback on Cyberlink,solve AVI playback on Windows Media Player problems and read how to add mp4 to VLC Player.
Now, you can get any DVD ISO files playback on Windows Media Player, Have Fun! I guess the key word is "simplicity" - the ability of Pavtube's software to lead the user through a maze of codecs to the desired solution.
Editor’s Note: If you are considering to get a powerful all-in-one tool to convert videos, Blu-ray movies and DVDs to your Windows Media Player, Nook HD, Galaxy Tab, Nexus 10, Nexus 9, Kindle Fire HDX, Galaxy Note, Galaxy S6, PS4 at the same saving time and effort, the all-in-one Pavtube Video Converter Ultimate program will a nice choice for you. If you are running a Mac OS X computer, iMedia Converter for Mac is the alternative.
Read More:
While 2015 Father's Day is nearly here, have you got something for beloved dad yet? What dad really wants for Father's Day? Do you want to make a unique gift that will be truly memorable?This year, let's get something useful - 50% off offer for powerful yet easy-to-use Blu-ray/DVD Rippers and Video Converters to watch videos on any home devices!  To celebrate Father's Day together with you, Pavtube Studio now offering up to 50% off software as the 2015 Father's Day Special Gifts. Backup your dad's favorite Blu-ray/DVD movie, or convert camera/camcorder footage to phone/tablet, HD TV, home theatre, game console. Even better you can make a father's day video for your beloved dad on your own! It's more precious than just picking up something on store casually!The first 5 customer can contact us with your order number to win a free license of any product!Expires on June 25, 2015. Never miss it!More details at: https://www.facebook.com/pavtubefans/app_201742856511228
Q: " Does anyone know of an alternative to MakeMKV for ripping Blu-Rays in Mountain Lion? I tried the demo and came across some discs that it would not rip. I don't really want to pony up the $$$ if it's not going to work with all of my discs. If only Handbrake would support Blu-Ray!"
As a regular user of DVD/Blu-ray discs and prefer to backup, copy, share or extract video/game content off a DVD/Blu-ray disc, you’re probably familiar with MakeMKV, which is a rarely functional program enabling people to rip DVD and Blu-ray free. However, But MakeMKV is limited to output MKV video format that won’t be able to meet all of your needs. So, ever considered looking for a MakeMKV alternative to convert Blu-ray, DVD much easier? If so, find out in the following paragraphs.
You can search the related key words on line, and many results would be available. However, most of the MakeMKV alternative are charged, and you have to figure out whether the one you choose pays off. Here, I directly recommend Pavtube ByteCopy. It has the ability to let you convert Blu-ray, DVD, DVD folder, ISO files to MKV on Windows 10 in high quality and with the ultrafast speed. Here is the reivew.
Besides MKV, it also allows you to convert BD/DVD files to any other audio & video formats like AVI, WMV, MP4, MOV, VOB, MPEG, etc, even various portable devices. For Mac users, you can use this great MakeMKV Yosemite/Mavericks alternative, you can feel free to enjoy your digital life on Mac (Yosemite include). Below is a step-by-step guide to mainly show you how to with it convert Blu-ray/DVDs to MKV for uses.
Now, Just free download this best MakeMKV Alternative for Windows or Mac:
Step 1. Load Disc: Insert your Blu-ray disc into Blu-ray drive. Launch the MakeMKV alternative for Windows 10 and click "Disc" button to import the Blu-ray movies.
 Step 2. Choose output format: Clicking the Format bar, here you can select MPEG-4, MPEG-2, MKV, WMV from the Common Video profile list as the target format. Or you can choose a preset for you device like iPad. Or you can also choose "Format > Multi-track Video > Lossless/encoded Multi-track MKV (*.mkv)" to get a loosless mkv format.Learn >> Windows 10 Supported formats
.
 Tips:
a. If you want to customize the output video quality, you can click the "Settings" button to open the Settings window and set video resolution, frame rate, bit rate, codec, etc.
b. This app provides various video editing features, like cut, crop, merge, add video effect, add subtitles. If you want to edit your files, just click the "Edit" button to do it.
3. Start the conversion: When all settins are done, what you need to do now is to click the big Convert button and the program will begin ripping Blu-ray to MKV on Windows 10 immediately.
So there you have it. Pretty simple. If you want to convert Blu-ray videos to various format and your devices, this Blu-ray ripper for Windows 10 will be absolutely the best choice. Just get it and have a try!
Tips:
a. If you want to customize the output video quality, you can click the "Settings" button to open the Settings window and set video resolution, frame rate, bit rate, codec, etc.
b. This app provides various video editing features, like cut, crop, merge, add video effect, add subtitles. If you want to edit your files, just click the "Edit" button to do it.
3. Start the conversion: When all settins are done, what you need to do now is to click the big Convert button and the program will begin ripping Blu-ray to MKV on Windows 10 immediately.
So there you have it. Pretty simple. If you want to convert Blu-ray videos to various format and your devices, this Blu-ray ripper for Windows 10 will be absolutely the best choice. Just get it and have a try!
Updated on 6th, April, 2016
Read More:
Good News! Pavtube has upgraded BDMagic for Win/Mac to V4.8.6.2 by adding full support for 2D/3D Blu-ray, DVD, ISO and IFO to m3u8 encoding on Windows and Mac.  Download Pavtube BDMagic:Windows version 4.8.6.2: http://www.multipelife.com/download/bdmagic/bdmagic_setup.exeMac Version 4.8.6.2: http://www.multipelife.com/download/bdmagic-mac/bdmagic_setup.dmgWhat's New:1.support encoding to .m3u8 2.support new Blu-ray/DVD movies 3.fix some bugsWith this updated Blu-ray Ripper, you are able to rip 2D/3D Blu-ray, 4K Blu-ray, standard DVD and ISO files, IFO to m3u8 which can be dragged fast because of no extra datas and be played with Apple's built-in player like Quicktime and Safari. What's more, this program is a powerful all-in-one utility integrated by DVD Ripper, DVD Copy, Blu-ray Ripper, Blu-ray Copy, Blu-ray/DVD Editor, etc.to copy Blu-ray, DVD with original structure, and convert 2D/3D Blu-rays and standard DVDs to other video/audio format for mobile devices, editors and online websites.Pricing and AvailabilityBDMagic for Win/Mac is offering with $39.2 (20% off instead of the original $49 price) with a lifetime free upgrade. Other upgraded products are listed below:Pavtube DVDAid/DVDAid for MacPavtube ByteCopy/ByteCopy for MacPavtube Video Converter Ultimate/Pavtube iMedia Converter for MacPavtube Video Converter/Video Converter for MacPavtube HD Video Converter/HD Video Converter for MacPavtube MTS/M2TS Converter/MTS/M2TS Converter for MacPavtube MXF Converter/MXF Converterfor MacPavtube MXF MultiMixer/iMixMXFNote:The output m3u8 files should be named without space and file path should be in plain English or pure digital, otherwise you couldn't play them successfully. After conversion, you just need to set up a server to enjoy M3U8. All customers are welcomed to get these upgraded hottest and comprehensive products. Get more money-saving bundles at http://www.multipelife.com/special-offer. Come on!For more info about this Pavtube update, just visit: http://www.multipelife.com/pavtube-upgrade-with-m3u8-encoding.htmlSource: http://multimedia-hive.com/2015/06/12/bdmagic-support-m3u8-output/
Find a YouTube video that perfectly matches your PowerPoint topic, and you want to share with your audience, Microsoft PowerPoint versions and the network conditions are the two major aspects that the presenter must consider. So is it possible to insert YouTube video into PowerPoint? It's especially useful if you are transferring and using the presentation on other computers. Follow this guide to find out how, regardless of your version of PowerPoint.
 Part I: Insert YouTube Videos into PowerPoint Online
Please note this part only works when you have high-speed Internet or Wi-Fi at the show place, so that you can stream live YouTube videos from the Internet.
Step 1. Launch Microsoft PowerPoint on your computer and select a slide that is suitable for your presentation. Followed by clicking "View > Toolbars > Control Toolbox > More Controls". Mouse down to click "Shockwave Flash Object".
Step 2. Draw a box and customize the size of it. Right click the box and chooses the button of "Properties". Then, double click on "Custom" and a URL box will pop up for you.
Step 3. Copy and paste the link of your selected video into the URL box. Do not check the box named "embed movie". Here, you need to properly change the URL, such as use forward slash instead of equal sign and delete the "watch?". Now you can click "Apply" and then "OK".
Ok, you can save your PPT presentation now. Just open and check if the video is working normal.
You can read >> YouTube on Apple Series | YouTube Video Converters | YouTube Videos on TV...
Different versions of Microsoft PowerPoint have different interfaces and different functions, leading to different usages. The network condition decides whether you need to download the YouTube video or just stream live YouTube videos. So, you're going to have to find a website or tool to download the videos, which is not something YouTube officials supports, except for downloading your own videos. Then you'll have to convert the files to AVI or WMV because PowerPoint doesn't support the default format that YouTube videos are encoded in.
Part II: Add YouTube Videos into Microsoft PPT Offline (PowerPoint 2003, 2007, 2010 and 2013)
If you want to play the YouTube video offline, you need to download it first. It is important to note that you should take the right video format because PowerPoint can only support the videos of asf, avi, mpeg and wmv formats. Here you need the one-in-one solution - Pavtube Video Converter Ultimate, to download videos from YouTube and then convert them to WMV, AVI, MP4, FLV, MKV, 3GP, MP3, AAC and other formats. After doing that, we will separate the explanation according to the versions of Microsoft PowerPoint. Here is review.
Note: You should keep the downloaded YouTube video in the same folder as your PPT presentation to make sure it still works on other computers. If you want to send the PPT to other people, send the YouTube video too. For Mac users, iMedia Converter for Mac is a helpful app to encode videos for further usage. Learn >> Youtube Supported Video Format.
Step 1. Run Top FLV to PPT Video Converter, drag and drop source FLV file(s) to the software.
Part I: Insert YouTube Videos into PowerPoint Online
Please note this part only works when you have high-speed Internet or Wi-Fi at the show place, so that you can stream live YouTube videos from the Internet.
Step 1. Launch Microsoft PowerPoint on your computer and select a slide that is suitable for your presentation. Followed by clicking "View > Toolbars > Control Toolbox > More Controls". Mouse down to click "Shockwave Flash Object".
Step 2. Draw a box and customize the size of it. Right click the box and chooses the button of "Properties". Then, double click on "Custom" and a URL box will pop up for you.
Step 3. Copy and paste the link of your selected video into the URL box. Do not check the box named "embed movie". Here, you need to properly change the URL, such as use forward slash instead of equal sign and delete the "watch?". Now you can click "Apply" and then "OK".
Ok, you can save your PPT presentation now. Just open and check if the video is working normal.
You can read >> YouTube on Apple Series | YouTube Video Converters | YouTube Videos on TV...
Different versions of Microsoft PowerPoint have different interfaces and different functions, leading to different usages. The network condition decides whether you need to download the YouTube video or just stream live YouTube videos. So, you're going to have to find a website or tool to download the videos, which is not something YouTube officials supports, except for downloading your own videos. Then you'll have to convert the files to AVI or WMV because PowerPoint doesn't support the default format that YouTube videos are encoded in.
Part II: Add YouTube Videos into Microsoft PPT Offline (PowerPoint 2003, 2007, 2010 and 2013)
If you want to play the YouTube video offline, you need to download it first. It is important to note that you should take the right video format because PowerPoint can only support the videos of asf, avi, mpeg and wmv formats. Here you need the one-in-one solution - Pavtube Video Converter Ultimate, to download videos from YouTube and then convert them to WMV, AVI, MP4, FLV, MKV, 3GP, MP3, AAC and other formats. After doing that, we will separate the explanation according to the versions of Microsoft PowerPoint. Here is review.
Note: You should keep the downloaded YouTube video in the same folder as your PPT presentation to make sure it still works on other computers. If you want to send the PPT to other people, send the YouTube video too. For Mac users, iMedia Converter for Mac is a helpful app to encode videos for further usage. Learn >> Youtube Supported Video Format.
Step 1. Run Top FLV to PPT Video Converter, drag and drop source FLV file(s) to the software.
 Step 2. Click on "Format" bar, and select "Common Video>> WMV3 (WMV9)(*.wmv)" format from its drop-down profile list.
Step 3. Press on the big "Convert" button to get This Top FLV to PPT Video Converter Convert FLV to PowerPoint preferred WMV format.
Step 4. After conversion you can press "Open" to locate resulting file. Once the video is saved as an AVI or WMV file, switch to PowerPoint and choose Insert – > Movie – > "Movie from file" to put the YouTube video into the current slide.
Part III: How to add converted WMV file into PowerPoint
1. In PowerPoint, select the slide that you’d insert video.
2. Click the "Insert" menu and select "Movies and Sounds."
3. Choose "Movie From File" and browse to locate the video you want to insert.
4.Double-click the WMV file you just saved. The video will now appear in the PowerPoint slide.
Now, you can get tons of FLV videos into PowerPoint presentation online or offline according to different PPT versions for sharing.
Read More:
Step 2. Click on "Format" bar, and select "Common Video>> WMV3 (WMV9)(*.wmv)" format from its drop-down profile list.
Step 3. Press on the big "Convert" button to get This Top FLV to PPT Video Converter Convert FLV to PowerPoint preferred WMV format.
Step 4. After conversion you can press "Open" to locate resulting file. Once the video is saved as an AVI or WMV file, switch to PowerPoint and choose Insert – > Movie – > "Movie from file" to put the YouTube video into the current slide.
Part III: How to add converted WMV file into PowerPoint
1. In PowerPoint, select the slide that you’d insert video.
2. Click the "Insert" menu and select "Movies and Sounds."
3. Choose "Movie From File" and browse to locate the video you want to insert.
4.Double-click the WMV file you just saved. The video will now appear in the PowerPoint slide.
Now, you can get tons of FLV videos into PowerPoint presentation online or offline according to different PPT versions for sharing.
Read More:
Windows 8 Media Center does not support Blu-Ray?
Windows Media Player, the native video player on Windows 8's desktop and the video player application on the start screen cannot play DVD or Blu-Ray movies. The core reason for the missing feature is money in the form of licensing fees that companies have to pay when they integrate playback support into their hardware or software. Microsoft saves money, and makes available the Windows Media Center as an upgrade to bring back support to the operating system.
 Learn More>> Top Alternatives for Windows Media Center | Windows 10 VS Windows 8 Comparison | Blu-ray on Windows Desktop....
Part 1: How to Convert Blu-ray to Windows Media Center on Windows 8/8.1/10?
The Video File Types that Windows Media Center supports:
*.wm, *.asf, *.wmv, *.avi, *.mpeg, *.mpg, *.mpe, *.m1v, *.mp2, and *.mpv2, *.dvr-ms(Microsoft Recorded TV Show file)
In order to convert Blu-ray to Media Center, my preferred tool is Pavtube BDMagic, it will do the job of ripping Blu-ray to the video file types that are supported in Windows Media Center. I choose it due to its ease of use, the support service and very affordable price. It is capable of converting Blu-ray discs and Blu-ray ISO files to various formats for almost any devices. Read the review.
P.S. If you are a Mac user, go to get BDMagic for Mac. Free download it now. Once having installed it, follow below instructions to rip Blu-ray to Windows Media Center.
Step 1. Load Blu-ray to the Best Blu-ray to Windows Media Center Ripper.
You are allowed to load Blu-ray discs, load Blu-ray files or load from blu-ray folder.
Learn More>> Top Alternatives for Windows Media Center | Windows 10 VS Windows 8 Comparison | Blu-ray on Windows Desktop....
Part 1: How to Convert Blu-ray to Windows Media Center on Windows 8/8.1/10?
The Video File Types that Windows Media Center supports:
*.wm, *.asf, *.wmv, *.avi, *.mpeg, *.mpg, *.mpe, *.m1v, *.mp2, and *.mpv2, *.dvr-ms(Microsoft Recorded TV Show file)
In order to convert Blu-ray to Media Center, my preferred tool is Pavtube BDMagic, it will do the job of ripping Blu-ray to the video file types that are supported in Windows Media Center. I choose it due to its ease of use, the support service and very affordable price. It is capable of converting Blu-ray discs and Blu-ray ISO files to various formats for almost any devices. Read the review.
P.S. If you are a Mac user, go to get BDMagic for Mac. Free download it now. Once having installed it, follow below instructions to rip Blu-ray to Windows Media Center.
Step 1. Load Blu-ray to the Best Blu-ray to Windows Media Center Ripper.
You are allowed to load Blu-ray discs, load Blu-ray files or load from blu-ray folder.
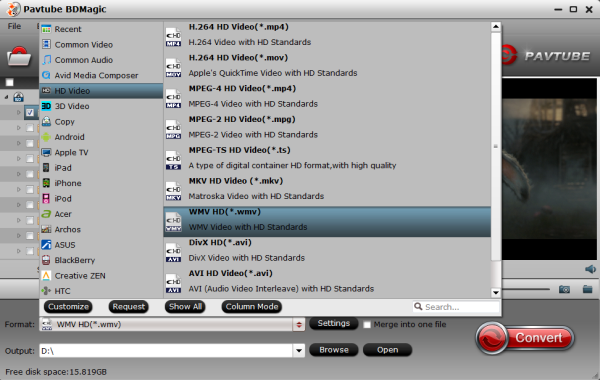
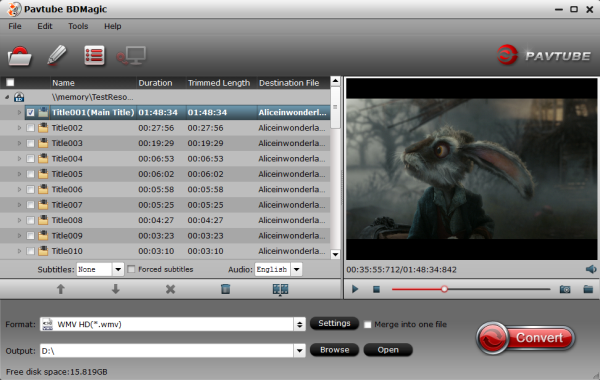 Step 2. Select video format for Windows Media Center.
Click "Format" menu to choose the output format. Here you can choose "DivX HD(*.avi)" from "HD Video" option, or you can choose "WMV HD(*.wmv)" which works for Windows Media Center natively.
Step 2. Select video format for Windows Media Center.
Click "Format" menu to choose the output format. Here you can choose "DivX HD(*.avi)" from "HD Video" option, or you can choose "WMV HD(*.wmv)" which works for Windows Media Center natively.
 Step 3. Set parameters for output video. (Optional)
Click "Settings" to adjust the parameters including size, bitrate, frame rate, etc according to your own need. Then you can save it as your customized option with the new name made by yourself. The new option will locate in "Custom" under "Format" menu.
Step 3. Set parameters for output video. (Optional)
Click "Settings" to adjust the parameters including size, bitrate, frame rate, etc according to your own need. Then you can save it as your customized option with the new name made by yourself. The new option will locate in "Custom" under "Format" menu.
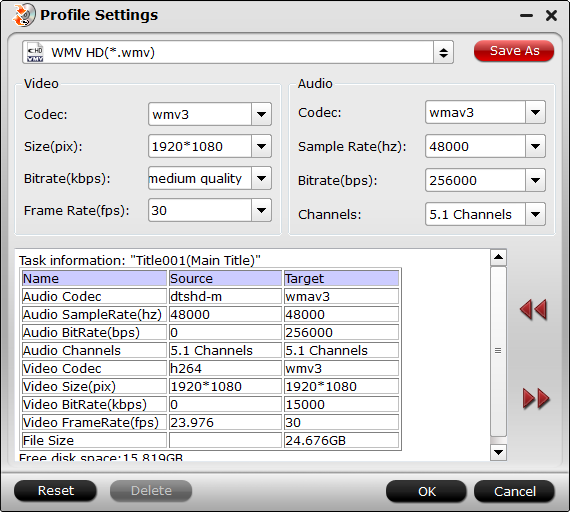 Tip : If you are not good at settings or have no idea about it, it is ok to keep the default settings for output video. The default settings are able to provide an output video with high quality.
Step 4. Convert Blu-ray to Windows Media Center.
Click big "Convert" button to start ripping Blu-ray to AVI/WMV for Windows Media Center and then click "Open" button to get generated videos for Windows Media Center when completed. Open Windows Media Player and then add items to the Windows Media Player Library via Windows 8/8.1/10 for playback.
Tip 2: It supports CUDA Acceleration, which will contribute to speed up the conversion. Find "Option" button on the interface to get "Acceleration" option, then Enable GPU Acceleration to get a faster conversion.
Part 2: Set up Xbox 360 as your Media Center Extender
If you have an Xbox 360 connected to a home network that also has a PC running Windows Media Center, you can add your Xbox 360 as an Extender for Windows Media Center – so you can enjoy your digital media from your PC on your TV. You can connect your Xbox 360 to a wireless or a wired network (using an Ethernet cable).
When you convert Blu-ray to Media Center Extender, you can take entertainment on the go with your windows phone device, Zune, Xbox, etc.
Read More:
Tip : If you are not good at settings or have no idea about it, it is ok to keep the default settings for output video. The default settings are able to provide an output video with high quality.
Step 4. Convert Blu-ray to Windows Media Center.
Click big "Convert" button to start ripping Blu-ray to AVI/WMV for Windows Media Center and then click "Open" button to get generated videos for Windows Media Center when completed. Open Windows Media Player and then add items to the Windows Media Player Library via Windows 8/8.1/10 for playback.
Tip 2: It supports CUDA Acceleration, which will contribute to speed up the conversion. Find "Option" button on the interface to get "Acceleration" option, then Enable GPU Acceleration to get a faster conversion.
Part 2: Set up Xbox 360 as your Media Center Extender
If you have an Xbox 360 connected to a home network that also has a PC running Windows Media Center, you can add your Xbox 360 as an Extender for Windows Media Center – so you can enjoy your digital media from your PC on your TV. You can connect your Xbox 360 to a wireless or a wired network (using an Ethernet cable).
When you convert Blu-ray to Media Center Extender, you can take entertainment on the go with your windows phone device, Zune, Xbox, etc.
Read More:
Blu-ray Disc is a digital optical disc data storage format, in that it is capable of storing 1080p video. The format was developed by the Blu-ray Disc Association, a group representing makers of consumer electronics, computer hardware, and motion pictures. According to Singulus Technologies AG, Blu-ray is being adopted faster than the DVD format was at a similar period in its development. If you’ve collected a pile of Blu-ray discs, it’s time for you to learn how to rip a Blu-ray disc on Mac (Yosemite) for free and then use the ripped files anywhere you want them. Just pay attention to this article.
 Many Mac users are encountering issues after updating their OS X Yosemite on their Mac. To find an easy-to-use yet professional Blu-ray Ripping tool for Mac, which supports ripping and converting Blu-ray movie in one-stop. Here,Pavtube BDMagic for Mac ranks top on the list of Mac Blu-ray Rippers for its versatile features-it can import most of Blu-ray discs protected Blu-ray Disc and unprotected Blu-ray discs. With it you can “Full copy your Blu-ray” or directly copy your Blu-rays without extra. Using "Directly Copy" feature, you can backup Blu-ray/DVD main movie in original format(m2ts or vob) on Mac without quality loss. Not like Aurora which only makes complete disc copy, and MakeMKVwhich I don’t know how to find a way to burn my files, Pavutbe seems very useable and complete as it is now.
You can convert your Blu-rays to more than 200 video/audio formats, and you also can transfer them to your iPhone, iPad, iPod or Anroid Tablets and Phones. More prominent, you can convert 2D Blu-ray or 3D Blu-ray to 3D effect, and you can with 3D Movies on home theater. It also comes with editor, you can also edit your Blu-ray by yourself. There are more humane setting, waiting for your visit! The windows version is here.
More highlights in BDMagic for Mac:
Many Mac users are encountering issues after updating their OS X Yosemite on their Mac. To find an easy-to-use yet professional Blu-ray Ripping tool for Mac, which supports ripping and converting Blu-ray movie in one-stop. Here,Pavtube BDMagic for Mac ranks top on the list of Mac Blu-ray Rippers for its versatile features-it can import most of Blu-ray discs protected Blu-ray Disc and unprotected Blu-ray discs. With it you can “Full copy your Blu-ray” or directly copy your Blu-rays without extra. Using "Directly Copy" feature, you can backup Blu-ray/DVD main movie in original format(m2ts or vob) on Mac without quality loss. Not like Aurora which only makes complete disc copy, and MakeMKVwhich I don’t know how to find a way to burn my files, Pavutbe seems very useable and complete as it is now.
You can convert your Blu-rays to more than 200 video/audio formats, and you also can transfer them to your iPhone, iPad, iPod or Anroid Tablets and Phones. More prominent, you can convert 2D Blu-ray or 3D Blu-ray to 3D effect, and you can with 3D Movies on home theater. It also comes with editor, you can also edit your Blu-ray by yourself. There are more humane setting, waiting for your visit! The windows version is here.
More highlights in BDMagic for Mac:
- Full Disc Copy will help to 1:1 backup the whole Blu-ray with original structure;
- Rip latest Blu-ray/DVD including 3D/2D Blu-ray;
- Backup Blu-ray/DVD main movie with original quality;
- Convert Blu-ray/DVD movies for Android, iOS, Windows devices;
- Blu-ray/DVD movie before conversion, like trim, crop, add watermark, add subtitles, etc.
Availability
Free trial for three months. Only $49 (If you buy now, only need $39.2) for lifetime license and upgrade.
Okay, Download the tool and learn a simple guide on ripping Blu-ray on Mac OS X ( 10.10 Yosemite) within 3 steps. How to Rip and Convert Blu-ray on Mac OS X (Yosemite)?
Step 1. Load Blu-ray to the software
Insert the Blu-ray disc to Blu-ray drive as the source file. Launch the top Blu-ray Ripper for Mac Yosemite; click the disc button to load the entire Blu-ray disc for ripping. If you have backed up the entire Blu-ray disc on hard drive with BDMV file structure, you can also load the BDMV folder for conversion on Yosemite.
 Step 2. Choose output format
Click the Format bar and follow Common Video; MP4, MOV, AVI, MPEG, M4V... are all the popular output formats for you. This Mac Blu-ray Riper also has 150+ presets for almost all popular multimedia devices. You are allowed to choose one device as the output format as well.
Step 2. Choose output format
Click the Format bar and follow Common Video; MP4, MOV, AVI, MPEG, M4V... are all the popular output formats for you. This Mac Blu-ray Riper also has 150+ presets for almost all popular multimedia devices. You are allowed to choose one device as the output format as well.
 Tip: The Blu-ray movie has more than one audio tracks and subtitles. You can choose your preferred one from the "Subtitles", "Audio" options retained in the output video.
Step 3. Adjust video and audio settings (Optional)
This Mac Yosemite Blu-ray Converter allows users to adjust video and audio parameters to customize the output file quality. Click "Settings" button and then you can adjust video resolution, frame rate, bit rate, audio channel, etc.
Step 4. Start ripping Blu-ray on Mac OS X Yosemite
Click "Convert" button to start converting Blu-ray movie on Mac OS X 10.10 Yosemite. After conversion click "Open" to find converted movie, and then you can play the output video on Yosemite or sync to iPad, iPhone, upload to YouTube, Vimeo freely.
Read More:
Tip: The Blu-ray movie has more than one audio tracks and subtitles. You can choose your preferred one from the "Subtitles", "Audio" options retained in the output video.
Step 3. Adjust video and audio settings (Optional)
This Mac Yosemite Blu-ray Converter allows users to adjust video and audio parameters to customize the output file quality. Click "Settings" button and then you can adjust video resolution, frame rate, bit rate, audio channel, etc.
Step 4. Start ripping Blu-ray on Mac OS X Yosemite
Click "Convert" button to start converting Blu-ray movie on Mac OS X 10.10 Yosemite. After conversion click "Open" to find converted movie, and then you can play the output video on Yosemite or sync to iPad, iPhone, upload to YouTube, Vimeo freely.
Read More:
Whether you have music DVDs, latest fantastic DVD movies and other DVDs, it’s worth your time to make sure that your investment doesn’t become scratched, lost, stolen, or otherwise useless. If you have a collection of DVDs, the last thing you probably want to do is swap them out every time you want to watch something. The solution, of course, is to rip them: to convert them to a digital format the same way you may have done in the past with your audio CDs. Hold on reading...  (For the sake of simplicity, I'm going to deal with Blu-ray Discs separately, so the tips I'm giving you are mainly for DVDs specifically.)Copy protectionAs we know, Commercial discs are encrypted to make copying them a little more difficult. The first part of this guide will show you how to bypass that encryption and maintaining original structure without loss, second part is Directly Copy only DVD Main Movie and Leave Out Extras. Thanks to copy protection and encryption on commercially produced DVDs and Blu-ray Discs, this isn't just as easy as popping them in and hitting an "Import DVD" button in iTunes, like it is for audio CDs.First, it's worth noting that the Motion Picture Association of America (MPAA) and most content publishers say that you shouldn't copy, convert, or otherwise mess with the content you buy on DVDs and Blu-ray Discs for any reason. You Need: Pavtube BDMagic for MacPavtube BDMagic for Mac is highly recommended as one of the best BD/DVD disc handling tools for Mac users on the market, integrates disc backing up and ripping skills to make it standout.Features:Mac Blu-ray Ripper + Mac Blu-ray 3D Ripper + Mac DVD ripper.Directly Copy Blu-ray 3D/2D main movie without extras.Full Disc Copy 3D/2D Blu-ray Disc with original disc structure.Convert Blu-ray 3D/2D movies or ISO files to MP4, M4V, MOV, AVI, MKV files for iPad, ATV 3, iPhone, iTunes, QuickTime player, Galaxy Note, Samsung Galaxy Tab, Nexus devices, etc.Convert BD/DVD to iMovie, Final Cut Express/Pro compatible video format.Convert/rip/shrink/copy the latest releases of Blu-ray/DVD movies.Support adding *.srt or *.ass subtitles in BD/DVD movies.Price: $34.3 nowRequires: Mac OS X 10.10 Yosemite, 10.9 Mavericks, 10.8 Mountain Lion, 10.7 Lion, Snow Leopard10.6, Leopard 10.5Overall, it can make a 1:1 copy of BD or DVD movies to your computer with all subtitles, audio streams and chapter information included. You could download it to take a try right now. How to rip DVDs on OS X and get movies onto your Mac Media server?Option 1 - "Full Disc Copy" maintaining original structure without loss. Step 1. Directly download Pavtube BDMagic for Mac, Then install and drive it on Mac OS X (10.10 Yosemite include). Step 2. Launch it and load your DVD movie from discs to the app, Click the quick button "Copy the entire disc" to start copying Blu-ray with original structure.
  Step 3. Click the “Browse” button to set output folder where you want to save the copied DVD movies. Step 4. Hit the copy the entire disc icon on this Top Blu-ray/DVD Backup tool main interface and start DVD backing up process.Option-2: Directly Copy only DVD Main Movie and Leave Out Extras. Step 1. Load DVD movies.Load DVD Disc to this Pavtube BDMagic for Mac, Launch it and click "Load from disc" button to import DVD movies.
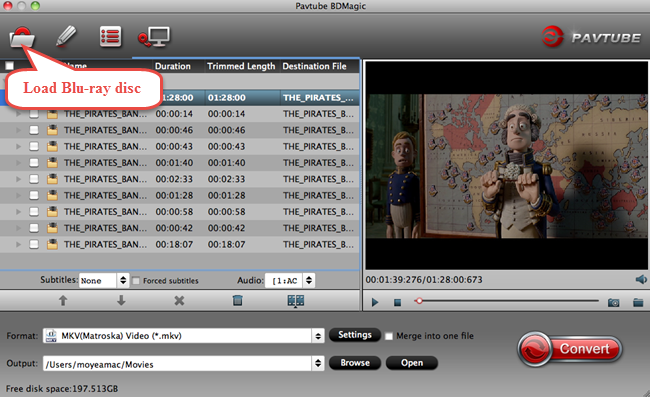 Step 2. Choose Directly Copy DVD disc. Click "Format" bar, choose "Copy" > "Directly Copy" from the Format menu and then specify a folder to save the VOB files from DVD disc.
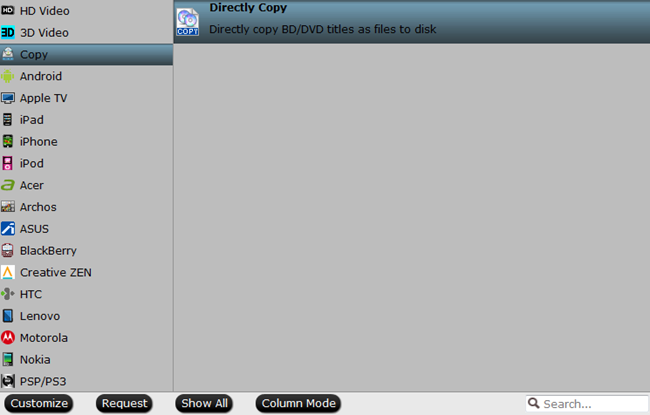 Step 3. Start DVD backup on Mac. Hit "Convert" button to start copying your DVD discs. When the copying work is done, you are able to click "Open" button to get the output .VOB files without any other extra structures or contents. Now, you don't need to worry about how to Backup DVDs on Mac and stream movies onto your Mac Media server. Hope you can find it more useful and helpful. Well worth a shot, in one word. Read More:
Q: "I wanna backup a DVD movie on PC since “The Hobbit 3: The Battle of the Five Armies” is much important for me. Do you know how to lossless copy the Blu-ray into digital formats so that I can store in my HD forever? Thank you for any tip." The Hobbit: The Battle of the Five Armies (2014) is much important to movie lovers. Now, it can be DVDs for adding it into your movie collection at home and backup DVD on Mac OS X Yosemite or Windows 10. This article will discuss how to play The Hobbit 3: The Battle of the Five Armies DVD on PC/Mac. For Movie Fans: Top Robin Williams Comedy Movies List | Top Antonio Banderas Movies | 2015 New Disney Movies Reviews... Movie Information: The Hobbit: The Battle of the Five Armies (2014) PG-13 | 144 min | Adventure, Fantasy | 23 January 2015 (China) Bilbo and Company are forced to engage in a war against an array of combatants and keep the Lonely Mountain from falling into the hands of a rising darkness.Director: Peter JacksonWriters: Fran Walsh (screenplay), Philippa Boyens (screenplay), 3 more credits »Stars: Ian McKellen, Martin Freeman, Richard Armitage | See full cast and crew » The Hobbit: The Battle of the Five Armies DVD release date: March 24, 2015 Storyline: After the Dragon leaves the Lonely Mountain, the people of Lake-town see a threat coming. Orcs, dwarves, elves and people prepare for war. Bilbo sees Thorin going mad and tries to help. Meanwhile, Gandalf is rescued from the Necromancer's prison and his rescuers realize who the Necromancer is. A Good Choice to Rip DVD The Hobbit 3: The Battle of the Five Armies to MP4 MOV AVI WMV on PC/MacAs you see, a professional DVD ripper is badly needed to remove region code and make personal DVD backups from The Hobbit 3: The Battle of the Five Armies DVD, or convert to a common video file. The best program I can recommend for handling The Hobbit 3: The Battle of the Five Armies DVD disc is Pavtube DVDAid. It takes everything from the DVD, including the chapters, extras, and subtitles. It comes with decent decrypting capability (removing CSS Copy-protections and DVD region codes including the latest DVD discs); provides high quality video output and considerate backup solution and specific format templates for iPad, iPhone 6, Apple TV, Xbox, PS4, Galaxy S6, etc. More than a powerful DVD ripper, it can also allows you to backup a DVD with original structures or just copy main movie from a DVD. Read the review. So much for the features of Pavtube DVDAid, the following post will guide you to rip and convert DVD The Hobbit: The Battle of the Five Armies to MP4, MOV, AVI and others for DVD backup and playback on PC/mobiles. For Mac users, Pavtube DVDAid for Mac is a helpful app to encode videos for further usage.Step 1. Import DVD source filesOnce you run the The Hobbit: The Battle of the Five Armies DVD Ripping software, click DVD disc to load DVD movie into the program. Select wanted subtitles and audio track if necessary.
 Tips: For copying The Hobbit: The Battle of the Five Armies DVD discs, the button on the top of the main interface can help you to achieve the goal, which allows you to backup entire The Hobbit: The Battle of the Five Armies DVD with original structures. Alternatively, click “Format” bar, choose “Copy > Directly Copy”, you can copy The Hobbit: The Battle of the Five Armies DVD main movies only. Step 2. Choose output profileNavigate the Format and click Common Video; MP4, MOV, AVI, WMV, MPEG-2, M4V are all the popular output formats for you.
 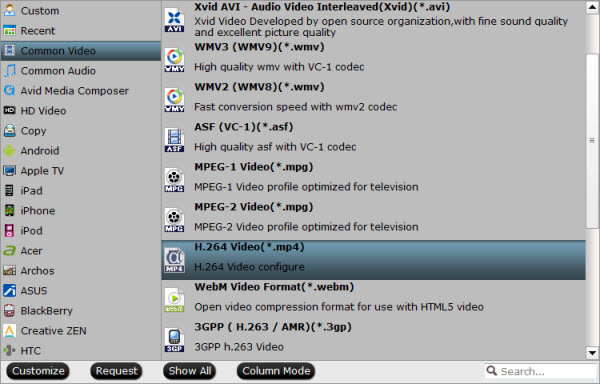 Step 3. Start DVD backup and rippingOnce the above mentioned steps are finished, you can click “Convert” button to rip The Hobbit: The Battle of the Five Armies DVD movie to either the hard drive of your pc, or to your portable devices, like iPad, iPhone, Apple TV, Microsoft Surface tablet, etc. When the ripping task is completed, you can click “Open” button to get the ripped files of The Hobbit: The Battle of the Five Armies DVD files. Enjoy! Hot News for all Mac users! Pavtube Studio has launched a user-requested upgrade for all its Mac BD/DVD and package tools: DVDAid for Mac, BDMagic for Mac, ByteCopy for Mac, iMedia Converter for Mac to version 4.8.5.1, which focuses on the addition of the H.265 encoders and decoders. Read More: